
Contents: Standard dual-zone climate control… ↧ Automatic dual-zone climate control… ↧ Ventilation grilles ↧ Recommendations for working with the… ↧ Rear window defroster ↧ Rear heating/air conditioning system… ↧
Standard dual-zone climate control system
1. Dual-zone climate control system allows the driver and front passenger to independently regulate the air temperature (see illustration). If your vehicle has such a system, it works as follows.
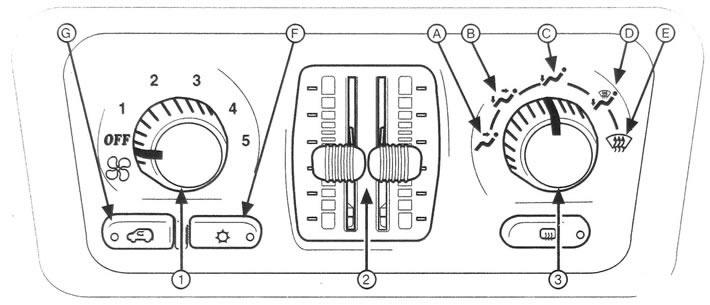
5.1 Standard dual-zone climate control system controls
1 Fan speed controller
2. The left knob controls the fan speed. The fan has five different operating modes: 1,2, 3, 4 and 5.
3. To increase the fan speed, turn the knob clockwise; to decrease it, turn the knob counterclockwise. When the fan speed control is turned fully counterclockwise, the system turns off. However, outside air continues to flow into the passenger compartment in the previously set air distribution mode.
2 Air temperature regulator
4. This regulator is used to change the temperature of the air coming from the system.
The left slider allows you to adjust the temperature in the driver's area. The right slider controls the temperature of the air supplied to the front passenger area and the rear seat area. To increase the temperature, move the corresponding regulator up; to decrease the temperature, move the regulator down.
3 Air distribution regulator in the cabin
5. Turn the knob to direct the air flow through the ventilation grilles as desired.
"OFF" position
6. When you turn the fan speed controller counterclockwise until it stops, the fan turns off. However, outside air still enters the passenger compartment when the vehicle is moving. Even when the system is off, you can still adjust the air temperature and air distribution mode throughout the cabin.
Ventilation
7. To supply air through the air ducts in the control panel, set the regulator to position A.
Mixed mode
8. Turn the control to position B to supply outside air through the ventilation grilles located in the control panel and through the air ducts located in the floor. Some air is also supplied through the glass blower nozzles. Cooler air is supplied through the control panel grilles, and the air supplied through the air ducts located in the floor can be slightly warmed.
Heating
9. Turn the control to position C to supply most of the air through the air vents located in the floor and a small amount of air through the windshield and side window blower nozzles.
In this mode, air recirculation cannot be turned on.
Heating/condensation removal from glass
10. Turn the regulator to position D to distribute air evenly between the windshield and side window blower nozzles and the heating ducts. Use this mode to eliminate fogging of the windshield or side windows and simultaneously warm the air in the cabin.
11. In this mode, air recirculation cannot be turned on.
Removal frost from glass
12. Turn the regulator to position E to supply most of the air through the windshield and side window vents and a small amount of air through the heating system vents. In this mode, the air conditioning compressor may be turned on to remove moisture from the air. Use this mode in cold weather to remove condensation, frost or ice from the windshield.
In this mode, air recirculation cannot be turned on.
Warning: Do not move your vehicle until all windows are clear of condensation, snow, ice or any other obstructions that may limit visibility.
Air conditioning compressor on/off button
13. To turn on the air conditioning compressor, press button F. The LED located in the button should light up. The system will cool the air in the cabin and remove moisture from it.
To turn off the air conditioner, press this button again.
14. Since the air conditioning compressor consumes energy, you may notice a slight decrease in engine power and reduced vehicle performance while the compressor is running. This is a normal phenomenon.
Air recirculation
15. To activate the air recirculation mode in the passenger compartment, press button G. This function is useful when driving through areas with high levels of dust or unpleasant odors, and also when it is necessary to quickly cool the air in the passenger compartment. When the system is turned on, the indicator located in the button lights up. In this mode, the air conditioning compressor is on. To stop this function, press this button again. Air recirculation cannot be switched on in heating, heating/condensation removal or frost removal mode. Using this mode in cold and damp weather may cause the windows to fog up.
Automatic dual-zone climate control system
16. This electronic automatic air conditioning system allows the driver and front passenger to independently regulate the air temperature (see illustration). If your vehicle has such a system, it works as follows.
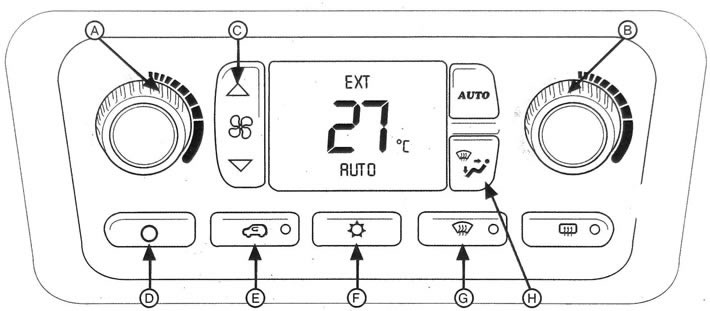
5.16 Automatic dual-zone climate control system controls
17. To turn on the system, press the fan speed control button, select the air distribution mode, the AUTO button, or turn any of the air temperature controls. If you press the AUTO button, you will turn on the automatic mode of the system. When the climate control system is turned on, the display will show the temperature set by the driver for approximately five seconds. The display will then show the outside temperature.
Outdoor temperature display
18. The display will show the new outside air temperature value if the vehicle engine has not been running for more than three hours. If the engine has not been running for less than three hours, the display will show a different temperature value because the heat in the engine compartment can affect the outside air temperature sensor readings. The heat generated by a running engine can also affect the air temperature in the immediate vicinity of a stationary vehicle. Therefore, it may take several minutes of driving before the display shows the actual outside temperature.
"OFF" position
19. To turn off the system, press button d. Air will still enter the passenger compartment when the car is moving and will be directed through the air ducts located on the floor.
Temperature regulation
20. You can set the desired air temperature in the range from 15°C (60°F) to 32°C (90T). However, if the system is in automatic mode and you set the temperature to 15°C (60°F) for maximum cooling or 32°C (90T) for maximum heating, the system will remain in maximum cooling or heating mode. Setting the maximum or minimum temperature will not result in faster heating or cooling of the air in the cabin.
Temperature control on the driver's side
21. To set the desired air temperature in the driver's area, rotate knob A. To increase the temperature, rotate the knob clockwise; to decrease the temperature, rotate the knob counterclockwise. When you turn the knob, the display will show the set air temperature and an arrow pointing towards the driver. If the front passenger side temperature control is not activated, the driver side temperature control sets the temperature throughout the entire vehicle interior.
Temperature control on the passenger side
22. To increase the temperature in the front passenger area, turn knob B clockwise; to decrease the temperature, turn it counterclockwise. When you turn the knob, the display will show the set air temperature and an arrow pointing towards the passenger.
23. After turning the temperature control on the front passenger side, the air temperature control in the passenger area remains independent of the temperature set by the driver until the AUTO button is pressed (Automatic mode) is not pressed for more than three seconds.
24. If the front passenger side temperature control is not activated, the driver side temperature control sets the temperature in the entire vehicle interior.
25. The display will show arrows pointing towards the driver and passenger.
26. If the vehicle engine has been off for more than three hours, the air temperature in the passenger area will be set to the same as in the driver area.
Automatic operation mode
27. In automatic mode, the system will automatically adjust the air temperature inside the cabin, air distribution mode and fan speed to reach the set temperature as quickly as possible.
28. To switch the system to automatic mode, press the AUTO button. Set the desired comfortable temperature.
29. It may take up to 20 minutes for the system to reach the specified settings.
30. Adjust the temperature as desired. If you want to set the same temperature in the front passenger area as in the driver area, press the AUTO button and hold it down for about three seconds. In this mode, the air conditioner compressor will turn on if the outside air temperature exceeds 4°C.
31. In automatic mode, the air recirculation mode is also automatically switched on if necessary, if it is hot outside and it is necessary to quickly cool the air in the cabin.
Manual operation mode
32. Fan speed controller. To manually adjust the fan speed, use button C. To increase the fan speed, press the upper part of the button; to decrease the fan speed, press the lower part of the button.
33. The display will show the fan speed and the air temperature set by the driver for five seconds.
34. Air distribution regulator in the cabin
Press the H button repeatedly to cancel the automatic mode and manually select the air flow distribution mode.
35. The display will show the air distribution mode and the air temperature set by the driver for five seconds.
a) In this mode, all air enters through the ventilation grilles in the control panel.
b) In mixed mode, part of the air enters through the ventilation grilles in the control panel, and part through the air ducts in the floor. Some of the air may be supplied to blow air onto the windshield and side windows. The air coming through the floor ducts may be slightly warmed.
c) In heating mode, most of the air is directed through the air ducts in the floor, and some of the air is directed to blow on the windshield and through the ventilation grilles for blowing side windows. In this mode, air recirculation cannot be turned on.
d) In this mode, the air is distributed equally between the windshield decondensation vents and the floor air ducts. Use this mode to eliminate fogging of the windshield or side windows, and simultaneously warm the air in the cabin. In this mode, air recirculation cannot be turned on.
Air recirculation
36. To turn on the air recirculation mode in the passenger compartment, press button E. This function is useful when driving through areas with high levels of dust or unpleasant odors, and also when it is necessary to quickly cool the air in the passenger compartment. When the system is turned on, the indicator located in the button lights up. In this mode, the air conditioning compressor is on. To stop this function, press this button again. Air recirculation cannot be switched on in heating, heating/condensation removal or frost removal mode. If you try to turn on the recirculated air mode at a time when this mode is not allowed, the indicator will flash three times, indicating that this function cannot be turned on. Using this mode in cold and damp weather may cause the windows to fog up. The air recirculation mode is switched off each time the ignition is turned off.
Air conditioning compressor on/off button
37. To turn on the air conditioning compressor, press the F button. When the air conditioner is turned on, a snowflake image will appear on the display. The system will cool the air in the cabin and remove moisture from it.
38. To turn off the air conditioner, press this button again.
39. The air conditioner compressor cannot be switched on in the windshield condensation or frost removal mode. If you try to turn off the air conditioner compressor while the system is in the frost and condensation removal mode or in the recirculation mode, the "snowflake" symbol on the display will go out, but the air conditioner compressor will continue to operate to prevent fogging of the windows.
40. Since the air conditioning compressor consumes energy, you may notice a slight decrease in engine power and reduced vehicle performance while the compressor is running.
Removal frost from glass
41. To remove frost or ice from the windshield and side windows of your vehicle, press button G. If this button is pressed when the system is in automatic mode, the fan speed will still be adjusted automatically. In this mode, the air conditioner compressor will automatically turn on if the outside air temperature exceeds 4°C.
Ventilation grilles
42. You can adjust the direction of air flow through the ventilation grilles as you wish - up, down, right and left.
Recommendations for working with the system
43. Before turning on the air conditioning system, open the windows for a few minutes to allow hot air to escape from the cabin. When turning on the air conditioning system, close the windows.
44. Keep the hood and front air intake grilles clear of ice, snow, leaves or other objects.
45. In cold weather, after entering the vehicle, set the fan speed to the highest setting to clear the air vents of snow and moisture and reduce the likelihood of fogging up the windows from inside the vehicle.
46. Do not place objects under the front seats that may impede the free circulation of air in the passenger compartment.
47. Installing additional equipment in the front of the vehicle may cause the climate control system to malfunction. Always consult your dealer before installing any external additional equipment.
Rear window defroster
48. Click on this button (see illustration) to turn on the rear window heater. To turn off the electric heater, press this button again or turn off the ignition. Otherwise, the electric heater will turn off automatically after ten minutes. To turn the electric heater back on, simply press the button again.
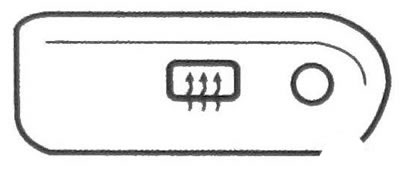
5.48 Rear window defroster button
49. When the heating is turned on, the LED located in the button lights up. On some vehicles, the heated rear view mirrors also turn on whenever the rear window heater is turned on.
Warning:
- Do not scrape the inside surface of the rear window with blades or other hard or sharp objects.
- In doing so, you may tear or damage the heater's electrically conductive mesh.
- Do not attach or glue any objects in the area of the rear window defogger's electrical mesh. The manufacturer's warranty does not cover any possible damage.
Rear heating/air conditioning system (Additional equipment)
50. If your vehicle is equipped with rear heating/air conditioning, it has a second control panel for rear seat passengers (see illustration).
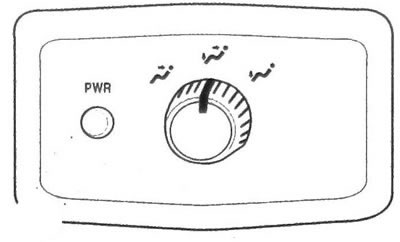
5.50 Control panel for passengers. sitting in the back seat
Vehicles not equipped with rear seat audio
51. Press the PWR (Power)button to turn the system on or off (see illustration 5.50).
52. The temperature of the air supplied through the rear air vents is determined by the temperature set by the front passenger. By turning the handle, you can direct the air flow through the upper or lower air ducts, or set a mixed air distribution. The rear climate control control panel is disabled when the defrost and ice removal mode is activated in the main climate control system.
Cars equipped with rear seat audio system
53. If your vehicle is equipped with a rear seat audio system, the rear air conditioning/heating controls are integrated into the rear seat audio system control panel (see illustration). To switch the rear air conditioning/heating system on or off, press button A.
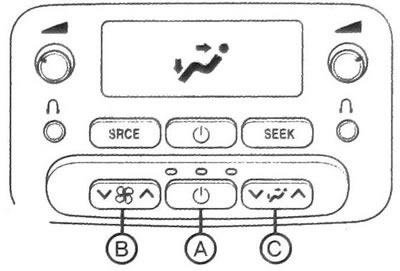
5.53 Rear air conditioning/heating controls integrated into audio system panel
54. The temperature of the air supplied through the rear air vents is determined by the setting specified by the front passenger.
To increase or decrease the fan speed, press the upper or lower arrow on the key with the fan symbol B, respectively. To select the air distribution mode, press the upper or lower arrow on the key C. The display will show the selected mode. The rear climate control control panel is disabled when the defrost and ice removal mode is activated in the main climate control system.