
Contents: Direction indicators ↧ Headlight high/low beam switch ↧ Cruise control ↧ Turning on the cruise control system ↧ Turning off the cruise control system ↧ Restoring the set speed of movement ↧ Increasing the set speed of movement ↧ Reducing the set speed of movement ↧ Overtaking another vehicle with… ↧ Using the cruise control system in… ↧ Windscreen wipers ↧ Rear window wiper/washer ↧
Direction indicators
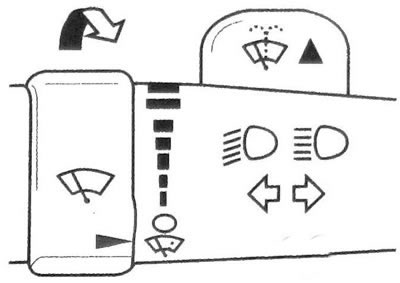
1. To signal a turn, move the lever (see illustration) all the way up (turn right) or down (left turn). After turning, the lever will automatically return to its original position. To signal a lane change, raise or lower the lever until the arrow starts flashing. Keep the lever in this position until the maneuver is completed. An arrow on the instrument panel shows the direction of a turn or lane change.
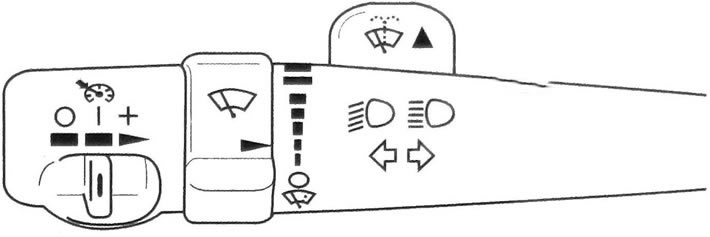
9.1 Multifunctional lever
2. If the turn signal is left on for more than 1 km, a gong will sound and the message TURN SIGNAL ON will be displayed (The direction indicator is on) will appear on the driver information center display to remind you to turn off the turn signal. If you want the turn signal to continue working, turn it off and on again.
3. If the arrow flashes faster than usual, it may mean that the turn signal bulb has burned out. Check the functionality of the front and rear turn signals.
4. If the turn signal lamp burns out, replace it immediately to avoid possible traffic accidents. If the green arrow does not come on at all when you turn on the turn signal, check the fuse and turn signal bulbs.
Headlight high/low beam switch
6. When the headlights are on and the multifunction lever is in the center position, the low beam headlights are on. To turn on the high beam headlights, press the lever forward. To switch the headlights back to low beam mode, pull the lever towards you so that it returns to the center position.
7. You can signal other drivers by flashing your high beam headlights. To do this, pull the multifunctional lever towards you. When the high beam headlights are turned on, the corresponding indicator lights up on the instrument panel.
Cruise control
Warning: It is dangerous to use the cruise control system in heavy traffic or on slippery or winding roads.
8. The cruise control system allows you to maintain a constant vehicle speed, starting from 40 km/h and above, without pressing the accelerator pedal.
9. When the cruise control system is on, the cruise control indicator on the instrument panel lights up.
If the Stabilitrak system is engaged while the cruise control is on, limiting wheel slip, the cruise control will automatically disengage.
10. Once normal driving conditions have been restored, you can turn the cruise control system back on.
Turning on the cruise control system
11. Move the cruise control switch to the middle position (see illustration).
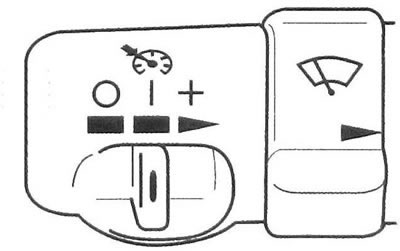
9.11 Move the cruise control switch to the middle position
12. Bring the vehicle speed to the required value.
13. Press the button located at the end of the lever and release it (see illustration).
9.13 Press and release the button
14. Remove your foot from the accelerator pedal. When the system is on, the cruise control indicator on the instrument panel lights up.
Caution: Do not leave the cruise control system on when not in use.
Turning off the cruise control system
15. To temporarily disable cruise control without erasing the stored speed:
a) Place your foot on the brake pedal, or
b) Move the automatic transmission selector lever to the N (Neutral) position. The indicator light will go out.
16. To turn off cruise control and clear the previously set speed:
a) Move the cruise control switch to the far left position (off position) (see illustration).
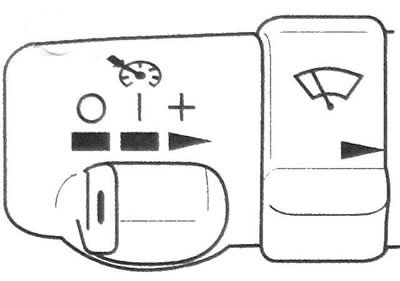
9.13 Press and release the button located at the end of the lever
or
b) Turn off the ignition.
Restoring the set speed of movement
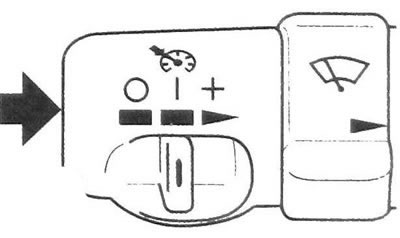
17. If you have temporarily disabled the cruise control without erasing the previously set speed, then when the vehicle is moving at a speed of 40 km/h or more, briefly move the switch to the extreme right position "speed recovery/acceleration" (see illustration). The car will accelerate to the previously set speed and maintain it constant.
9.17 Move the switch to the far right position "speed recovery/acceleration"
18. When you move the switch to the "speed recovery/acceleration" position to restore the previously set speed, do not hold it in this position. If you hold the switch down for more than one second, the vehicle will continue to increase speed. The car will accelerate until you release the switch or press the brake pedal.
Increasing the set speed of movement
19. You can increase the set speed of movement in any of the following ways:
a) Using the accelerator pedal: press the button located at the end of the lever (see illustration 9.13). Release the button and the accelerator pedal. The system will now automatically maintain a constant, higher speed.
b) Move the switch to the "speed recovery/acceleration" position (see illustration 9.17). Hold the switch until the vehicle accelerates to the new desired speed. When the vehicle reaches the desired speed, release the switch. The car will now maintain a new, higher speed.
c) Short press on the button (see illustration 9.13) will cause the vehicle's speed to increase by 1.6 km/h with each press.
Reducing the set speed of movement
20. Press the button located at the end of the lever and hold it down (see illustration 9.13). The car will begin to slow down. When the desired lower speed value is reached, release the button. The car will now maintain a new, lower speed.
21. When you press the button briefly, the set speed will decrease by 1.6 km/h with each press.
Overtaking another vehicle with cruise control on
22. To increase the speed of the car, simply press the accelerator pedal. As soon as you take your foot off the accelerator pedal, the car will return to the speed previously set by the cruise control system and will continue to move at that speed.
Using the cruise control system in hilly terrain
23. The operation of the cruise control system when driving on hilly terrain depends on several factors: vehicle speed, vehicle load, and the steepness of the ascents and descents.
24. When driving up a steep hill, you may need to press the accelerator pedal to maintain the set speed. When driving down a steep slope, you may need to press the brake pedal to control your speed. When you press the brake pedal, the cruise control system is automatically disengaged.
25. Most drivers rightly believe that using cruise control in hilly areas is too difficult.
Windscreen wipers
Caution: To avoid damaging the wiper blade or overloading the wiper motor, remove any ice from the blade before turning it on.
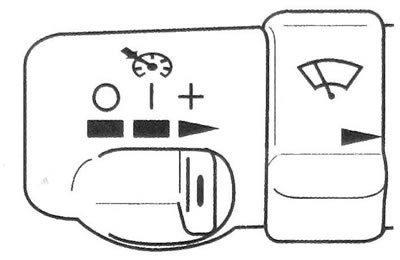
26. To turn on the windscreen wiper, turn the ring switch on the multifunction lever.
27. To make the wiper blades make only one stroke, turn the ring switch to the "drizzle" position (see illustration).
9.27 To make the wiper blades make only one stroke, turn the ring switch to the "drizzle" position
28. To make the wiper blades make several strokes, hold the ring switch in this position.
29. To turn on the continuous wiper mode, set the ring switch to one of the two upper positions, depending on the desired frequency of wiper operation.
30. In light rain or snow, you can use the intermittent wiper mode. Turn the ring switch to one of the intermittent operation positions with the required delay period between operating cycles (see illustration). The closer the mark on the ring switch is to the top of the multi-function lever, the shorter the delay period will be.
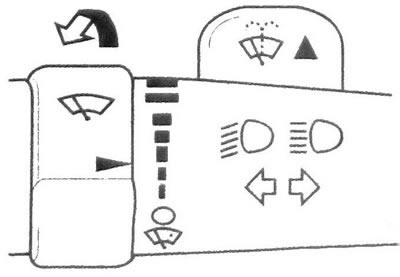
9.30 Turn the ring switch to one of the intermittent operation positions with the required delay period
31. To turn off the windshield wiper, turn the control to the "Off" position (see illustration).
9.31 To turn off the windscreen wiper, turn the control to the "O" position
32. The windshield wiper electrical circuit is protected by an automatic circuit breaker and a fuse. If there is an electrical overload, the wiper will automatically turn off and will not turn back on until the wiper motor has cooled down.
33. Over time, the wiper blades wear out and do not clean the windshield properly, which reduces forward visibility. Badly worn wiper blades need to be replaced. Windscreen washer
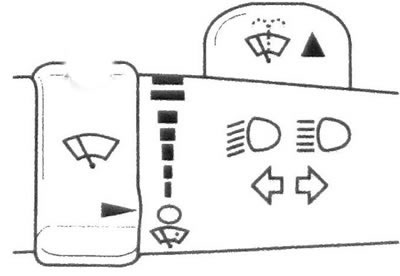
34. At the top of the multifunctional lever there is a protrusion with a symbol for the windshield washer. To spray jets of washing fluid onto the windshield, press and release this tab (see illustration). At the same time, the windshield wiper will turn on, which will then stop in its original position or return to the previously set operating mode.
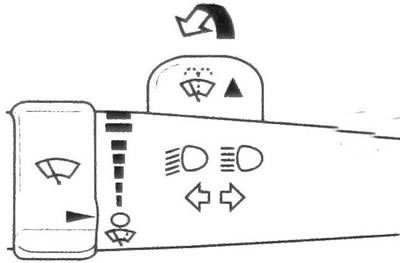
9.34 To spray jets of washing fluid onto the windshield, press the protrusion marked windshield washer, located at the top of the multi-function lever
Warning: In freezing weather, do not operate the washer until the windshield is sufficiently warm, otherwise it may ice up and impair visibility.
Rear window wiper/washer
35. Your vehicle may be equipped with a rear window wiper/washer. The switch is located on the instrument panel, to the right of the steering wheel.
36. To turn on the rear window wiper, turn the switch to position 1, 2 or 3 (see illustration).
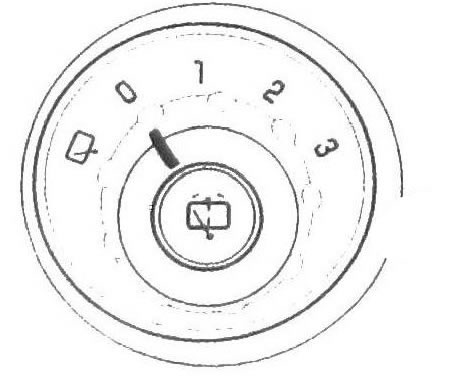
9.36 To turn on the rear window wiper, turn the switch to position 1, 2 or 3
37. To turn on the delayed windshield wiper, turn the switch to position 1 or 2.
38. To operate the windshield wiper continuously, turn the switch to position 3.
39. To turn off the rear window wiper, turn the switch to position 0.
40. To spray a jet of washing fluid onto the rear window, press the button.
41. The windshield and rear window washer fluid is located in the same tank. If the windshield washer still works, but the rear window washer no longer functions, check the fluid level in the reservoir and bring it up to normal.