ChevyMan.ru
Mazda Mitsubishi Toyota Land Rover Honda Kia Nissan
English Русский
Български
Беларускі
Український
Српски
Hrvatski
Română
Polski
Slovenský
Magyar
|
Articles | Sitemap | Contacts |


Home   Aveo   Captiva   Cruze   Lacetti   Lanos   Niva   Tahoe   Others  
Orlando 1 (2010-2018) Trailblazer 1 (2001-2008, petrol) Lumina 1 (1989-1994)
  • Home
  • Chevrolet
  • Trailblazer 1
  • Power unit
  • Cooling and heating
  • Air Conditioning Accumulator/Dryer — Removal and Installation

Air Conditioning Accumulator/Dryer — Removal and Installation (Chevrolet Trailblazer 1)

            0

Contents: Removal ↧ Installation ↧

Removal


Warning: The air conditioning system is under high pressure. Do not loosen the couplings or remove components without first discharging the system when contacting an authorized or specialized service station. When disconnecting the air conditioning system couplings, wear protective glasses or a mask.


1. Discharge the air conditioning system at a service station of the appropriate profile (see warning above). Disconnect the negative battery cable.

2. Disconnect the refrigerant supply and return lines (see illustration). Loosen each nut and remove the connectors from the mounting stud. Immediately plug any open lines to prevent moisture from entering the system and causing clogs.

14.2. Fastening the accumulator-dryer A Union nut of the refrigerant circulation line B Low…

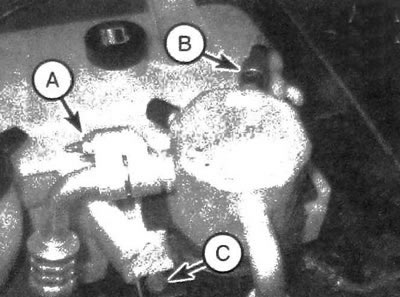
14.2. Fastening the accumulator-dryer A Union nut of the refrigerant circulation line B Low pressure circuit switch (cycle switch) With Mounting Bracket Bolt


3. Disconnect the wiring connector and remove the low pressure circuit switch.

4. Remove the bracket clamp bolt, lift and remove the battery/dryer from the engine compartment.

Installation


5. When replacing the accumulator/dryer, it is necessary to pour approximately 30 g of new compressor oil into the new unit (corresponding to the R-134a brand).


6. Place the new accumulator/dryer in its original location on the bracket, then place the bracket with the assembly installed on the stud.

7. Connect the refrigerant supply and return lines, lubricating the new O-rings with compressor oil. Tighten the mounting bolt securely.

8. Install the cycle switch and connect the wire connector.

9. Connect the negative battery cable.

10. Charge the air conditioning system at a specialized station.

The article was checked: Vladimir Romannikov
This article is available at russian, bulgarian, belarusian, ukrainian, serbian, croatian, romanian, polish, slovak, hungarian

Share information:

Previous articles
Trailblazer 1: Cooling and heating
Next articles

Air conditioning and heating systems — performance testing and maintenance
Heater — removal and installation
Control panel for heating and air conditioning systems — removal and installation
Heater Fan — Removal and Installation
Heater fan and its electrical circuit — checking the functionality
Air conditioning compressor — removal and installation
Air conditioning condenser — removal and installation
Evaporator — replacement
Air conditioning expansion tube — removal and installation


See similar articles on the topic of Chevrolet cars:
Heating, air conditioning and ventilation Chevrolet Aveo T300 (2012-2018)
Air Conditioning Control Chevrolet Captiva 1 (2006-2018)
Heating (air conditioning) and ventilation of the passenger compartment Chevrolet Cruze 1 (2008-2016)
Replacing the heating, ventilation and air conditioning system filter Chevrolet Lacetti 1 (2002-2009)
Heating, ventilation and air conditioning control unit Chevrolet Lanos T150 (2002-2009)
Air Conditioning Control Chevrolet Niva 1 (2002-2016)
Parts and units of cooling, heating and air conditioning systems Chevrolet Tahoe 1 (1992-2000)
Link in different formats to this page


Visitor comments

No comments yet


How much will 35 + 35 =


Orlando 1 (2010-2018) 
  • General information
  • Introduction to manual
  • User manual
  • Maintenance
  • Troubleshooting
  • Power unit
  • Engine repair
  • Fuel and control system
  • Cooling and lubrication system
  • Ignition system
  • Transmission
  • Clutch
  • Gearbox
  • Drive shafts
  • Chassis
  • Car suspension
  • Steering
  • Brake system
  • Body
  • Exterior (external elements)
  • Doors, locks and windows
  • Electrical equipment
  • Equipment and devices
  • Windscreen wipers
  • Power devices
  • Electrical diagrams


Trailblazer 1 (2001-2008) 
  • General information
  • User manual
  • Troubleshooting
  • Maintenance
  • Power unit
  • Engine in a car
  • Engine overhaul
  • Cooling and heating
  • Fuel and exhaust system
  • Engine electrical equipment
  • Engine control
  • Transmission
  • Automatic gearbox
  • Transfer case
  • Drive shafts and cardan
  • Chassis
  • Brake system
  • Car suspension
  • Steering
  • Body
  • Exterior (external elements)
  • Interior (internal elements)
  • Doors, locks and windows
  • Electrical equipment
  • Equipment and devices
  • Electrical circuits


Lumina 1 (1989-1994) 
  • General information
  • Maintenance
  • Power unit
  • Engine 3.1L V6
  • Engine 3.8L V6
  • Engine overhaul
  • Cooling system
  • Power and exhaust system
  • Fuel injection
  • Engine electrical equipment
  • Reduced exhaust gas toxicity
  • Transmission
  • Automatic gearbox
  • Drive shafts
  • Chassis
  • Brake system
  • Car suspension
  • Steering
  • Body
  • Heating and air conditioning
  • Repair of body elements
  • Doors, covers and windows
  • Interior (internal elements)
  • Electrical equipment
  • Equipment and devices
  • Electrical circuits


ChevyMan.ru © 2017-2026 · Mobile version · Feedback · Site search · Interesting to read · Sitemap: EN BG BY UA RS HR RO PL SK HU

Aveo 2003-2008 · Aveo 2006-2011 · Aveo 2012-2018 · Captiva 2006-2018 · Cruze 2008-2016 · Lacetti 2002-2009 · Lanos 2002-2009 · Niva 2002-2016 · Tahoe 1992-2000 · Tahoe 2000-2014 · Lumina 1 1989-1994 · Trailblazer 1 2001-2008 · Orlando 1 2010-2018 ·
🛡️ For your security and to improve our service, this site uses cookies. You can disable them in your browser.