ChevyMan.ru
Mazda Mitsubishi Toyota Land Rover Honda Kia Nissan
English Русский
Български
Беларускі
Український
Српски
Hrvatski
Română
Polski
Slovenský
Magyar
|
Articles | Sitemap | Contacts |


Home   Aveo   Captiva   Cruze   Lacetti   Lanos   Niva   Tahoe   Others  
Orlando 1 (2010-2018) Trailblazer 1 (2001-2008, petrol) Lumina 1 (1989-1994)
  • Home
  • Chevrolet
  • Trailblazer 1
  • Power unit
  • Cooling and heating
  • Air conditioning compressor — removal and installation

Air conditioning compressor — removal and installation (Chevrolet Trailblazer 1)

            0

Contents: Removal ↧ Installation ↧

Removal


Warning: The air conditioning system is under high pressure. Do not loosen the couplings or remove components without first discharging the system when contacting an authorized or specialized service station. When disconnecting the air conditioning system couplings, wear protective glasses or a mask.


Note: If the compressor is replaced, the accumulator/dryer must also be replaced (see subsection 14) and expansion tube (see subsection 18).


1. Discharge the air conditioning system at a service station of the appropriate profile (see warning above).

2. Disconnect the negative battery cable.

3. Clean the compressor areas adjacent to the refrigerant line connections.

4. Remove the drive belt (see chapter 1).

5. Remove the generator (see chapter 5) and the bracket of the intermediate pulley of the drive belt.

6. Disconnect the compressor wiring connector (see illustration).

15.6. Location of compressor mounting bolts: A - connecting nut of the refrigerant circulation…

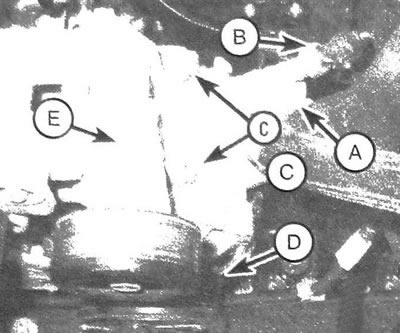
15.6. Location of compressor mounting bolts: A - connecting nut of the refrigerant circulation line; B - Refrigerant pressure sensor; C - Compressor mounting bolts (the top bolt is shown - the bottom fastener is not visible from this angle); D - Compressor drive clutch connector; E - Bracket of intermediate pulley of drive belt


7. Disconnect the suction and discharge unit from the compressor. Both lines are connected to the compressor by a twin coupling, which is secured with a single bolt. Cap the connectors to prevent clogging and moisture from entering the system. The seals located between the plate and the compressor must be replaced.

8. Unscrew the mounting bolts and remove the compressor.

Installation


9. If replacement is planned, drain the oil from the new compressor into a graduated container to determine the volume that needs to be added to the new compressor. It is necessary to comply with the requirements of the accompanying instructions.

Note: Sometimes the replacement compressor is supplied with oil already filled. Follow the instructions in the accompanying manual regarding draining excess oil before installation.


Caution: The oil added to the system must be compatible with R-134a refrigerant.


10. Installation is carried out in the reverse order of removal. When installing the refrigerant circulation line connector on the compressor, it is necessary to replace and lubricate the seals with compressor oil, then securely tighten the fastening nut.

11. Connect the negative battery cable.

12. Charge the air conditioning system at a specialized station.

[The article was reprinted from the website CHEVYMAN.ru]

The article was checked: Vladimir Romannikov
This article is available at russian, bulgarian, belarusian, ukrainian, serbian, croatian, romanian, polish, slovak, hungarian

Share information:

Previous articles
Trailblazer 1: Cooling and heating
Next articles

Air Conditioning Accumulator/Dryer — Removal and Installation
Air conditioning and heating systems — performance testing and maintenance
Heater — removal and installation
Control panel for heating and air conditioning systems — removal and installation
Heater Fan — Removal and Installation
Air conditioning condenser — removal and installation
Evaporator — replacement
Air conditioning expansion tube — removal and installation


See similar articles on the topic of Chevrolet cars:
Features of air conditioning compressor operation Chevrolet Aveo T300 (2012-2018)
Air Conditioning Compressor Relay Chevrolet Captiva 1 (2006-2018)
Features of air conditioning compressor operation Chevrolet Cruze 1 (2008-2016)
Removal the air conditioning compressor Chevrolet Lacetti 1 (2002-2009)
Checking the condition and replacing the air conditioning compressor drive belt Chevrolet Lanos T150 (2002-2009)
Air Conditioning Control Chevrolet Niva 1 (2002-2016)
Air conditioning compressor — removal and installation Chevrolet Tahoe 1 (1992-2000)
Link in different formats to this page


Visitor comments

No comments yet


How much will 24 + 33 =


Orlando 1 (2010-2018) 
  • General information
  • Introduction to manual
  • User manual
  • Maintenance
  • Troubleshooting
  • Power unit
  • Engine repair
  • Fuel and control system
  • Cooling and lubrication system
  • Ignition system
  • Transmission
  • Clutch
  • Gearbox
  • Drive shafts
  • Chassis
  • Car suspension
  • Steering
  • Brake system
  • Body
  • Exterior (external elements)
  • Doors, locks and windows
  • Electrical equipment
  • Equipment and devices
  • Windscreen wipers
  • Power devices
  • Electrical diagrams


Trailblazer 1 (2001-2008) 
  • General information
  • User manual
  • Troubleshooting
  • Maintenance
  • Power unit
  • Engine in a car
  • Engine overhaul
  • Cooling and heating
  • Fuel and exhaust system
  • Engine electrical equipment
  • Engine control
  • Transmission
  • Automatic gearbox
  • Transfer case
  • Drive shafts and cardan
  • Chassis
  • Brake system
  • Car suspension
  • Steering
  • Body
  • Exterior (external elements)
  • Interior (internal elements)
  • Doors, locks and windows
  • Electrical equipment
  • Equipment and devices
  • Electrical circuits


Lumina 1 (1989-1994) 
  • General information
  • Maintenance
  • Power unit
  • Engine 3.1L V6
  • Engine 3.8L V6
  • Engine overhaul
  • Cooling system
  • Power and exhaust system
  • Fuel injection
  • Engine electrical equipment
  • Reduced exhaust gas toxicity
  • Transmission
  • Automatic gearbox
  • Drive shafts
  • Chassis
  • Brake system
  • Car suspension
  • Steering
  • Body
  • Heating and air conditioning
  • Repair of body elements
  • Doors, covers and windows
  • Interior (internal elements)
  • Electrical equipment
  • Equipment and devices
  • Electrical circuits


ChevyMan.ru © 2017-2026 · Mobile version · Feedback · Site search · Interesting to read · Sitemap: EN BG BY UA RS HR RO PL SK HU

Aveo 2003-2008 · Aveo 2006-2011 · Aveo 2012-2018 · Captiva 2006-2018 · Cruze 2008-2016 · Lacetti 2002-2009 · Lanos 2002-2009 · Niva 2002-2016 · Tahoe 1992-2000 · Tahoe 2000-2014 · Lumina 1 1989-1994 · Trailblazer 1 2001-2008 · Orlando 1 2010-2018 ·
🛡️ For your security and to improve our service, this site uses cookies. You can disable them in your browser.