
Warning: The models described are equipped with air bags. Before performing procedures in the area where the passive restraint components are located, it is necessary to turn off the power to the SPS system to prevent accidental deployment of the airbags, which could result in serious injury (see chapter 12).
Note: After replacing the remote control, it is necessary to configure the control unit. To do this, after replacing the unit, turn the ignition key to the Off position, then start the engine and leave it idling for one minute. Do not disturb this process as this may result in malfunction of the air conditioning/heating system.
Front heater control panel (all models)
1. Disconnect the negative battery cable.
2. Remove the console (see chapter 11).
3. Remove the additional trim panel (see chapter 11).
4. Remove the mounting screws, then press the latches and pull the control panel out of the instrument panel (see illustrations). It is necessary to pull the remote control out far enough to disconnect the wiring connectors and the damper drive cables (if their presence is provided for by the design). When disconnecting, you need to use a small screwdriver.
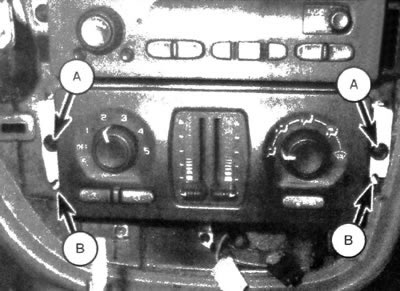
11.4a. Unscrew the screws (A), squeeze the latches (B) and pull out the control panel...

11.4b...then disconnect the wiring connectors
5. The remote control is installed in the reverse order of removal.
6. Perform control unit setup (see note at the beginning of this subsection).Rear additional heater control panel
7. Using a small screwdriver, pry up and remove the rear control panel.
8. Pull the remote control down from the center console, disconnect the electrical connectors and remove it from the passenger compartment. To detach the clips, you need to use a small screwdriver.
9. The remote control is installed in the reverse order of removal. Make sure the clips that connect the remote to the center console are securely fastened.
10. Perform control unit setup (see note at the beginning of this subsection).