
Warning 1: The air conditioning system is under high pressure. Do not loosen the couplings or remove components without first discharging the system when contacting an authorized or specialized service station. When disconnecting the air conditioning system couplings, wear protective glasses or a mask.
Warning 2: Before proceeding with this procedure, wait until the engine has cooled down completely.
Note: The vehicles described use spring-loaded radiator hose clamps. If you decide to continue using the hoses, make sure the hose surface on the branch pipe is clean and dry before securing them with spring clamps. Do not secure replacement hoses with spring clamps - replace them with worm drive fasteners.
1. If the procedure is performed on a vehicle without an additional (rear) air conditioning system, drain the refrigerant (see Warning at the beginning of this subsection).
2. Disconnect the negative cable from the battery.
3. Drain the coolant from the system (see chapter 1), then remove the fan together with the casing and drive coupling (see subsection 5).
4. Raise the vehicle and support it on vertical stands.
5. Disconnect the lower hose from the radiator.
6. If necessary, remove the radiator bracket shield.
7. Disconnect the transmission cooling lines from the radiator (see illustration). First, you need to disconnect the plastic ring, then remove the clamp and disconnect the quick-release coupling. After disconnecting, plug the lines to prevent coolant from leaking out. To catch spilled liquid, it is necessary to prepare a suitable container. Before subsequent installation, it is necessary to inspect the sealing rings of the transmission cooling lines.
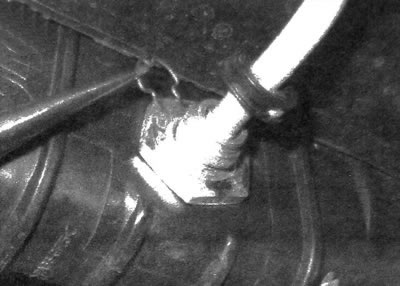
6.7. As a rule, to disconnect the quick-release coupling of the transmission coolant line, it is necessary to disconnect the plastic ring and remove the clamp
Note: Do not remove the clutch clamp by simply pulling it out. Holding one side with your fingers, grab the outer edge with tweezers (with curved tips) and remove the clamp using a rotating motion. The clamp is installed using a similar technique, without direct pressing.
8. Lower the vehicle onto a supporting surface.
9. Remove the radiator support bridge (see illustration) and a cooling system hose connected to the expansion tank.
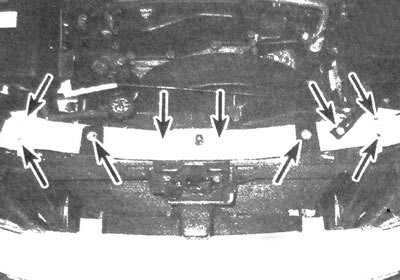
6.9. Radiator support crossbar fasteners
10. Disconnect the side panels and remove the radiator.
Note: On models without rear air conditioning, the condenser is removed together with the radiator. The separation of the elements occurs when the bolts of the capacitor bracket are unscrewed.
11. Before installing the radiator, if necessary, replace damaged hoses and clamps.
12. The radiator is installed in the reverse order of removal. After installation, make sure that the radiator is securely seated in the lower saddles and that the upper brackets are securely fastened. Before connecting the transmission coolant lines, install the clamps into the quick release couplings, then secure the lines with the couplings. Don't forget to secure the coupling clamps with plastic rings.
Note: If the plastic rings do not connect easily to the couplings, the assembly is not done correctly.
13. After installation, fill the cooling system (see chapter 1) and check the engine oil and automatic transmission fluid levels.
14. If the vehicle is not equipped with a rear air conditioning system, contact a specialized station to refill the system with refrigerant.
[The original material is located on the website «ChevyMan»]