ChevyMan.ru
Mazda Mitsubishi Toyota Land Rover Honda Kia Nissan
English Русский
Български
Беларускі
Український
Српски
Hrvatski
Română
Polski
Slovenský
Magyar
|
Articles | Sitemap | Contacts |


Home   Aveo   Captiva   Cruze   Lacetti   Lanos   Niva   Tahoe   Others  
Orlando 1 (2010-2018) Trailblazer 1 (2001-2008, petrol) Lumina 1 (1989-1994)
  • Home
  • Chevrolet
  • Trailblazer 1
  • Power unit
  • Cooling and heating
  • Thermostat — Checking Performance and Replacement

Thermostat — Checking Performance and Replacement (Chevrolet Trailblazer 1)

            0

Contents: Checking functionality ↧ Replacement ↧
Note: The thermostat is an integral part of the housing.


Checking functionality


1. Before deciding that the thermostat is faulty, check the coolant level, drive belt tension (see chapter 1) and the performance of the sensor (or indicator) temperature.

2. If the engine takes too long to warm up (which can be determined by the cold air coming out of the heater or by the temperature indicator readings), then it is possible that the thermostat is stuck in the open position. Make a replacement.

3. If the engine is warm, touch the lower radiator hose with your hand. If the hose does not heat up, then the thermostat is probably stuck in the closed position and does not allow coolant to pass from the cooling jacket to the radiator - replace it.

Warning: Do not operate the vehicle without a thermostat. The engine control unit will constantly record an open thermostat condition, which will reduce the efficiency of exhaust gas toxicity control and lead to increased fuel consumption.


4. A hot lower radiator hose indicates that coolant is circulating in the system, which is only possible when the thermostat is open. To determine the cause of engine overheating, refer to the "Determining the Causes of Malfunctions" subsection at the beginning of this manual.

Replacement


Warning: Allow the engine to cool completely before performing this procedure.


5. Disconnect the negative battery cable.

Partially drain the coolant from the cooling system. If the condition allows, the drained liquid can be reused for its intended purpose. If you are planning to change the fluid, please refer to the safety requirements for handling antifreeze in subsection 2.


6. Remove the generator (see chapter 5).

7. Locate the thermostat housing, which is located in the upper radiator hose, on the left side of the cylinder block (see illustration).

3.7. The thermostat housing is located on the left side of the cylinder block (for clarity, shown…

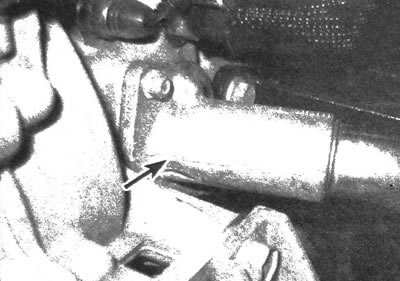
3.7. The thermostat housing is located on the left side of the cylinder block (for clarity, shown with the generator removed); it should be noted that the thermostat is not separated from the casing


8. Loosen the clamp and disconnect the radiator hose from the thermostat housing. If necessary, grasp the hose near the fitting with a pipe wrench and twist it to disconnect. It may be necessary to cut the old hose during removal in order to replace it during subsequent assembly.

9. If the outer surface of the thermostat adjacent to the hose is subject to corrosion, has cavities or other defects, then further damage may occur when the hose is removed. In this case, it is necessary to replace the thermostat housing.

10. Remove the bolts and detach the thermostat housing. If necessary, use a soft-faced hammer to remove the casing. If the casing becomes depressurized, coolant may leak out.

11. Clean the mating surfaces of the cylinder block and thermostat housing. Install a new sealing ring into the groove of the casing (see illustration).


3.11. After cleaning the casing or when replacing the thermostat, it is necessary to install a new…

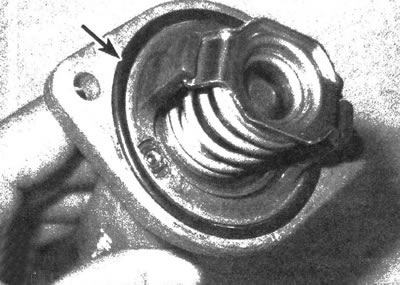
3.11. After cleaning the casing or when replacing the thermostat, it is necessary to install a new sealing ring


12. Connect the thermostat housing to the intake manifold and tighten the mounting bolts to the required torque.

13. The rest of the assembly is carried out in the reverse order of removal. At the same time, one should not miss the convenient opportunity to inspect and replace the cooling system hoses as necessary (see chapter 1).

14. Fill the cooling system as described in chapter 1. Start the engine and check for coolant leaks.

15. Repeat the operations described in paragraphs 1-4 to ensure that the reasons that led to the replacement were eliminated during the replacement.

The article was checked: Vladimir Romannikov
This article is available at russian, bulgarian, belarusian, ukrainian, serbian, croatian, romanian, polish, slovak, hungarian

Share information:

Previous articles
Trailblazer 1: Cooling and heating
Next articles

Antifreeze — general information
General information
Cooling system fan and its clutch — checking the functionality
Cooling system fan, its coupling and casing — removal and installation
Radiator — removal and installation
Coolant pump — checking performance and replacement
Coolant Temperature Sensor — Checking Functionality and Replacement


See similar articles on the topic of Chevrolet cars:
Thermostat — Removal, Checking and Installation Chevrolet Aveo T250 (2006-2011)
Checking oil pressure Chevrolet Captiva 1 (2006-2018)
Checking the wheels Chevrolet Cruze 1 (2008-2016)
Removal and checking the thermostat Chevrolet Lacetti 1 (2002-2009)
Removal and checking the thermostat Chevrolet Lanos T150 (2002-2009)
Checking the performance of the vacuum booster Chevrolet Niva 1 (2002-2016)
Checking the air filter with thermostat Chevrolet Tahoe 1 (1992-2000)
Link in different formats to this page


Visitor comments

No comments yet


How much will 16 + 28 =


Orlando 1 (2010-2018) 
  • General information
  • Introduction to manual
  • User manual
  • Maintenance
  • Troubleshooting
  • Power unit
  • Engine repair
  • Fuel and control system
  • Cooling and lubrication system
  • Ignition system
  • Transmission
  • Clutch
  • Gearbox
  • Drive shafts
  • Chassis
  • Car suspension
  • Steering
  • Brake system
  • Body
  • Exterior (external elements)
  • Doors, locks and windows
  • Electrical equipment
  • Equipment and devices
  • Windscreen wipers
  • Power devices
  • Electrical diagrams


Trailblazer 1 (2001-2008) 
  • General information
  • User manual
  • Troubleshooting
  • Maintenance
  • Power unit
  • Engine in a car
  • Engine overhaul
  • Cooling and heating
  • Fuel and exhaust system
  • Engine electrical equipment
  • Engine control
  • Transmission
  • Automatic gearbox
  • Transfer case
  • Drive shafts and cardan
  • Chassis
  • Brake system
  • Car suspension
  • Steering
  • Body
  • Exterior (external elements)
  • Interior (internal elements)
  • Doors, locks and windows
  • Electrical equipment
  • Equipment and devices
  • Electrical circuits


Lumina 1 (1989-1994) 
  • General information
  • Maintenance
  • Power unit
  • Engine 3.1L V6
  • Engine 3.8L V6
  • Engine overhaul
  • Cooling system
  • Power and exhaust system
  • Fuel injection
  • Engine electrical equipment
  • Reduced exhaust gas toxicity
  • Transmission
  • Automatic gearbox
  • Drive shafts
  • Chassis
  • Brake system
  • Car suspension
  • Steering
  • Body
  • Heating and air conditioning
  • Repair of body elements
  • Doors, covers and windows
  • Interior (internal elements)
  • Electrical equipment
  • Equipment and devices
  • Electrical circuits


ChevyMan.ru © 2017-2026 · Mobile version · Feedback · Site search · Interesting to read · Sitemap: EN BG BY UA RS HR RO PL SK HU

Aveo 2003-2008 · Aveo 2006-2011 · Aveo 2012-2018 · Captiva 2006-2018 · Cruze 2008-2016 · Lacetti 2002-2009 · Lanos 2002-2009 · Niva 2002-2016 · Tahoe 1992-2000 · Tahoe 2000-2014 · Lumina 1 1989-1994 · Trailblazer 1 2001-2008 · Orlando 1 2010-2018 ·
🛡️ For your security and to improve our service, this site uses cookies. You can disable them in your browser.