
Warning 1: Before starting this procedure, you must wait until the engine has cooled down completely.
Warning 2: Do not allow antifreeze to come into contact with human or animal skin, or with car or other painted surfaces. The area where antifreeze has come into contact should be immediately washed with running water. Keep stored antifreeze out of reach of children or pets, who may be attracted by its sweet odor. Swallowing even a small amount of antifreeze can be fatal. Wipe up any spilled antifreeze from the garage floor immediately. Keep antifreeze containers tightly sealed and repair any leaks in the cooling system immediately. Dispose of used coolant in accordance with environmental regulations and requirements. Do not drain coolant onto the ground or into a drain. Antifreeze is flammable under certain conditions - check the safety precautions on the container label.
Note: Non-toxic antifreeze is now available in many stores, but coolant based on this type of antifreeze must also be disposed of safely and in accordance with environmental requirements.
Warning: It is prohibited to mix green ethylene glycol antifreeze with orange antifreeze "DEX-COOL", which does not contain silicate components, since this reduces the efficiency of the latter, which is intended for use for a mileage of 160,000 km (or 5 years).
Draining liquid
1. The cooling system periodically requires draining the fluid, flushing and filling with a new antifreeze solution. This is necessary to prevent the formation and accumulation of corrosive deposits in the system, the presence of which leads to a decrease in performance and damage to the engine.
2. Apply the parking brake and place chocks under the wheels.
Warning: If the vehicle has just been used. proceed with this procedure after several hours have passed and the engine has cooled down completely.
3. Place a large container under the radiator drain nipple to catch the drained fluid. Loosen the clamp, slide the lower radiator hose back and drain the fluid into a container (see illustration). Remove the radiator cap.
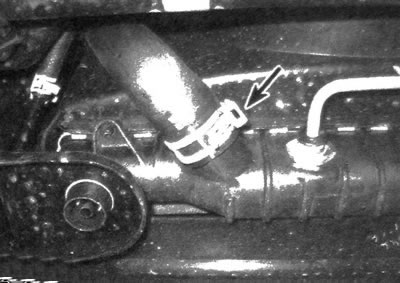
30.3. The liquid from the cooling system on the described vehicles is drained by disconnecting the lower hose from the radiator
4. After draining the coolant, inspect the radiator and heater hoses, as well as their clamps (see subsection 14).
5. Replace damaged hoses and clamps. Connect the lower hose to the radiator and the bleed hose to the throttle body.
Flushing
6. Fill the system with clean water as described in this subsection starting from item 12 under the subheading "Filling".
7. Start the engine and wait until it warms up to normal operating temperature, then press the accelerator pedal several times.
8. Turn off the engine, wait until it cools down and drain the water as described above.
9. Perform the operation described in paragraph. 6-8, until the drained water becomes clear.
10. If the radiator is heavily soiled or clogged, remove it (see chapter 3) and provide it to the workshop for cleaning or repair.
11. Deposits covering the radiator walls are removed using special products. Follow the instructions for using the cleaner.
Note: If regular maintenance is performed and the system is filled with an aqueous solution of antifreeze of the appropriate type, then no special chemicals are required for flushing.
Filling
12. Connect the lower hose to the radiator and install the clamp. Disconnect the bleed hose from the throttle body.
13. Move the heater temperature control to the maximum position.
14. Gradually fill the radiator with new fluid of the appropriate type. Install the radiator cap.
15. Add fluid to the expansion tank until the level reaches the FULL COLD mark, then install the cap.
16. Connect the hose to the throttle body to bleed the system.
17. Start and warm up the engine at 2000 rpm to operating temperature. After this, let it idle for three minutes.
18. Turn off the engine and wait until it cools down.
19. After the engine has cooled down, remove the radiator cap and add coolant if necessary. Install the radiator cap, then add fluid to the expansion tank if necessary.
20. Check for coolant leaks.
(The original source of the article is the website: CHEVYMAN.RU)