
2. As a rule, when replacing spark plugs, it is necessary to use a special socket head on an extension lever with a ratchet. This head has a rubber sealing ring installed to protect the porcelain insulator from damage, as well as to secure the spark plug during installation. You will also need extension cords and a feeler gauge to check and adjust the interelectrode gap (see illustration). To tighten new spark plugs to the required torque, use a torque wrench.
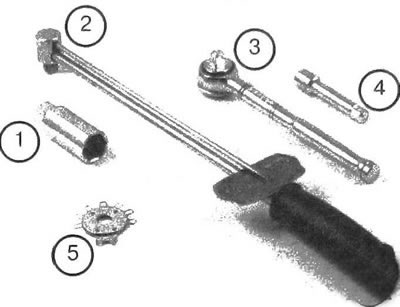
25.2. Tools required for replacing spark plugs:1. Spark plug socket head - The inner surface of the head has a special coating that protects the porcelain insulator of the spark plug; 2. Torque wrench - It is advisable to use it when tightening spark plugs to ensure reliability; 3. Ratchet Lever - Standard attachment in addition to the spark plug socket. When performing the procedure on different models, it is necessary to use all sorts of extensions and articulated sections to get to one or more candles with limited access; 4. Extension rod - To allow one or more spark plugs to be removed or tightened (depending on the vehicle modification) extensions and universal joints may be required; 5. Spark plug gap feeler gauge - This feeler gauge can be used to check spark plug gaps. Make sure the feeler gauge is designed to check the gap of the correct spark plug type.
Note: These models use spark plugs that are 3mm longer than the standard spark plugs used on earlier model years. Make sure the spark plug socket depth matches the length of the spark plugs. Using a small head may cause destruction of the ceramic insulator.
3. When replacing spark plugs, first purchase and adjust the spark plugs, then replace each spark plug individually. When purchasing candles, make sure they are the correct type. The spark plug type is specified in the specifications in this chapter, as well as in the owner's manual supplied with the new vehicle.
4. Wait until the engine has cooled down before removing the spark plugs. While waiting for the engine to cool down, inspect the new spark plugs and adjust their interelectrode gaps.
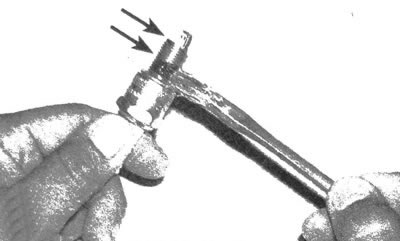
5. Check that the gap is within the specified standard by inserting a feeler gauge of the required thickness into the gap between the electrodes located on the spark plug tip (see illustration). The spark plug gap must be within the specifications in this chapter or on the emission control system information label. The plate is glued in the engine compartment. The probe wire should pass between the electrodes with little resistance. If the gap does not meet the standard, adjust it using a feeler gauge by bending the outer electrode until the gap reaches the required value (see illustration). If the outer electrode is not exactly centered over the inner electrode, bend it using a feeler gauge. Inspect the porcelain insulator for cracks (if there are cracks, the spark plug is not suitable for use).
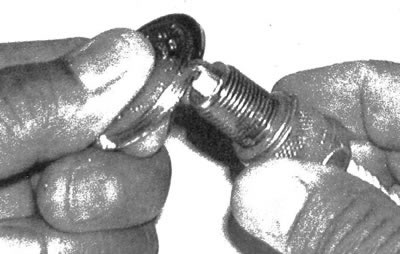
25.5a. Spark plug manufacturers recommend using a cone gauge to check gap compliance. Insert the thin edge of the measuring device into the gap and turn it so that the measuring device is clamped between the electrodes. Determine the thickness using the scale on the gauge. It is prohibited to insert the measuring device with force or use it to bend the electrode.
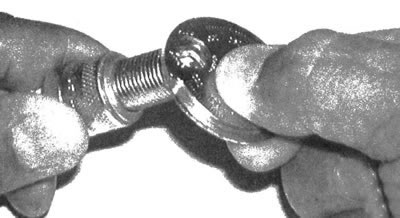
25.5b. To change the gap, bend the outer electrode by inserting it into the hole in the meter. Do not allow the porcelain insulator of the central electrode to crack or split
Caution: When checking the gap of platinum or iridium spark plugs, do not pass a feeler gauge between them as this may damage the coating and reduce the life of the plug. In this case, it is necessary to use a cone thickness gauge.
6. Remove the ignition coils from the cooled engine (see chapter 5). Remove the spark plug boots by twisting them slightly and pulling them upward.
7. If possible, use compressed air to remove dirt and foreign particles from the area around the spark plugs. This procedure will prevent dirt from getting into the cylinders when removing the spark plugs.
8. Remove the spark plugs by turning them counterclockwise with a spark plug wrench (see illustration).
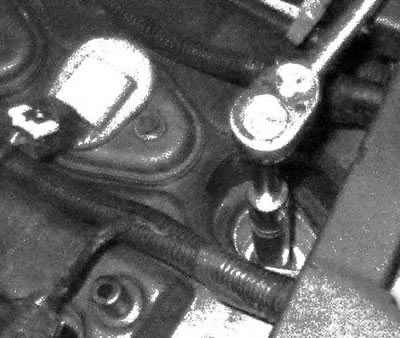
25.8. To unscrew the spark plug, use a spark plug wrench with an extension. In order to get to one or more spark plugs, on some modifications it is necessary to use extensions of different lengths and sections with a flexible joint
9. Compare each removed spark plug with the spark plugs shown in the illustration to assess the technical condition of the engine (see illustration). Apply a small amount of anti-seize compound to the threads of the new spark plugs (see illustration).
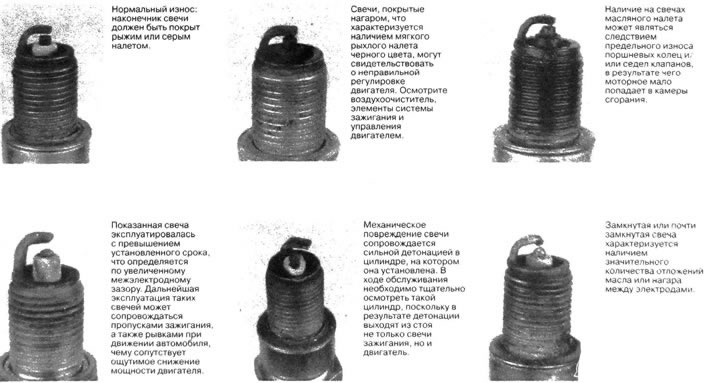
25.9a. To determine the technical condition of the engine, inspect the removed spark plugs
25.9b Apply anti-seize compound to the spark plug threads, avoiding contact with the lower threads
10. Screw the spark plug in with your fingers, then use a torque wrench to tighten it. Quite often difficulties arise when aligning the spark plug thread and the hole. To make this task easier, stretch a piece of rubber hose over the spark plug before installation (see illustration). The flexible section of hose will act as a hinge when the threads are aligned. If the spark plug goes in crooked, having a piece of hose will prevent damage to the hole thread.
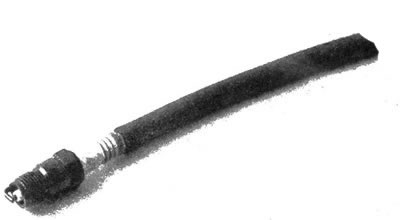
25.10 Using a piece of rubber hose will help align the threads when inserting the spark plug into its mounting hole and will prevent damage to the cylinder head
11. Place the cover on the coil and install it on the spark plug.
12. Perform the described procedure on the remaining candles.
[The original source of the article is the website chevyman.ru]