ChevyMan.ru
Mazda Mitsubishi Toyota Land Rover Honda Kia Nissan
English Русский
Български
Беларускі
Український
Српски
Hrvatski
Română
Polski
Slovenský
Magyar
|
Articles | Sitemap | Contacts |


Home   Aveo   Captiva   Cruze   Lacetti   Lanos   Niva   Tahoe   Others  
Orlando 1 (2010-2018) Trailblazer 1 (2001-2008, petrol) Lumina 1 (1989-1994)
  • Home
  • Chevrolet
  • Trailblazer 1
  • General information
  • Maintenance
  • Replacing the fuel filter

Replacing the fuel filter (Chevrolet Trailblazer 1)

            0

Warning: Certain precautions must be observed when performing preventive inspection and maintenance on fuel system components. Work in well-ventilated areas and do not allow open flames or unshielded light bulbs in the work area. Avoid contact with gasoline on your skin. Work with rubber gloves. If gasoline gets on your skin, wash it off with running water and soap. Wipe up spilled fuel immediately and store the absorbent cloth where it cannot be ignited. Before acting on the elements, release the pressure in the system (see chapter 4). Have a class B fire extinguisher on hand and wear eye protection when working with the system.


1. Relieve the pressure in the fuel system (chapter 4). Disconnect the negative cable from the battery.

2. Raise the vehicle and support it with vertical supports.


3. The fuel filter is located in the bracket on the fuel tank.

4. Using compressed air or a fuel system cleaner, remove dirt from areas adjacent to the filter inlet and outlet.

5. Each end of the filter has a quick-release coupling, to disconnect which you need to use needle-nose pliers or squeeze the lock with your fingers (see illustration).

24.5. When replacing the fuel filter (A), to disconnect the couplings, it is necessary to compress…

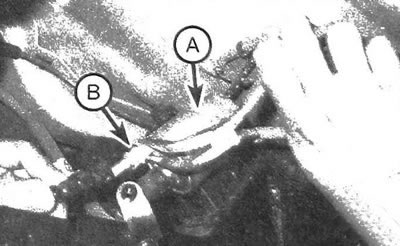
24.5. When replacing the fuel filter (A), to disconnect the couplings, it is necessary to compress the clamps (B)


Note: To receive or absorb the fuel in the filter, place a suitable container or use a damp cloth.


6. Unscrew the screw securing the bracket to the tank.

Note: On all-wheel drive vehicles, the tank has a protective panel that has a hole in it to provide access to the bracket screw.


7. Squeeze the plastic clips and disconnect the fuel lines from the filter. New filter modifications have improved fasteners.

8. Installation is carried out in the reverse order of removal.

The text of the article was obtained from the website: «chevyman.ru»

The article was checked: Vladimir Romannikov
This article is available at russian, bulgarian, belarusian, ukrainian, serbian, croatian, romanian, polish, slovak, hungarian

Share information:

Previous articles
Trailblazer 1: Maintenance
Next articles

Replacing the air cleaner
Replacing brake fluid
Checking the Transfer Case Fluid Level (4WD Models)
Checking the technical condition of the exhaust system
Checking the technical condition of the brake system
Replacing spark plugs
Inspection of rubber boots of suspension elements, steering and drive shafts
Automatic transmission fluid and filter replacement
Transfer Case Fluid Replacement (4WD Models)
Changing differential oil


See similar articles on the topic of Chevrolet cars:
Replacing the air filter Chevrolet Aveo T250 (2006-2011)
Fuel filter Chevrolet Captiva 1 (2006-2018)
Replacing the air filter element Chevrolet Cruze 1 (2008-2016)
Replacing the fuel filter Chevrolet Lacetti 1 (2002-2009)
Replacing the fuel filter Chevrolet Lanos T150 (2002-2009)
Fuel tank cap Chevrolet Niva 1 (2002-2016)
Replacing the fuel filter Chevrolet Tahoe 1 (1992-2000)
Link in different formats to this page


Visitor comments

No comments yet


How much will 26 + 32 =


Orlando 1 (2010-2018) 
  • General information
  • Introduction to manual
  • User manual
  • Maintenance
  • Troubleshooting
  • Power unit
  • Engine repair
  • Fuel and control system
  • Cooling and lubrication system
  • Ignition system
  • Transmission
  • Clutch
  • Gearbox
  • Drive shafts
  • Chassis
  • Car suspension
  • Steering
  • Brake system
  • Body
  • Exterior (external elements)
  • Doors, locks and windows
  • Electrical equipment
  • Equipment and devices
  • Windscreen wipers
  • Power devices
  • Electrical diagrams


Trailblazer 1 (2001-2008) 
  • General information
  • User manual
  • Troubleshooting
  • Maintenance
  • Power unit
  • Engine in a car
  • Engine overhaul
  • Cooling and heating
  • Fuel and exhaust system
  • Engine electrical equipment
  • Engine control
  • Transmission
  • Automatic gearbox
  • Transfer case
  • Drive shafts and cardan
  • Chassis
  • Brake system
  • Car suspension
  • Steering
  • Body
  • Exterior (external elements)
  • Interior (internal elements)
  • Doors, locks and windows
  • Electrical equipment
  • Equipment and devices
  • Electrical circuits


Lumina 1 (1989-1994) 
  • General information
  • Maintenance
  • Power unit
  • Engine 3.1L V6
  • Engine 3.8L V6
  • Engine overhaul
  • Cooling system
  • Power and exhaust system
  • Fuel injection
  • Engine electrical equipment
  • Reduced exhaust gas toxicity
  • Transmission
  • Automatic gearbox
  • Drive shafts
  • Chassis
  • Brake system
  • Car suspension
  • Steering
  • Body
  • Heating and air conditioning
  • Repair of body elements
  • Doors, covers and windows
  • Interior (internal elements)
  • Electrical equipment
  • Equipment and devices
  • Electrical circuits


ChevyMan.ru © 2017-2026 · Mobile version · Feedback · Site search · Interesting to read · Sitemap: EN BG BY UA RS HR RO PL SK HU

Aveo 2003-2008 · Aveo 2006-2011 · Aveo 2012-2018 · Captiva 2006-2018 · Cruze 2008-2016 · Lacetti 2002-2009 · Lanos 2002-2009 · Niva 2002-2016 · Tahoe 1992-2000 · Tahoe 2000-2014 · Lumina 1 1989-1994 · Trailblazer 1 2001-2008 · Orlando 1 2010-2018 ·
🛡️ For your security and to improve our service, this site uses cookies. You can disable them in your browser.