
Warning: Dust generated by the wear of brake pad friction linings is hazardous to health. Do not use compressed air to remove this dust and avoid inhaling it. Use only a special solvent to clean brake components. When servicing the brake system, it is advisable to wear a respirator.
Note: Detailed illustrations relating to the braking system are provided in chapter 9.
1. In addition to inspection at the specified intervals, inspect the brake system whenever the wheels are removed or if you suspect a malfunction in the system.
2. Indicators of problems with the braking system include such signs as the car pulling to the side when braking, noise in the brakes when they are applied, an increase in the pedal travel, pulsation felt when pressing the pedal, and the presence of brake fluid leaks on the inner end surface of the wheels.
3. Loosen the tightening force of the wheel nuts.
4. Raise the car with a jack and install special supports.
5. Remove the wheels (see the "Jacking and Towing" section at the beginning of this manual or the instructions in your vehicle's owner's manual).
Disc brakes
6. Each caliper has two pads - inner and outer. The brake shoe linings are visible after removing the wheels. The vehicles described are equipped with front and rear disc brakes with a drum-type mechanical parking brake located inside each rear brake disc.
7. Inspect the brake pad linings through the hole in each caliper (see illustrations). If the lining thickness is less than the value given in the specifications in this chapter, replace the pads.
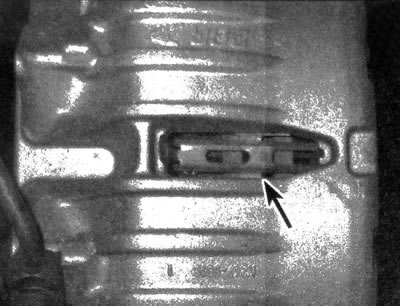
19.7a. After removing the wheel, check the thickness of the inner brake shoe lining through the inspection hole (shown on the front brake; the design of the rear disc brake is similar)
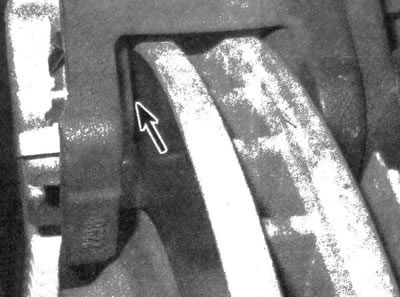
19.7b. It is easier to check the thickness of the outer brake shoe lining at the edge of the caliper
Note: Do not include the thickness of the metal base to which the trim is glued or riveted in your measurement results.
8. If it is difficult to check the thickness of the linings using the method described above, if you are concerned about the condition of the brake pads, remove the calipers, then remove the pads from them for further thorough inspection (see chapter 9).
9. After removing the pads from the caliper, clean them with a special agent and measure the thickness of the pads with a steel ruler or calipers (see illustration).
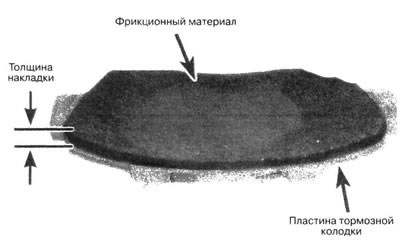
19.9. To accurately determine the thickness of the lining, remove the brake shoe
10. Make sure that the brake disc thickness complies with the standard by measuring with a micrometer. If any disc is thinner than the specified minimum thickness, replace it(see chapter 9). Even if the disc thickness is within the norm, check its condition. Check the disc for chips, scratches, or areas that have been exposed to excessive heat. If the described defects are present, remove the disk and subject its surfaces to mechanical treatment (see chapter 9).
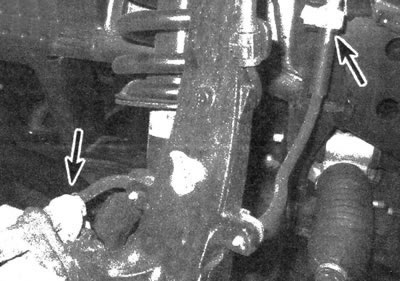
11. Before installing the wheels, make sure there is no brake fluid leakage, damage, critical wear, deformation, cracking, corrosion, kinking or twisting of the hoses and tubes of the system, especially in the area of the brake caliper hoses (see illustration). Check the connections for tightness and ensure there are no signs of leakage in the connectors. Make sure that the hoses and tubes do not come into contact with sharp edges of other elements, moving parts and components of the exhaust system. If the described contacts are present, reposition or properly route the hoses and tubes (see chapter 9).
11/19 No translation
Checking the performance of the brake booster
12. While in the driver's seat, perform a check using the following method.
13. Press the brake pedal all the way down and start the engine. At the same time, it should move downwards slightly.
14. Without turning off the engine, press the pedal several times. Its course must remain constant.
15. Press the brake pedal, turn off the engine, and continue to hold it for about 30 seconds. The pedal position should not change while pressed.
16. Start the engine and leave it running for approximately one minute, then turn off the engine. Press the brake pedal all the way down several times. With each press you should notice a decrease in the stroke.
17. If the brakes do not work as described above, then the brake booster needs to be repaired or replaced. The procedure for removing the vacuum booster is described in chapter 9.
Parking brake
18. The check is carried out by stopping the vehicle on a slope and applying the parking brake with the gearbox in neutral position. You must remain in the driver's seat while this test is being carried out. If the vehicle is not held by the parking brake, perform an adjustment (see chapter 9).