
Warning: The vehicles described in this manual are equipped with a Supplemental Restraint System (SRS), also known as an air bag system. Before carrying out work in the area where the elements of this system are located, it is necessary to disconnect its power supply, since accidental deployment of the airbags can result in serious injury (see chapter 12).
Examination
Checking functionality
1. Press the brake pedal and start the engine. Normal operation of the vacuum booster is confirmed by a slight decrease in the pedal.
2. Press the brake pedal several times with the engine running and make sure that it does not drop to the floor.
Checking for leaks
3. Start the engine and, after a couple of minutes, turn it off. Slowly press the brake pedal several times. An increase in the stiffness of the stroke with successive pressing of the pedal indicates that the amplifier is tight.
4. With the engine running, depress the brake pedal, then, without releasing the pedal, turn off the engine. If the pedal height does not change within 30 seconds, the shock absorber is sealed.
Removal
5. Turn off the power supply to the SRS system (see chapter 12). Disconnect the negative cable from the battery.
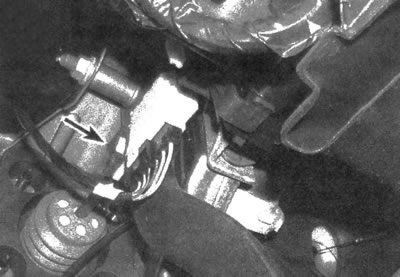
6. Disconnect the vacuum hose from the booster (see illustration).

9.6. Pull the vacuum hose nipple out of the booster rubber coupling in a perpendicular direction
7. Remove the master cylinder without disconnecting the brake lines. Pull the amplifier forward and out of the procedure area. Do not allow brake lines to become kinked or twisted.
8. Remove the panel located on the left under the instrument panel.
9. Remove the rod retainer (see illustration) and pull the brake light switch and rod off the pin.
9.9. Pry off the brake light switch retainer and the vacuum booster rod from the brake pedal pin
10. Unscrew the four nuts that secure the vacuum booster to the engine compartment bulkhead (see illustration).
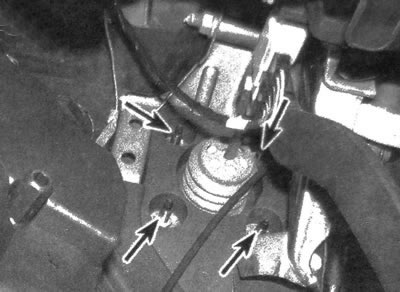
9.10. Unscrew the vacuum booster mounting nuts
11. Pull the amplifier off the partition by moving it in a perpendicular direction. so that the pins come out of the holes, then remove the amplifier together with the gasket from the engine compartment.
Installation
12. Installation is carried out in the reverse order of removal. Install a new gasket and tighten the nuts securing the booster and master brake cylinder to the required torques.
(The original text can be found on the website: CHEVYMAN.RU)