
Contents: Inspection ↧ Replacement ↧
Inspection
1. Every six months, with the vehicle raised and securely supported on supports, perform a preventive inspection of the flexible brake hoses that connect the steel brake lines to the front and rear brakes. Check for cracks, frayed braiding, leaks, swelling or other signs of damage to the hoses. Hoses are the most important and vulnerable elements of the system, so inspection should be carried out especially carefully and fully. To carry out high-quality visual control, it is necessary to use a flashlight and a mirror. If any of the above defects are found on the hose, replace it.
Replacement
Front brake hoses
2. Loosen the wheel nuts, raise the vehicle and install vertical supports. Remove the wheel.
3. Unscrew the nipple located on the bracket from the hose (see illustration). To prevent the edges of the fitting nut from rounding, use a socket wrench. In this case, it is necessary to fix the hose tip with another key to prevent the bracket from turning.
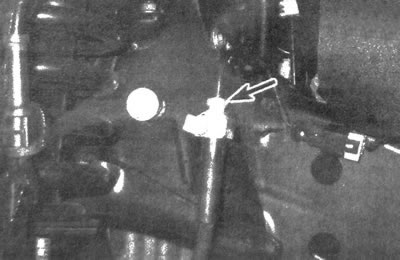
7.3. Using a spanner, unscrew the brake pipe nipple...
4. Unscrew the bolt from the bracket and disconnect the hose from it (see illustration).
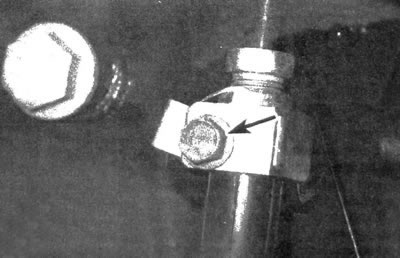
7.4. ...then unscrew the bolt and disconnect the hose from the bracket
5. Unscrew the bolt of the inlet fitting located on the hose on the caliper side, then disconnect the hose from the caliper. It should be noted that there are two copper sealing washers on both sides of the fitting (see illustration 4.2) - these elements must be replaced after disconnecting the hose.
6. When installing the hose, it is necessary to connect the inlet fitting to the support and secure it with a bolt, and also install new copper washers. Tighten the inlet fitting bolt to the specified torque.
7. Route the hose back to its original route and ensure that it is not kinked. Tighten the hose bracket bolt securely. Connect the brake pipe nipple, starting to tighten with your fingers. Tighten the nipple securely with a wrench.
8. Bleed the caliper (see subsection 8).
9. Install the wheel and secure it with nuts, lower the vehicle onto the supporting surface and tighten the wheel nuts to the torque value given in the specifications in Chapter 1.
Rear brake hoses
10. Raise the rear of the vehicle and support it on stands. Place chocks under the front wheels to prevent the vehicle from rolling.
11. Unscrew the nipple located on the bracket from the hose (see illustration). To prevent the edges of the fitting nut from rounding, use a socket wrench. In this case, it is necessary to fix the hose tip with another key to prevent the bracket from turning.
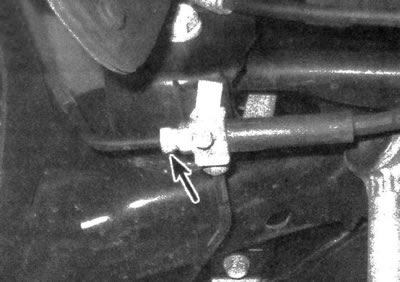
7.11. Using a spanner, unscrew the nipple located at the end of the brake hose...
12. Unscrew the bolt from the bracket and disconnect the hose from it (see illustration).
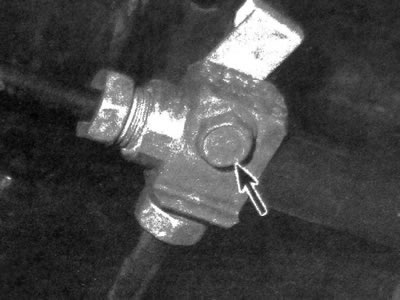
7.12. ...then unscrew the bolt that secures the connector to the chassis element
13. Unscrew the bolt of the inlet fitting located on the hose on the caliper side, then disconnect the hose from the caliper. It should be noted that there are two copper sealing washers on both sides of the fitting (see illustration 4.2) - these elements must be replaced after disconnecting the hose.
14. When installing the hose, it is necessary to connect the inlet fitting to the support and secure it with a bolt, and also install new copper washers. Tighten the inlet fitting bolt to the specified torque.
15. Route the hose back to its original route and ensure that it is not kinked. Tighten the hose bracket bolt securely. Connect the brake pipe nipple, starting to tighten with your fingers. Tighten the nipple securely with a wrench.
16. Bleed the caliper (see subsection 8).
17. Install the wheel and secure it with nuts, lower the vehicle onto a supporting surface and tighten the wheel nuts to the torque specified in specifications of chapter 1.
Metal tubes of the brake system
18. When replacing tubes, make sure that the replacement parts meet the technical requirements. Do not use copper pipes in the brake system. Replacement steel tubes should be purchased from branded auto stores or other reputable sources.
19. Prepared tubes with flared ends and installed connectors are available for sale. These tubes are also curved accordingly.
20. When installing a new brake pipe, make sure that it is securely fixed in the bracket and is not located in close proximity to moving or heating elements of the vehicle. The distance between parallel brake hoses must be at least 6 mm.
21. After completing the installation procedure, check the fluid level in the master cylinder reservoir and top up if necessary. Bleed the brake hydraulic system as described in subsection 8 and check the operation of the brakes before driving on the road.