
Contents: Checking shock absorbers ↧ Checking the condition of steering… ↧ Inspection of drive shaft covers… ↧
Note: Steering and suspension components should be inspected regularly. Symptoms such as uneven tire wear, increased fuel consumption, excessive vehicle sway when driving on uneven roads, and excessive body roll when cornering indicate a faulty steering and/or suspension component. Description of the systems and illustrations are given in chapter 10.
Checking shock absorbers
1. Place the vehicle on a level surface, turn off the engine and apply the parking brake. Check your tire pressure.
2. Check the functionality of the shock absorbers by alternately rocking the car by the corners.
3. If the car does not stabilize after one or two vibrations, the shock absorbers may have reached their wear limit and require replacement.
4. Rock the car at each corner.
5. Raise the car with a jack and place it on special supports.
6. Inspect the shock absorbers for signs of fluid leakage (see illustration). The presence of a thin oily film on the shock absorber is normal. If there are traces of fluid, make sure that this is the result of a leak in the shock absorbers. In this case, the entire set should be replaced.
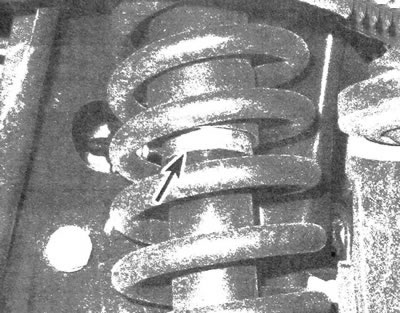
26.6 Check for leaks in the specified area of the shock absorber (front shock absorber strut shown)
7. Make sure the connection is secure and the shock absorbers are not damaged. Inspect the top mounts. If there is damage, the entire shock absorber set should be replaced (front and back).
8. The replacement procedure is described in chapter 10.
Checking the condition of steering and suspension components
9. Inspect suspension and steering components for damage and deformation. Make sure there are no leaks of operating fluids and lubricants, and that the seals, dust boots and rubber bushings are intact. Inspect the bushings that connect the suspension arms to the supporting frame members (see illustrations).

26.9a. Inspect the attachment points of the upper...
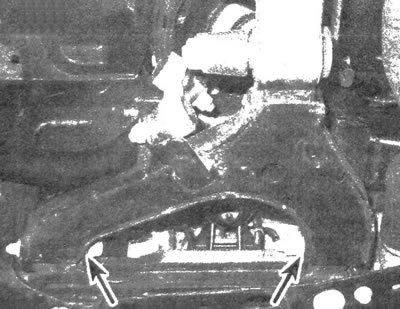
26.9b.... and lower suspension arm
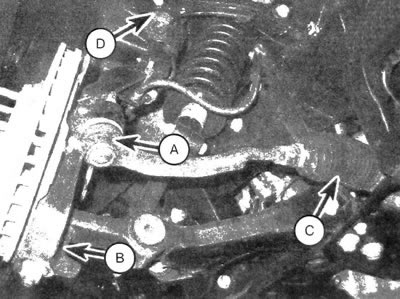
26.9c. Inspect the tie rod ends (A), lower ball joints (B), steering box boots (C) and upper ball joints (D)
10. Clean the underside of the hub knuckle. Ask your assistant to move the wheel forward and backward in a horizontal plane, grasping it by the bottom edge. At this time, evaluate the movement in the support joint between the hub knuckle and the suspension arm. If there is any play, replace the support.
11. Grasping the front wheel at the 3 and 9 o'clock positions, try to turn it by pushing the front edge and pulling the rear edge. Check for play in the steering system if there is play in the intermediate lever of the steering gear and the steering rod ends (see illustration).
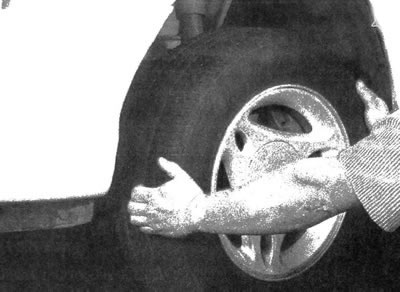
26.11. By locking the steering column of the raised vehicle. grab the front wheel and move it back and forth. If there is any play, check the reliability of the steering gear fastening and the tightening of the steering rod ends
12. On vehicles with air suspension, it is necessary to inspect the air shock absorbers and air lines for damage to the components, cracks and depressurization.
13. Detailed descriptions and illustrations relating to the steering and suspension systems are given in chapter 10.
Inspection of drive shaft covers (all-wheel drive models)
14. Rubber covers of the drive shaft serve to protect the CV joints from the penetration of sand, water and other foreign materials, thereby preventing the failure of the joints. It is recommended to wash the drive shaft covers with a soap solution, since oil and other lubricants that get in gradually destroy their material. The outer CV joints, which constantly move when the wheels turn, wear out faster than the inner joints and require regular inspection.
15. Inspect the covers for cracks and tears, and make sure they are securely fastened with clamps(see illustration). If cracks or signs of grease leakage are detected, replace the boots as described in chapter 8.
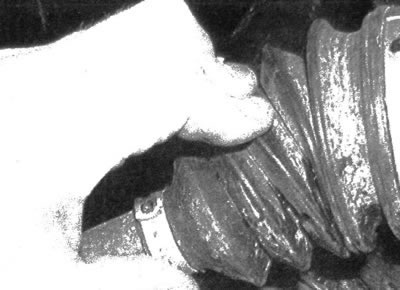
26.15. On all-wheel drive vehicles, it is necessary to inspect the inner and outer drive shaft covers for loose clamps, cracks and signs of grease leakage (the inner cover is shown)