


Contents: Front suspension ↧ Rear suspension ↧ Steering ↧ Level control system ↧ Precautionary measures ↧
Front suspension
Front suspension (see illustration) is completely independent. Each wheel is connected to the frame via a steering knuckle, upper and lower ball joints, and upper and lower control arms. All models described use units consisting of a shock absorber and a spring (called shock absorber struts). Lateral vibrations of the car when turning are reduced due to the presence of a stabilizer connected to both lower suspension arms and the frame.
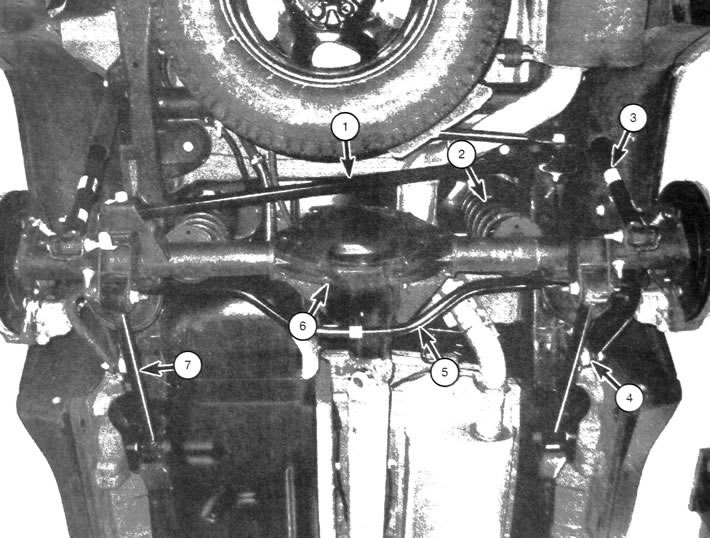
1.2. Rear suspension: 1. Transverse thrust; 2. Spring; 3. Shock absorber; 4. Anti-roll bar earring;5. Anti-roll bar; 6. Rear axle; 7. Longitudinal thrust (lower; the upper pull is not visible from this angle)
Rear suspension
The rear suspension of the cars has a design with five rods, coil springs, upper and lower suspension arms, a transverse rod, two shock absorbers and an anti-roll bar (see illustration).
Steering
The steering elements include a rack and pinion steering gear and two adjustable steering rods. Power steering is fitted as standard equipment. The design may include a steering damper, which is connected to a bracket located on the frame, as well as to the transmission rod.
Level control system
As an option, the car can have a pneumatic rear suspension. Instead of conventional springs, this design provides for the presence of pneumatic cushions, the height of which is automatically adjusted depending on the vehicle's load. The adjustment occurs when air is pumped by the compressor.
Precautionary measures
Often when servicing a steering or suspension system, connections are encountered that are very difficult to disconnect. Due to their location on the underside of the vehicle, they are constantly exposed to moisture and road dirt, which leads to intense corrosion and jamming. To disconnect without damage, such connections should be pre-treated with penetrating lubricant and allowed to soak in. Using a wire brush, clean the exposed threads to make it easier to remove bolts and nuts and to prevent damage to the threads. Sometimes it may be necessary to use a sharp blow with a hammer to dislodge the threads of a seized connection, but do not use excessive force, as the threads may be stripped. Sometimes heating the jammed connector and the surrounding area will help to release it, but this method is not recommended as it carries the risk of causing a vehicle fire due to the use of an open flame. Long pry bars or lengths of pipe can be used to increase leverage, but do not use an extension when using a ratchet lever as this can damage the ratchet mechanism. Frequently turning the bolt or nut in the direction of tightening (clockwise) helps to loosen jammed connectors. Connectors that were unscrewed using emergency measures. must be replaced during subsequent assembly.
Most of the procedures described in this chapter require jacking up the vehicle and working from the underside, so you should first have a couple of sturdy supports on which to rest the raised vehicle. When lifting a vehicle, it is advisable to use a hydraulic floor jack, which can also be used to support units during various procedures.
Warning: When performing procedures, do not allow the raised vehicle to rest solely on the jack. Whenever you unscrew or remove connectors from suspension or steering components, always inspect them and. if necessary, subsequent replacement with parts of the same dimensions and with the same technical characteristics or original connectors. To ensure successful assembly and secure fastening of the components, the specifications for tightening torques of the connectors must be followed. Do not heat or straighten deformed suspension and steering components. Such parts and components must be replaced with new ones.