
Contents: Checking functionality ↧ Replacement ↧
Warning: Wait until the engine has cooled down completely before proceeding with this procedure.
Checking functionality
1. A faulty coolant pump can cause the engine to overheat, which can cause serious damage to the engine. There are three methods for checking the performance of the cooling system pump installed on a vehicle. If, during testing using one of the above methods, it is determined that the pump is out of order, it should be replaced.
2. The impeller shaft of the pump has a seal that protects it from contamination by coolant. When the pump seal fails, coolant flows out of the hole (see illustration) (if the hole is not located on top of the pump, use a mirror to inspect the back of this element). If liquid is leaking from the hole, the impeller shaft bearing may fail. Replace the pump immediately.
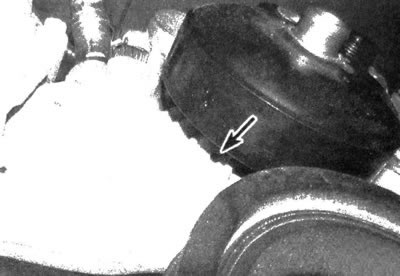
7.2 The drain hole is usually located at the base of the coolant pump
3. The impeller shaft bearing may also wear out during normal operation. Failure of the shaft bearing is characterized by the pump making a characteristic squealing sound. If such a sound is heard from the pump while the engine is running, it should be concluded that the shaft bearing is faulty and the pump should be replaced immediately.
Note: Do not confuse the sound of a slipping drive belt with the characteristic sound of a worn or damaged pump bearing.
4. To determine the degree of wear of the shaft bearing, remove the drive belt (see chapter 1), grab the pump pulley with your hand and try to swing it in every possible direction. If the shaft moves in a horizontal or vertical direction, it means that the bearing has reached its limit of wear. In this case, it is necessary to replace the cooling system pump.
5. It may happen that the failed pump will not leak or make a squealing noise. Sometimes the plates located on the back side of the impeller become covered with a layer of corrosion, and the pump fails. Such defects are revealed only during inspection of the removed pump.
Replacement
6. Disconnect the negative battery cable.
7. Drain the coolant (see chapter 1). Remove the intake duct together with the resonator.
8. Remove the radiator shroud together with the fan/coupling (see subsection 5).
9. Remove the drive belt (see chapter 1).
10. Remove the coolant pump pulley (see illustration).
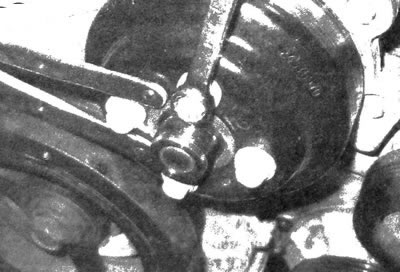
7.10. When unscrewing the bolts, it is necessary to fix the pulley of the cooling system pump using a pin wrench (or a belt device that needs to be wrapped around the pulley)
11. Unscrew the pump mounting bolts (see illustrations). To break the insulation of the pump connection, it may be necessary to tap it with a hammer with a soft striker. Inspect the plates located on the back side of the impeller for corrosion deposits. If the plates are missing or if corrosion deposits are found on them, the pump should be replaced.
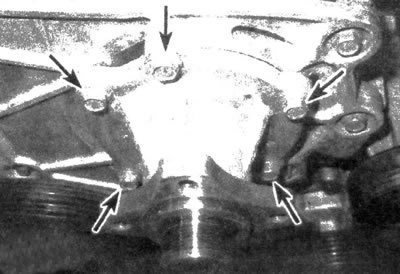
7.11. Coolant pump mounting bolts
12. Remove the insulating material from the mating surfaces of the pump and cylinder block. Wipe the mating surfaces with a cloth soaked in acetone.
13. Apply RTV sealant to both sides of the gasket and place it on the pump.
14. Install the pump, insert the mounting bolts and tighten them with your fingers. Do not allow the gasket to shift. Tighten the bolts to the specified torque.
15. Install the pulley and tighten the bolts to the required torque.
16. The rest of the installation procedure is carried out in the reverse order of removal.
17. Fill the cooling system with the appropriate antifreeze solution (see chapter 1), start the engine and check the coolant level in the cooling system. Remove air from the system as described in Chapter 1. Make sure that there is no fluid leakage through the pump and the hoses connected to it.