
ChevyMan.ru
Mazda Mitsubishi Toyota Land Rover Honda Kia Nissan
English Русский
Български
Беларускі
Український
Српски
Hrvatski
Română
Polski
Slovenský
Magyar
|
Articles | Sitemap | Contacts |


Home   Aveo   Captiva   Cruze   Lacetti   Lanos   Niva   Tahoe   Others  
Captiva 1 (2006-2018)
  • Home
  • Captiva
  • 1 (2006-2018)
  • Body
  • Doors and windows
  • Adjusting the door lock retainer

Adjusting the door lock retainer (Chevrolet Captiva 1)

            0

Contents: Adjusting the door lock retainer ↧ Up/down or in/out adjustment ↧

Adjusting the door lock retainer


The front door is shown, the back door is similar.


The door lock retainer consists of a retainer with two screws that are screwed into a sectional floating separator plate located in the corresponding body pillar. This floating separator plate allows easy adjustment of the retainer in-out and up-down.

The door is locked in the closed position when the door lock fork is released and engages the latch.

Note: The door lock striker is a critical fastener that can affect the operation of vital components and systems. This can result in major repair costs. If replacement is necessary, the door lock striker must be replaced with a striker of the same part number or equivalent. Do not use an inferior or substitute part. The specified torque values must be used during reassembly to ensure proper use of the part.
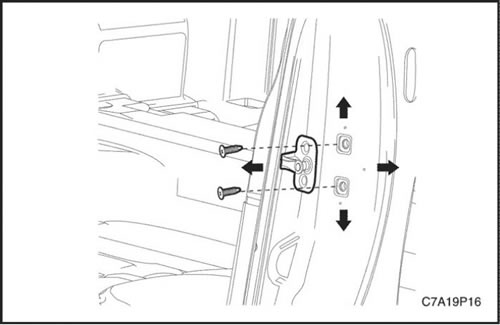

Note: The door lock striker is a critical fastener that can affect the operation of vital…


Up/down or in/out adjustment


Adjusting the retainer up and down and in and out may be necessary for several reasons:
  • Damage to the vehicle frame as a result of a collision.
  • Installing a new door seal.
  • Customer complaints about excessive wind noise.
  • Difficulty opening or closing the door.

Follow the following procedure when adjusting the door latch in the up-down and in-out directions:


1. The door must be properly aligned.

2. Loosen the retainer screws.

3. The floating mesh plate can be moved slightly by the tips of the locking screws. Move the floating mesh plate to the desired position.

4. If you need to move the floating mesh plate more than possible for proper adjustment, use a hand drill or a 3/8-inch flat-head circular file to extend the body opening in the desired direction.

Note: It is important to use a flat head drill to avoid damaging the floating mesh plate. The retainer screws and sectioned mesh plate are important fasteners that can affect the operation of vital components and systems.


5. Tighten the door lock retainer screws to the desired position.

5. Tighten the door lock retainer screws to the desired position.

Tighten

Tighten the door lock retainer screws to 24 N·m (18 lb-ft).

The article was checked: Vladimir Romannikov
This article is available at russian, bulgarian, belarusian, ukrainian, serbian, croatian, romanian, polish, slovak, hungarian

Share information:

Previous articles
Captiva 1: Doors and windows
Next articles

Door lock retainer
Door splash guard
Rear door trim panel
Front door trim panel
Rear door opening seal
Front door lock
Front door exterior handle
Rear door outer handle
Door lock cylinder
Electric window control


See similar articles on the topic of Chevrolet cars:
Adjusting the front door lock latch Chevrolet Aveo T300 (2012-2018)
Replacing the inner handle of the front door lock actuator Chevrolet Cruze 1 (2008-2016)
Removal the lock cylinder and the outer handle of the front door Chevrolet Lacetti 1 (2002-2009)
Removal the lock, lock cylinder mechanism, outer and inner front door handles Chevrolet Lanos T150 (2002-2009)
Adjusting the front door lock Chevrolet Niva 1 (2002-2016)
Door lock power supply system (excluding driver's cab door lock) Chevrolet Tahoe 1 (1992-2000)
Installation diagram of the central lock (sliding door) Chevrolet Lumina 1 (1989-1994)
Link in different formats to this page


Visitor comments

No comments yet


How much will 46 + 38 =


Captiva 1 (2006-2018) 
  • Manual
  • Before leaving
  • Keys, doors and windows
  • Seats, protection systems
  • Instruments and controls
  • Lighting system
  • Information and entertainment
  • Navigation system
  • Climate control
  • Driving a car
  • Car care
  • Maintenance
  • Engine 2.0 l (diesel)
  • Engine device
  • Troubleshooting
  • Engine repair
  • Cooling system
  • Engine electrical equipment
  • Control and power systems
  • Exhaust system
  • Engine FAM II 2.4D
  • Engine device
  • Troubleshooting
  • Engine repair
  • Cooling system
  • Engine electrical equipment
  • Control and power systems
  • Exhaust system
  • Engine HFV6 3.2L
  • Engine device
  • Troubleshooting
  • Engine repair
  • Cooling system
  • Engine electrical equipment
  • Control and power systems
  • Exhaust system
  • Transmission
  • Front drive axle
  • Rear drive axle
  • Automatic gearbox - device
  • Automatic gearbox - service
  • Automatic gearbox - repair
  • Manual gearbox - device
  • Manual gearbox - service and repair
  • Clutch
  • Transfer case
  • Chassis
  • Car suspension
  • Brake system
  • Steering
  • Body
  • Heating and ventilation
  • Air conditioning (manual)
  • Air conditioning (automatic)
  • Seat belts
  • Airbags
  • Car seat
  • Interior (internal elements)
  • Exterior (external elements)
  • Doors and windows
  • Electrical equipment
  • Equipment and devices
  • Lighting and lamps
  • Windshield wipers and washers
  • Electrical circuits


ChevyMan.ru © 2017-2026 · Mobile version · Feedback · Site search · Interesting to read · Sitemap: EN BG BY UA RS HR RO PL SK HU

Aveo 2003-2008 · Aveo 2006-2011 · Aveo 2012-2018 · Captiva 2006-2018 · Cruze 2008-2016 · Lacetti 2002-2009 · Lanos 2002-2009 · Niva 2002-2016 · Tahoe 1992-2000 · Tahoe 2000-2014 · Lumina 1 1989-1994 · Trailblazer 1 2001-2008 · Orlando 1 2010-2018 ·
🛡️ For your security and to improve our service, this site uses cookies. You can disable them in your browser.