
ChevyMan.ru
Mazda Mitsubishi Toyota Land Rover Honda Kia Nissan
English Русский
Български
Беларускі
Український
Српски
Hrvatski
Română
Polski
Slovenský
Magyar
|
Articles | Sitemap | Contacts |


Home   Aveo   Captiva   Cruze   Lacetti   Lanos   Niva   Tahoe   Others  
Niva 1 (2002-2016)
  • Home
  • Niva
  • 1 (2002-2016)
  • Transmission
  • Transfer case
  • Assembly of the axle shaft

Assembly of the axle shaft (Chevrolet Niva 1)

            0

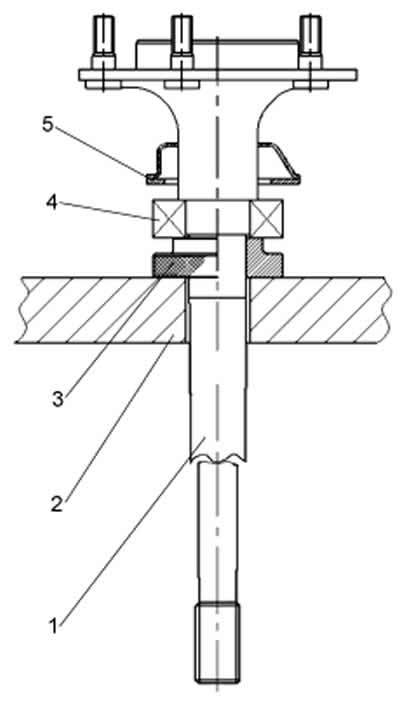
Install the axle shaft bearing oil deflector and bearing mounting plate with gasket, previously connected to each other with two screws, onto the axle shaft; install the axle shaft ball bearing and press it into the axle shaft flange until it stops (figure 3-56).

Figure 3-56. Pressing in the bearing and axle bearing retaining ring:

Figure 3-56. Pressing in the bearing and axle bearing retaining ring:
1 - half shaft;
2 - press table;
3 - ring from the fixture kit 67.7853.9571;
4 - bearing;
5 - bearing mounting plate and oil deflector assembly.


Insert the new locking ring into a special holder, place it in the oven and heat the ring to approximately 300°C so that when it is pressed onto the axle shaft its temperature is 220-240°C.

Press the locking ring onto the axle shaft using a press with a force no greater than 58.8 kN (6000 kgf) so that the inner bearing ring is clamped between the locking ring and the flange of the axle shaft.

After pressing, make sure that the ring does not shift under an axial load of 19.6 kN (2000 kgf). For this purpose, install the axle shaft assembly on a special device (figure 3-57), and clamp the locking ring in a special vice.
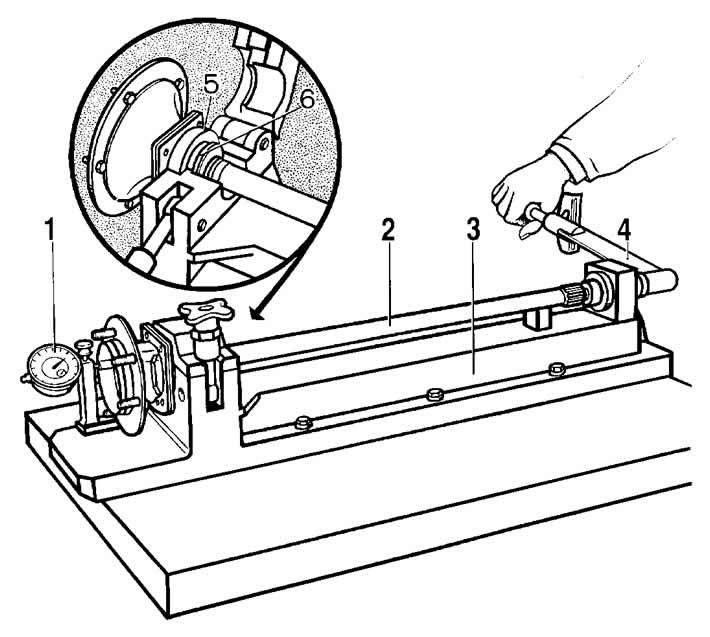
Figure 3-57. Checking the pressing force of the axle shaft bearing retaining ring:

Figure 3-57. Checking the pressing force of the axle shaft bearing retaining ring:
1 - indicator;
2 - half shaft;
3 - device;
4 - torque wrench;
5 - bearing;
6 - bearing retaining ring.


Place the indicator leg 1 with a division value of 0.01 mm on the flange of the axle shaft. After setting the indicator pointer to "0", apply the specified axial load, creating a tightening torque of 78.5-83.3 Nm (8-8.5 kgf·m) on the screw of the device with a torque wrench. The screw rests against the end of the axle shaft through the ball. In this case, not even the smallest gap should appear between the locking ring and the inner ring of the bearing.


After removing the load and unscrewing the screw of the device, the indicator arrow should return to the zero position; this proves that there has been no shift between the locking ring and the axle shaft. If the indicator needle does not return to the zero position, the locking ring has shifted and the axle shaft assembly must be replaced with a new one.

After checking the pressing of the locking ring, install the plate and oil deflector mounting bolts 6 (see figure 3-56) and secure them by bending the bolt holders inward.

The material was created based on information from the website: CHEVYMAN.ru

The article was checked: Vladimir Romannikov
This article is available at russian, bulgarian, belarusian, ukrainian, serbian, croatian, romanian, polish, slovak, hungarian

Share information:

Previous articles
Niva 1: Transfer case
Next articles

Axle shaft bearing retaining ring
Checking the technical condition of the axle shafts
Removal and installation axle shafts
Transfer case testing
Checking the technical condition
Measuring the axial free play of the axle shaft on a vehicle
Rear axle gearbox device
Determining gearbox faults by noise
Removal the gearbox
Installing the gearbox


See similar articles on the topic of Chevrolet cars:
Replacing the wheel drive shaft seal Chevrolet Aveo T250 (2006-2011)
Replacing the intermediate shaft seal of the front drive axle Chevrolet Captiva 1 (2006-2018)
Secondary shaft repair Chevrolet Cruze 1 (2008-2016)
Removal the intermediate steering shaft Chevrolet Lacetti 1 (2002-2009)
Axle shaft seal (semi-floating axle shaft) — replacement Chevrolet Tahoe 1 (1992-2000)
Checking the condition of the axle shaft boots (every 3000 miles or 3 months) Chevrolet Lumina 1 (1989-1994)
Link in different formats to this page


Visitor comments

No comments yet


How much will 21 + 13 =


Niva 1 (2002-2016) 
  • General information
  • Vehicle device
  • User manual
  • Maintenance
  • Power unit
  • Engine repair
  • Cooling system
  • Lubrication system
  • Power and exhaust system
  • Transmission
  • Clutch
  • Car gearbox
  • Transfer case
  • Cardan gear
  • Rear axle
  • Front axle
  • Chassis
  • Suspension and shock absorbers
  • Steering
  • Brake system
  • Body
  • Exterior (external elements)
  • Interior (internal elements)
  • Ventilation and heating
  • Electrical equipment
  • Power devices
  • Lighting and appliances


ChevyMan.ru © 2017-2026 · Mobile version · Feedback · Site search · Interesting to read · Sitemap: EN BG BY UA RS HR RO PL SK HU

Aveo 2003-2008 · Aveo 2006-2011 · Aveo 2012-2018 · Captiva 2006-2018 · Cruze 2008-2016 · Lacetti 2002-2009 · Lanos 2002-2009 · Niva 2002-2016 · Tahoe 1992-2000 · Tahoe 2000-2014 · Lumina 1 1989-1994 · Trailblazer 1 2001-2008 · Orlando 1 2010-2018 ·
🛡️ For your security and to improve our service, this site uses cookies. You can disable them in your browser.