
47. Remove the pressure regulator and fuel flow meter cover, cover gasket, meter outlet pipe gasket and pressure regulator seal.
48. Remove the injectors.
49. Unscrew the fuel inlet pipe and the drain line fittings (with threads), disconnect the lines and remove the sealing rings.
50. Unscrew the nuts of the inlet and outlet fuel pipes and the gaskets of the fuel flow meter unit (see illustration). Mark the location of the nuts for subsequent correct assembly. The fuel inlet pipe nut has a greater stroke than the outlet pipe nut.
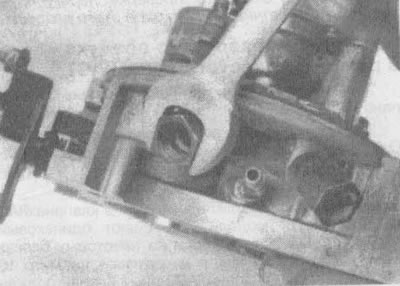
12.50. Unscrew the nuts of the inlet and outlet pipes from the fuel flow meter body
51. Remove the gasket from the inside end of each fuel supply pipe nut.
52. Remove the screws securing the fuel flow meter housing to the throttle body and remove the meter housing from the throttle body (see illustration).
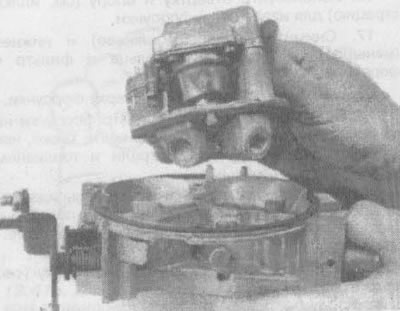
12.52. After unscrewing the nuts of the inlet and outlet pipes, pull the fuel supply meter unit upward to separate it from the throttle body
53. Install a new gasket between the throttle body and the fuel flow meter housing, aligning the cutouts in the gasket with the holes in the throttle body.
54. Install the fuel flow meter on the throttle body. Coat the screws that secure the fuel flow meter housing to the throttle body with sealant before installing them.
55. Install the fuel inlet and outlet pipe nuts with new gaskets onto the fuel flow meter body and tighten the nuts to the specified torque. Install the fuel inlet pipe and drain line fittings with new O-rings. Use a wrench to prevent the nuts from turning.
56. Install the injectors.
57. Install the pressure regulator and fuel flow meter caps.
58. Connect the electrical connectors to the injectors.
59. Connect the wire to the battery.
60. With the engine off and the ignition on, check for leaks in the fuel flow meter unit, gaskets, fuel line nuts and threaded connections.
61. Install the air filter, adapters and gaskets.