ChevyMan.ru
Mazda Mitsubishi Toyota Land Rover Honda Kia Nissan
English Русский
Български
Беларускі
Український
Српски
Hrvatski
Română
Polski
Slovenský
Magyar
|
Articles | Sitemap | Contacts |


Home   Aveo   Captiva   Cruze   Lacetti   Lanos   Niva   Tahoe   Others  
Orlando 1 (2010-2018) Trailblazer 1 (2001-2008, petrol) Lumina 1 (1989-1994)
  • Home
  • Chevrolet
  • Lumina 1
  • Power unit
  • Fuel injection
  • Idle Air Control Valve (IAC, 3.1L)

Idle Air Control Valve (IAC, 3.1L) (Chevrolet Lumina 1)

            0

37. Disconnect the electrical connector from the IAC valve and remove the valve (see illustration).

12.37. The Idle Air Control (IAC) valve can be turned using an adjustable wrench (shown in the…

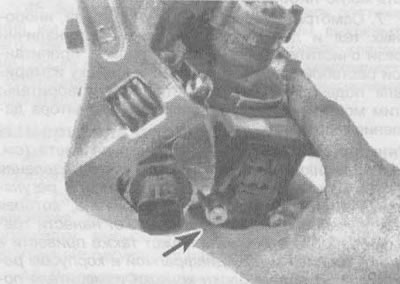
12.37. The Idle Air Control (IAC) valve can be turned using an adjustable wrench (shown in the illustration) or a 1 1/4 inch wrench


38. Remove the old IAC valve gasket. Clean the throttle body surface of the old gasket material to ensure proper positioning of the new gasket.

39. All valve shafts in IAC valves on TBI Model 220 blocks have the same double cone. However, the axles on some units are 12mm in diameter and on others they are 10mm in diameter. When replacing an IAC valve, the new valve must have the correct axle cone diameter and the correct diameter to properly seat the valve in the throttle body.

40. Measure the distance between the end of the axle in its fully extended position and the housing mounting surface (see illustration). If the distance "A" is greater than that specified in the specifications of this chapter, it must be reduced to prevent damage to the valve.

12.40. Flanged type IAC valve for injection system model TVI 220: A - extension distance of the…

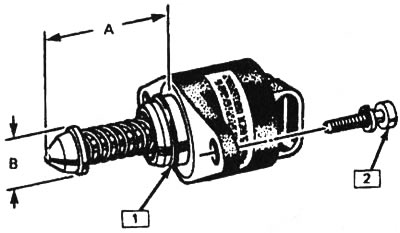
12.40. Flanged type IAC valve for injection system model TVI 220: A - extension distance of the distribution axis, B - diameter of the distribution axis, 1 - sealing ring, 2 - screw and washer


41. If you need to adjust the shaft, determine if your valve is a Type 1 (there is a flange around the electrical terminal) or to type 2 (the flange is missing).
  • a) To adjust the IAC flanged valve shaft, hold the valve and push down on the shaft with your thumb while rocking it from side to side (see illustration).
  • b) To adjust the IAC valve shaft without a flange, compress the retaining spring while turning the shaft clockwise (see illustration). Return the end of the spring to its original position, aligning the straight portion in the groove under the flat surface of the valve (see illustration).

12.41a. To adjust a flanged IAC valve, press firmly on the axle with your thumb while gently…

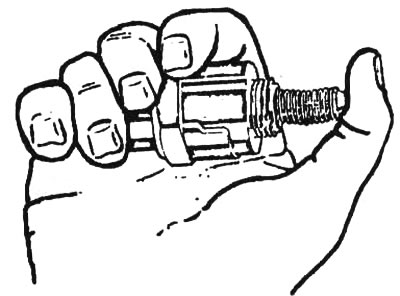
12.41a. To adjust a flanged IAC valve, press firmly on the axle with your thumb while gently rocking the axle from side to side
12.41b. To adjust the IAC valve without a flange, compress the valve retaining spring while turning…

12.41b. To adjust the IAC valve without a flange, compress the valve retaining spring while turning the shaft clockwise...


12.41v....then return the end of the spring to its original position, aligning the straight part in…

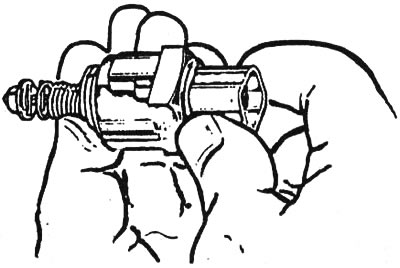
12.41v....then return the end of the spring to its original position, aligning the straight part in the groove under the flat surface of the valve


42. Install the IAC valve and tighten the screws securely. Connect the electrical connector.

43. Install the air filter, adapter and gaskets.

44. Connect the wire to the battery.

45. Start the engine and wait until it reaches operating temperature, then turn it off. No adjustments to the IAC valve are required after installation. The IAC valve is electrically "reset" by the ECM after the engine is turned off.

[The text of the article was obtained from the website: ChevyMan]

The article was checked: Vladimir Romannikov
This article is available at russian, bulgarian, belarusian, ukrainian, serbian, croatian, romanian, polish, slovak, hungarian

Share information:

Previous articles
Lumina 1: Fuel injection
Next articles

Throttle Position Sensor (TPS, 3.1L)
Injector housing — removal and installation (3.1 l)
Fuel Pressure Regulator and Fuel Gauge Cap (3.1L)
Checking the fuel injection system
Electronic Fuel Injection Control System — General Information
Fuel flow meter — removal and installation (3.1 l)
Throttle Body — Removal and Installation (3.1L)
Adjusting the minimum idle speed (3.1 l)
Checking the unregulated signal of the TPS sensor (3.1 L)
Throttle Body — Removal and Installation (3.8L)


See similar articles on the topic of Chevrolet cars:
Removal the idle air control valve Chevrolet Aveo T250 (2006-2011)
Remote control unit Chevrolet Captiva 1 (2006-2018)
Gearbox control Chevrolet Cruze 1 (2008-2016)
Removal camshafts and hydraulic valve lifters Chevrolet Lacetti 1 (2002-2009)
Removal the idle speed control valve Chevrolet Lanos T150 (2002-2009)
Control lamp block Chevrolet Niva 1 (2002-2016)
Electromagnetic valve block and automatic transmission control unit Chevrolet Tahoe 2 and 3 (2000-2014)
Link in different formats to this page


Visitor comments

No comments yet


How much will 21 + 34 =


Orlando 1 (2010-2018) 
  • General information
  • Introduction to manual
  • User manual
  • Maintenance
  • Troubleshooting
  • Power unit
  • Engine repair
  • Fuel and control system
  • Cooling and lubrication system
  • Ignition system
  • Transmission
  • Clutch
  • Gearbox
  • Drive shafts
  • Chassis
  • Car suspension
  • Steering
  • Brake system
  • Body
  • Exterior (external elements)
  • Doors, locks and windows
  • Electrical equipment
  • Equipment and devices
  • Windscreen wipers
  • Power devices
  • Electrical diagrams


Trailblazer 1 (2001-2008) 
  • General information
  • User manual
  • Troubleshooting
  • Maintenance
  • Power unit
  • Engine in a car
  • Engine overhaul
  • Cooling and heating
  • Fuel and exhaust system
  • Engine electrical equipment
  • Engine control
  • Transmission
  • Automatic gearbox
  • Transfer case
  • Drive shafts and cardan
  • Chassis
  • Brake system
  • Car suspension
  • Steering
  • Body
  • Exterior (external elements)
  • Interior (internal elements)
  • Doors, locks and windows
  • Electrical equipment
  • Equipment and devices
  • Electrical circuits


Lumina 1 (1989-1994) 
  • General information
  • Maintenance
  • Power unit
  • Engine 3.1L V6
  • Engine 3.8L V6
  • Engine overhaul
  • Cooling system
  • Power and exhaust system
  • Fuel injection
  • Engine electrical equipment
  • Reduced exhaust gas toxicity
  • Transmission
  • Automatic gearbox
  • Drive shafts
  • Chassis
  • Brake system
  • Car suspension
  • Steering
  • Body
  • Heating and air conditioning
  • Repair of body elements
  • Doors, covers and windows
  • Interior (internal elements)
  • Electrical equipment
  • Equipment and devices
  • Electrical circuits


ChevyMan.ru © 2017-2026 · Mobile version · Feedback · Site search · Interesting to read · Sitemap: EN BG BY UA RS HR RO PL SK HU

Aveo 2003-2008 · Aveo 2006-2011 · Aveo 2012-2018 · Captiva 2006-2018 · Cruze 2008-2016 · Lacetti 2002-2009 · Lanos 2002-2009 · Niva 2002-2016 · Tahoe 1992-2000 · Tahoe 2000-2014 · Lumina 1 1989-1994 · Trailblazer 1 2001-2008 · Orlando 1 2010-2018 ·
🛡️ For your security and to improve our service, this site uses cookies. You can disable them in your browser.