


Warning: Checking the wheel alignment angles is mandatory if replacement or repair of suspension components is carried out that may result in a change in the wheel alignment angles.
Check and adjust the wheel alignment angles on the vehicle with a design load of 2205 N (225 kgf) (three people 75 kg each).
When checking and adjusting the front wheel alignment angles, it is necessary to be guided by the parameters specified in Table 4-1.
Table 4-1. Parameters of the front wheel alignment angles of the vehicle
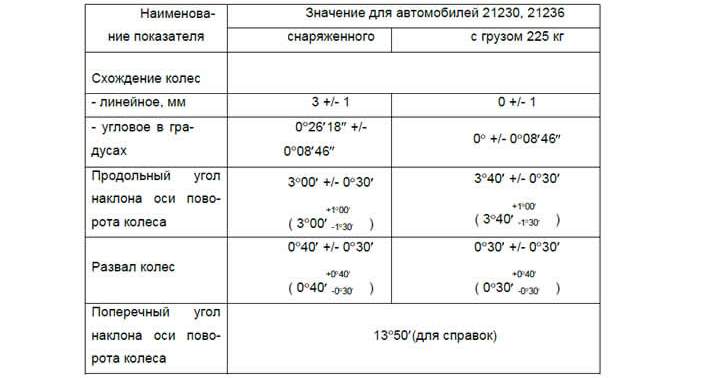
Note: For the period of stabilization of elastic elements before the first maintenance (mileage 2000...3000 km) the values given in brackets are allowed.
Before setting the wheel alignment angles, check:
- the total play in the steering should not exceed 10°.
- the axial clearance in the front wheel hub bearings should not be more than 0.15 mm;
- the gap in the upper ball pin should not be more than 0.7 mm;
- dents and deformations of wheel rims, deformations and cracks of levers, stretchers and hinges of the front and rear suspensions are not allowed (visual inspection);
- tire air pressure.
Correct any detected faults and make the necessary adjustments.
After installing the car on the stand, immediately before checking the angles, it is necessary to "squeeze" the car's suspension 2-3 times to self-install the front suspension units, applying a vertical load of 400 to 500 N with your hands (from 40 to 50 kgf) first to the rear, then to the front bumpers.
The order of checking and adjusting the wheels should be as follows:
1. The angle of longitudinal inclination of the wheel steering axis.
2. Wheel camber angle.
3. Wheel alignment.
Pivot Axis Angle To adjust the pivot axis angle:
- the number of adjusting washers on the upper arm axle mounting bolts changes;
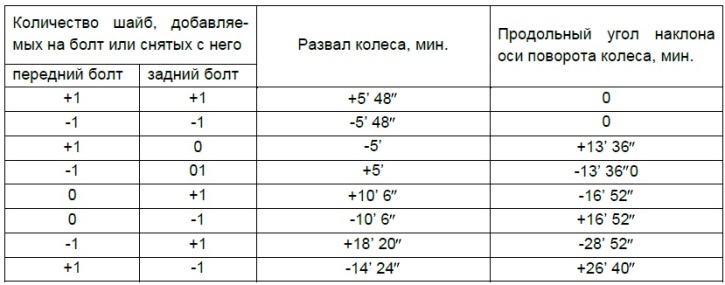
- according to Table 4-1, calculate the number of adjusting washers required for removal or installation using Table 4-2.
Table 4-2
- open the hood of the car;
- loosen the nuts securing the axle of the upper arm of the front suspension until the adjusting washers can be removed freely;
- remove or install the calculated number of adjusting washers on each upper arm axle mounting bolt;
- tighten the upper arm axle mounting nuts with a torque wrench, tightening torque of the nuts from 70 to 80 Nm (from 7.0 to 8.0 kgf·m);
- repeat the above operations for the other front wheel.
Front wheel camber angle. If the camber angle differs from the norm, it is necessary to adjust it by changing the number of washers 21 (see figure 4-1), installed between the upper arm axle and the cross member bracket.
To decrease the camber angle, remove the same number of washers from both bolts, and to increase it, add more.
Front wheel alignment. If the toe-in value differs from the norm, it is necessary to loosen the nuts of the steering rod clamps and use a wrench to turn the steering trapezoid rod by the same amount in opposite directions; in this way the couplings are screwed or unscrewed and change the length of the steering rods. After adjusting the lengths of the steering rods, the steering wheel should be in a position corresponding to straight-line movement.
After adjustment, install the clamping clamps with the slot towards the rear of the car, with an acceptable upward or downward deviation of no more than 60° from the horizontal plane of the car, and tighten them in this position. When the nuts are tightened, the edges of the slots of the clamping clamps should not touch.
After adjusting the wheel alignment, check whether the wheels and steering gear parts are touching the adjacent parts of the wheel suspension and body. To do this, turn the wheels in both directions until the steering knuckle stops against the steering gear housing mounting bolts.
The text of the article was obtained from the website «CHEVYMAN.ru»