


Remove caps 1, (see figure 4-1), 4 front wheel hubs and loosen the adjusting nuts 2 of the hub bearings and the front wheel mounting nuts.
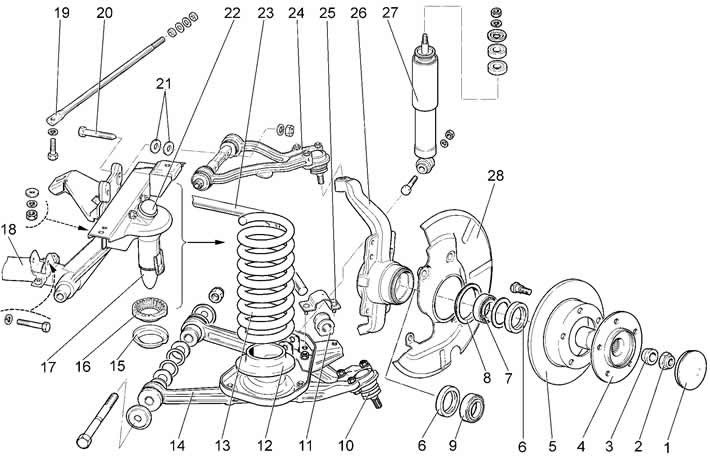
Figure 4-1. Front suspension:
1 - cap;
2 - nut;
3 - conical bushing;
4 - wheel hub;
5 - brake disc;
6 - oil seal;
7 - outer bearing;
8 - ring;
9 - inner bearing;
10 - lower ball joint;
11 - stabilizer bushing;
12 - lower spring cup;
13 - front suspension spring;
14 - lower suspension arm;
15 - upper spring cup;
16 - spring gasket;
17 - compression buffer;
18 - Front suspension cross member;
19 - stretching;
20 - upper arm mounting bolt;
21 - adjusting washers;
22 - rebound buffer;
23 - stabilizer;
24 - upper arm;
25 - bracket;
26 - steering knuckle;
27 - shock absorber;
28 - Front brake protective cover.
Raise the car and remove the front wheels.
Loosen the bolts securing the brake shield to the right wheel brake caliper.
Bend back the edges of the protective cover and unscrew the bolts securing the caliper to the steering knuckle. Remove the protective cover and hang the caliper on a technological hook, avoiding tension on the brake hoses.
Loosen the hub adjusting nut and remove the conical bushing 3. Remove the hub with the brake disc assembly. The hub adjusting nut is discarded.
Remove the cotter pin and disconnect the tie rod end from the steering knuckle arm.
Place a support under the lower arm 14 of the front suspension and, lowering the vehicle, compress the suspension spring 13 until the upper arm rebound buffer is unloaded.
Turn the steering knuckle to the extreme left (right) position and lift the outer drive joint tailpiece out of the steering knuckle cavity.
Unscrew the upper ball joint mounting nut, remove the guide bracket with the brake hose mounting bracket from the joint.
Install the tool and press the ball pin out of the mounting hole.
Loosen the nuts, remove the bolts securing the lower ball joint housing to the lower arm and remove the steering knuckle with bearings and the lower ball joint assembly.
Remove the seals, bearing dismantlers and inner bearing rings from the cavity of the steering knuckle. Mark the inner bearing rings with paint so that they can be installed in their original places. The hub seals are discarded.
Clean the outer wheel drive joint tailpiece and the inner cavity of the steering knuckle from old grease.
Wash and blow out with compressed air the wheel hub, the inner bearing rings with rollers in assembly and the dismounting rings.
Inspect the steering knuckle, hub with disc, bearings and dismantling rings. The following are not allowed: cracks in parts, chipping of rollers and bearing races. If the above defects are present, replace the parts.
Place grease in the bearing separators, apply it evenly into the cavity of the steering knuckle, lubricate the splines of the outer joint tailstock of the wheel drive.
Install the inner bearing rings into the cavity of the steering knuckle according to the marks, install the dismantling rings and press in the seals 6.
Install steering knuckle 26, hub and front brake caliper in the reverse order of disassembly. Tightening torques for threaded connections:
- upper ball joint fastening nut to steering knuckle — 85.105 Nm (8.5...10.5 kgf·m);
- nuts of the bolts fastening the ball joint to the lower suspension arm — 22...26 Nm (2.2...2.6 kgf·m);
- brake caliper to steering knuckle mounting bolts — 30.35 Nm (3.0...3.5 kgf·m);
- tie rod end ball joint nut - 44.54 Nm (4.4 to 5.4 kgf·m).
Adjust the axial clearances in the front wheel hub bearings following the recommendations in the subsection "Checking and adjusting the clearance in the front wheel hub bearings".
Install the hub cap, wheel and tighten the wheel nuts without tightening.
Repeat the above operations for the left front wheel hub.
Lower the vehicle and tighten the wheel nuts. Tightening torque of the nuts is from 85 to 95 Nm (from 8.5 to 9.5 kgf·m).
Check and, if necessary, adjust the front wheel alignment angles following the recommendations in the subsection "Checking and adjusting the front wheel alignment angles".
Note: Whenever the nut comes loose from the outer joint housing tail, replace it with a new one or use a nut removed from another vehicle.
(For details, visit the website ChevyMan.ru)