


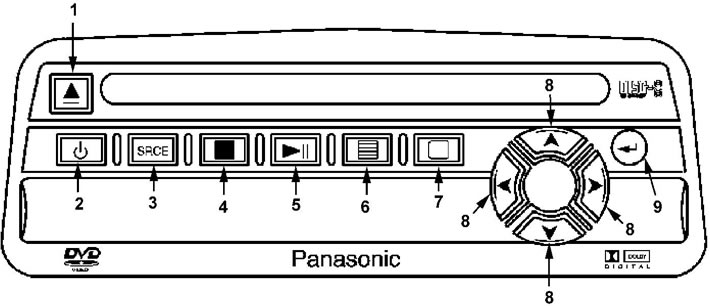
Rear passenger video system control panel. 1 - eject disc, 2 - turn system on/off, 3 - switch between DVD player and additional video device, 4 - stop playback (when pressed twice - returns to the beginning of the disc), 5 - Play/Pause, 6 - DVD Main Menu, 7 - Display Setup Menu (contrast, brightness, image format), 8 - function buttons, 9 - selection confirmation.
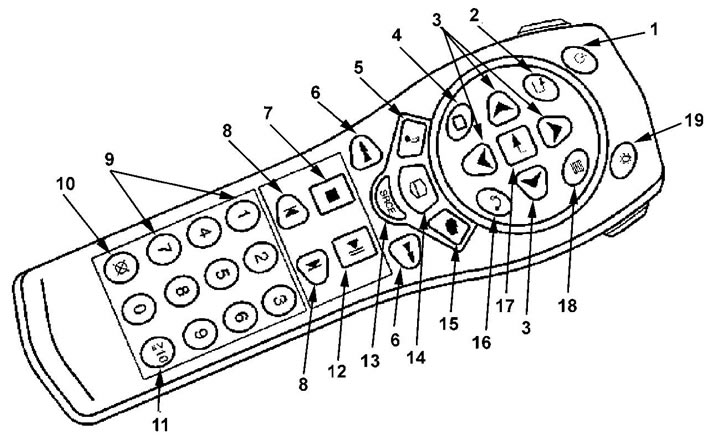
Remote control for rear passenger video system. 1 - system on/off, 2 - return to DVD main menu, 3 - function buttons, 4 - display menu (contrast, brightness, image format), 5 - menu of current playback settings, 6 - rewind, 7 - stop playback (when pressed twice - returns to the beginning of the disc), 8 - go to the beginning of the current track / go to the next track, 9 - single-digit numbers, 10 - delete entered numbers, 11 - enter two-digit numbers, 12 - start playback / pause, 13 - switch between DVD player and additional video device, 14 - turn on subtitles, 15 - change viewing angle, 16 - return to the previous menu, 17 - confirm selection, 18 - DVD main menu, 19 - turn on the remote control backlight (if you do not press any buttons on the remote control for 10 seconds, it turns off automatically).
Playing a disc
Start playback
1. To start playing a disc, insert it into the disc loading slot on the video control panel with the label facing up. The disc will start playing automatically after it is loaded if the ignition key is in the "ON" or "ACC" position.
2. If the disc is already inserted into the loading slot, to start playing the recording, press the "► and" button (5) on the control panel or the button (12) on the remote control of the video system.
Stop/resume playback
To stop playback of a disc, press the button (4) on the control panel or the button (7) on the video system remote control. To continue playback from the point where the recording was last stopped, press the button "
 ".
".
Note: If you eject the disc or press the "■" button twice, subsequent playback of the recording will start from the beginning of the disc.
Ejecting the disc
To eject a disc, press the button (1) on the video system control panel. If the disc is ejected but not removed, the video system will automatically load the disc after a while, but the disc will not start playing.
Video system main switch
On the back of the rear passenger video system display there is a switch that, when pressed, stops the video or audio playback. The system display will show the indicator "Parental Control ON" the indicator on the system on/off button is flashing!. At the same time, the video system control buttons on the control panel and remote control do not work (except for the disc eject button).
To continue playing the recording, press the switch again.
Error messages
Disc Format Error - the message appears if the disc is not loaded correctly, the disc surface is damaged, or the recording format is incorrect.
Load/Eject Error - the message appears when the disk is loaded/ejected incorrectly.
Disc Play Error - message appears when there is a disc playback error (the cause of this error may be damage or scratches on the disk).
Region Code Error - the message appears when the disc region code does not match the DVD player code. No Disc - the message appears when any video system control button is pressed when there is no disc loaded in the system.
Wireless headphones
The rear passenger video system is equipped with two sets of wireless headphones.
1. Turn on the headphones by pressing the power button on the headphones. When the headphones are turned on, the indicator lights up. If the indicator does not light up, replace the battery of the wireless headphones.
2. Volume control is performed using the control located on the headphones.
3. To turn off the headphones, press the power button again.
Note: The headphones will turn off automatically after four minutes if the connection to the rear seat video system is lost. The signal loss may be caused by the system being turned off or if the headphones are out of range of the rear seat video system transceiver.
4. Replacing the battery of wireless headphones.
- a) Unscrew the screw of the headphone power supply cover located on the left speaker.
- b) Replace the batteries (AAA), making sure they are installed correctly.
- c) Replace the headphone battery cover and tighten the screw.
Adapter for connecting additional audio and video devices
To connect an additional audio and video device, a video adapter is located behind the rear passenger video system display.
- Yellow connector - Video input.
- Red connector - Audio input #1.
- White connector - Audio input #2.
The rear passenger video system is switched to the additional audio and video device mode by pressing the "SRCE" button on the control panel or on the video system remote control.