


Contents: Radio ↧ Cassette player ↧ CD player ↧ Watch ↧ Radio tape recorder ↧ Radio ↧ Cassette player ↧ CD player ↧ CD changer ↧
Radio
The quality of radio signal reception may vary significantly while the vehicle is moving due to terrain features, weather conditions and proximity to sources of electromagnetic radiation.
Note: the more distance from the transmitting antenna of the radio station the signal power decreases. For the FM range the zone of confident reception is within 20-25 km in the "Stereo" mode and 30-40 km in the "Mono" mode.
Cassette player
Clean the tape drive of your radio with a cleaning cassette about once a month. This will ensure consistent playback quality.
It is not recommended to use 120-minute cassettes, as the thin film can cause damage to the film or cause it to become entangled in the tape drive mechanism.
Do not expose audio cassettes to high temperatures, such as under a windshield. This may cause deformation of the cassette case.
CD player
In cold weather or high humidity, due to fogging of the disc surface and optical elements of the player, playback failures are possible. After normalization of humidity, the system operation is restored.
Strong vibration may cause distortion and interruptions in playback. This is not a malfunction. It is not recommended to leave discs in direct sunlight. Protect the disc surface from scratches.
Watch
1. Manual clock setting mode. To set the time, use the "HR" (4) and "MN" (5) buttons:
- HR (Hour) button - to set the hours.
- MN (Minute) button - to set the minutes.
2. Automatic clock setting mode.
To select the automatic RDS clock setting mode, simultaneously press and hold the time setting buttons (4) and (5) until "RDS TIME" appears on the display.
Note: If the clock cannot be set automatically, "NO UPDAT" will appear on the display.
Radio tape recorder
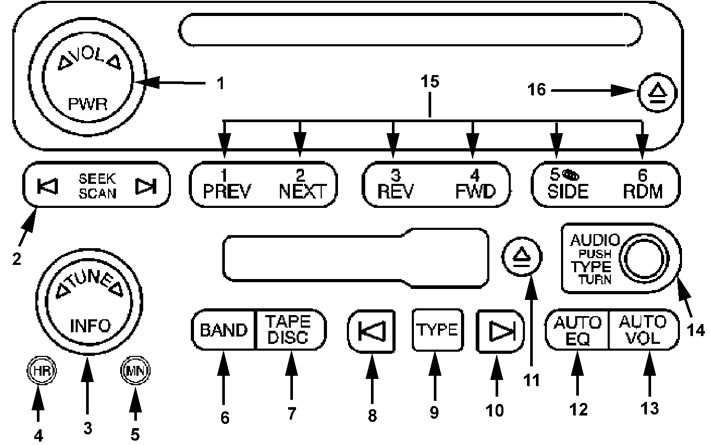
Turning the audio system on and off
The audio system is switched on by pressing the button (1) "PWR" (the system that was running before the last shutdown will turn on). The cassette player also turns on automatically when a cassette is inserted.
When the cassette is ejected, the audio system will return to its original state - turn off or switch to radio mode.
Volume control
The volume is adjusted by pulling out the regulator (1) and rotating it.
Volume compensation system (AUTO VOL)
On models with the Bose audio system, to compensate for extraneous noise that occurs when driving at high speeds, the volume level, tone and balance values will change automatically, depending on the vehicle speed.
To turn on the system, press and hold the "AUTO VOL" button (13) until the display shows "AVOL ON". To turn off the system, press and hold the button (13) again until the display shows "AVOL OFF".
Adjusting tone and balance
The adjustment is carried out by the regulator (14) "AUDIO". Switching between the adjustment parameters is carried out by pressing the regulator (14). In this case, the display shows the name of the parameter and the set value:
- FADE (balance between front and rear speakers).
- BAS (low frequency timbre).
- MID (midrange timbre).
- TRE (high frequency timbre).
- BAL (balance between right and left speakers).
By pressing and holding the button (14) until a beep is heard, the average value of the current parameter is set.
Equalizer Preset (Auto EQ)
By briefly pressing the button (12) "AUTO EQ" the equalizer is preset:
- NORMAL - standard value of timbre and balance;
- DRIVER - maximum sound quality in the driver's seat;
- REAR - maximum sound quality in the rear of the cabin;
- SPACIOUS - extended list of equalizer presets.
Radio
The radio is switched on by pressing the "BAND" button (6). Pressing this button again switches between the AM, FM1 and FM2 ranges.
Tuning radio stations
Press the button (2) "SEEK" (automatic radio station search will be turned on). The search will stop when a stable signal is found. If the signal is weak, if the automatic search does not fix the setting, press the setting button again (automatic search will be disabled) and tune manually one step at a time by turning the "TUNE" knob (3).
When you press and hold the (2) "SCAN" or (9) "TYPE" button until you hear a beep and see "SCAN" on the display, all radio stations received in the range are listened to in sequence. Each radio station will be listened to for a few seconds, and the frequency of the received station will start flashing on the display, then the frequency will change to another higher frequency. After tuning to the desired radio station, press the (2) or (9) button again.
Programming settings
The settings of the most frequently listened to radio stations can be saved into memory (6 radio stations for each range).
To do this, tune in to the desired radio station, then press and hold one of the buttons (15) until you hear a beep. Switching to the tuned radio station is done by briefly pressing the desired button.
Note: if the battery is not present for a long time, the radio memory is erased and the factory settings are restored.
Selecting radio station topics (PTY)
By pressing the button (9) "TYPE" (the display will show "PTY") and then rotating the knob (14) "TYPE", one of the possible radio station broadcast topics is selected (rock, jazz, classical, etc.).
After selecting the required topic, press the button (2) "SEEK", after which the automatic search for a radio station with the specified broadcast topic will begin, while the selected topic will flash on the display of the audio system. After finding the required radio station, the frequency and name of the radio station will be displayed on the display.
Reading radio station messages
If the radio station broadcasts any messages (song title, phone numbers, etc.), to view the message, use the (3) "INFO" button.
Error messages
CAL ERR - audio system factory setting error. Contact your dealer to resolve the problem.
LOCKED - The audio system is locked by the theft deterrent system (THEFTLOCK). Contact your dealer to unlock the system.
Cassette player
Switching the radio to the cassette player mode is done by pressing the button (7) "TAPE". When inserting a cassette, the radio automatically switches to the cassette player mode. To remove the cassette, press the button (11).
Rewind
To rewind the cassette, press button (15) "3" (rewind REV) or button (15) "4" (fast forward FWD). To stop rewinding, press the rewind button again or press the (14) "TAPE" button.
Search for a record
To go to any record located before or after the current playback position, press the (15) "1" (PREV) or (15) "2" (NEXT) button as many times as the number of records you want to go to (when moving back, take into account the current entry).
Note: If the pause between recordings is less than three seconds or there is extraneous sound, this function may not work properly.
Reverse
Changing the direction of cassette playback is done by pressing button (15) "5" (SlDE).
Watching a tape
To listen to the first 10 seconds of each recording on the tape one by one, press and hold the (2) "SCAN" button for more than two seconds (the display should show "SCAN").
Note: If the pause between recordings is less than 3 seconds or there are extraneous sounds, this function may not work properly.
CD player
Switching the radio to the CD player mode is done by pressing the button (7) "DISC". When loading a disc, the radio automatically switches to the CD player mode. To eject the disc, press the button (16).
View disc
Pressing and holding the (2) "SCAN" button for more than two seconds plays 10 seconds of each recording on the current disc in order. To select a recording, press the "SCAN" button again.
After scanning all records, the fast disk viewing mode will be disabled.
Search for a record
1. "PREV" and "NEXT" buttons for searching a record.
To go to any record located before or after the current playback track, press the button (15) "1" (PREV) or (15) "2" (NEXT) as many times as the number of records you want to go to (when moving back, take into account the current entry).
2. "SEEK" button for searching a record.
Pressing the "SEEK" button (2) allows you to search for the required entry.
- a) Press the "SEEK" button on the "side
 ", if the required entry is located after the current track.
 - b) Press the "SEEK" button on the "side
 ", if the required entry is located before the current track.
 - c) When pressed once from the side "" will jump to the beginning of the current record.
Rewind recording
To rewind the recording, press button (15) "3" (rewind REV) or button (15) "4" (fast forward FWD). If you press the button for less than two seconds, the rewind will be performed at 6x speed, if you hold it for more than two seconds, at 17x speed. To stop rewinding, press the rewind button again.
Random Playback (RDM)
Pressing the (15) "6" (RDM) button allows you to play the disc recordings or discs in random order.
- a) By briefly pressing the button (15) "6" switch on the "RDM" mode, after which the recordings on the CD will be played in random order. In this case, the "RDM" indication will light up on the display of the radio.
- b) To turn off the random play mode, press button (15) "6" again.
Information about recording from disk
When you press the (3) "INFO" button, the radio display will sequentially show possible options for indicating information about the recording (title of the recording, duration, etc.). To select the required indication mode, press and hold button (3) for more than two seconds.
CD changer
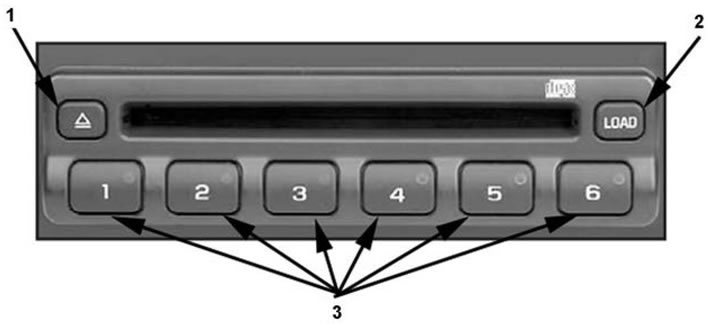
Loading CDs
The player can store from 1 to 6 discs. Green indicators on the buttons (2) of the CD changer panel show the numbers of the inserted discs. If the indicators on all six buttons (2) are lit, then no more discs can be inserted. Flashing of the indicator on one of the buttons (2) shows the number of the disc being played. Flashing of the indicators on the sides of the loading slot shows that the CD changer is ready to load discs.
Caution: Load discs with the label facing up.
Loading one disc
Press the "LOAD" button (3). Select a free disc slot by pressing one of the buttons (2) with a flashing indicator. If you do not select a free disc slot within five seconds, the CD changer will automatically select the free slot with the lowest number. After the indicators on the sides of the loading slot start flashing, load the disc into the CD changer. In about 10 seconds, the system will be ready to play the disc.
Loading multiple discs
Press and hold the "LOAD" button (3). The first disc loaded must have the lowest number. After the indicators on the sides of the loading slot start flashing, load the disc into the CD changer. After about 10 seconds, you can load the next disc. Repeat the disc loading procedure until all discs are loaded. If you do not want to load all discs, the disc loading function can be cancelled by pressing the button (2) with the flashing indicator or by waiting 20 seconds.
Removal one disk
Press the button (1). The numbers of the loaded discs will start flashing on the CD changer panel. Press the button (2) with the number of the disc you want to eject.
Note: If you do not remove the disc from the CD changer within 10 seconds after pressing button (2), it will be automatically loaded back.
Ejecting multiple discs
Press and hold the button (1). The discs are ejected in order, starting with the lowest number. If you do not remove the ejected disc within 10 seconds, the disc ejection function is blocked and it is impossible to eject the remaining discs.
Start playing discs
Playback of discs loaded into the CD changer can be started in two ways: by pressing one of the buttons (2) with a lit green indicator, or by pressing the button (7) "DISC" on the radio panel.
Note: The CD changer controls are the same as the CD player controls.
Controlling the radio from the control panel located on the steering wheel
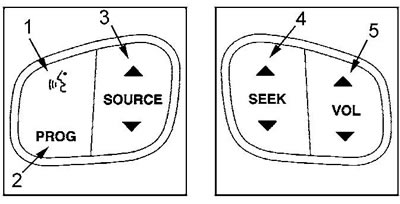
The radio can also be controlled from the control panel located on the steering wheel. Switching between the radio modes (radio (AM, FM1, FM2) or CD player) is carried out by button (3).
1. Volume control.
The volume level is changed using button (5).
Note: On models without the OnStar voice control system, instant mute is available by pressing the (1) button.
2. "Radio" mode.
- a) Search for radio stations using the "SEEK" button (4).
- b) Switching between radio stations stored in the radio's memory is carried out using the (2) "PROG" button.
3. CD player mode.
- a) The search for the required entry is carried out using the button (4) "SEEK".
- b) (Models with CD changer) To play the next disc, press the (2) "PROG" button.
For details, visit the website «chevyman.ru»