
ChevyMan.ru
Mazda Mitsubishi Toyota Land Rover Honda Kia Nissan
English Русский
Български
Беларускі
Український
Српски
Hrvatski
Română
Polski
Slovenský
Magyar
|
Articles | Sitemap | Contacts |


Home   Aveo   Captiva   Cruze   Lacetti   Lanos   Niva   Tahoe   Others  
Orlando 1 (2010-2018) Trailblazer 1 (2001-2008, petrol) Lumina 1 (1989-1994)
  • Home
  • Chevrolet
  • Lumina 1
  • Power unit
  • Engine overhaul
  • Checking main bearings and upper connecting rod bearings

Checking main bearings and upper connecting rod bearings (Chevrolet Lumina 1)

            0

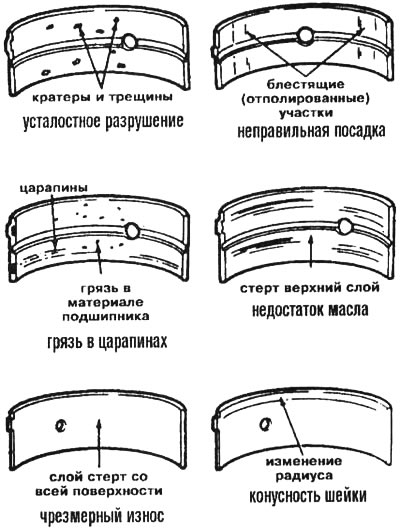
1. Although the main and connecting rod bearings should be replaced with new ones during an engine overhaul, the old bearings should be carefully inspected as this will provide valuable information about the condition of the engine (see illustration).

20.1. Typical signs of bearing failure

20.1. Typical signs of bearing failure


2. Bearing failure can occur due to lack of lubrication, presence of dirt and other foreign particles, engine overload and corrosion. Whatever the cause of bearing failure, it must be corrected before reassembling the engine to prevent it from recurring.

3. When checking the bearings, remove them from the cylinder block, main bearing caps, connecting rods and connecting rod caps and lay the bearings out on a clean surface in the same orientation as they were installed in the engine. This will allow you to link any bearing defects to the corresponding camshaft journals.

4. Dirt and other foreign particles enter the engine in various ways. They can be introduced into the engine during assembly or enter through filters or the crankcase ventilation system. Dirt can get into the oil and with it into the bearings. Often metal particles are found due to the processing of parts or normal engine wear. Following remanufacturing operations, abrasive particles may remain in the engine, especially if parts have not been thoroughly cleaned using recommended methods. Regardless of their source, these foreign particles often end up embedded in the soft bearing material where they become clearly visible. Large particles cannot penetrate the bearing and will scratch and damage the bearing and journal. The best way to prevent this cause of bearing failure is to thoroughly clean all parts and maintain immaculate cleanliness during engine assembly. In addition, frequent and regular replacement of engine oil and filters is recommended.


5. Lack of lubrication (or loss of its lubricating properties) is caused by a number of interrelated reasons. Excessive heating (which reduces the viscosity of the oil), overloads (in which grease is squeezed out of the bearings), oil leak or spill (due to excessive bearing clearances, oil pump wear or high vehicle speeds) - all this can lead to insufficient lubrication. Blocked oil passages, which are usually the result of misaligned oil holes in the bearing housing, also impair lubrication and damage the bearing. When bearing failure is caused by lack of lubrication, the bearing material is worn away or squeezed out of the steel bearing base. The temperature may rise so much that the steel base will take on a blue tint due to overheating.

6. Driving style also affects the service life of bearings. Full throttle, low revs (incorrect gear selection), cause excessive loads on bearings, which can lead to the squeezing out of the oil film. These loads deform the bearings, which leads to the formation of small cracks on their surfaces (fatigue failure). Eventually the material breaks into pieces and wears off the steel base. Frequent short-distance driving leads to bearing corrosion because the engine is not warmed up sufficiently to remove condensed water and corrosive gases. These substances enter the engine oil, forming acid and carbon deposits (sludge). When such oil enters the engine bearings, the acid destroys them and promotes corrosion of the bearing material.

7. Incorrect installation of the bearing during engine assembly will also lead to bearing failure. Bearings that are too tight will leave oil clearances that are too small, resulting in insufficient lubrication. Dirt or foreign particles that get behind the bearing shells cause raised spots on the bearing, which lead to its destruction.

(The article was reprinted from the website chevyman)

The article was checked: Vladimir Romannikov
This article is available at russian, bulgarian, belarusian, ukrainian, serbian, croatian, romanian, polish, slovak, hungarian

Share information:

Previous articles
Lumina 1: Engine overhaul
Next articles

Checking the crankshaft
Checking pistons and connecting rods
Cylinder honing
Checking the cylinder block
Cleaning the cylinder block
Engine Overhaul — Assembly Sequence
Installing piston rings
Installing the crankshaft and checking the crankshaft main bearing clearance
Installation of camshaft and balance shaft
Replacing the rear crankshaft oil seal


See similar articles on the topic of Chevrolet cars:
Adjusting differential bearings Chevrolet Aveo T250 (2006-2011)
Main and connecting rod bearings — calibrated plastic wire Chevrolet Captiva 1 (2006-2018)
Checking the wheels Chevrolet Cruze 1 (2008-2016)
Location of the main units and assemblies of the car Chevrolet Lacetti 1 (2002-2009)
Adjusting the rear wheel bearings Chevrolet Lanos T150 (2002-2009)
Checking and adjusting the clearance in the front wheel hub bearings Chevrolet Niva 1 (2002-2016)
Main and connecting rod bearings — inspection Chevrolet Tahoe 1 (1992-2000)
Link in different formats to this page


Visitor comments

No comments yet


How much will 28 + 17 =


Orlando 1 (2010-2018) 
  • General information
  • Introduction to manual
  • User manual
  • Maintenance
  • Troubleshooting
  • Power unit
  • Engine repair
  • Fuel and control system
  • Cooling and lubrication system
  • Ignition system
  • Transmission
  • Clutch
  • Gearbox
  • Drive shafts
  • Chassis
  • Car suspension
  • Steering
  • Brake system
  • Body
  • Exterior (external elements)
  • Doors, locks and windows
  • Electrical equipment
  • Equipment and devices
  • Windscreen wipers
  • Power devices
  • Electrical diagrams


Trailblazer 1 (2001-2008) 
  • General information
  • User manual
  • Troubleshooting
  • Maintenance
  • Power unit
  • Engine in a car
  • Engine overhaul
  • Cooling and heating
  • Fuel and exhaust system
  • Engine electrical equipment
  • Engine control
  • Transmission
  • Automatic gearbox
  • Transfer case
  • Drive shafts and cardan
  • Chassis
  • Brake system
  • Car suspension
  • Steering
  • Body
  • Exterior (external elements)
  • Interior (internal elements)
  • Doors, locks and windows
  • Electrical equipment
  • Equipment and devices
  • Electrical circuits


Lumina 1 (1989-1994) 
  • General information
  • Maintenance
  • Power unit
  • Engine 3.1L V6
  • Engine 3.8L V6
  • Engine overhaul
  • Cooling system
  • Power and exhaust system
  • Fuel injection
  • Engine electrical equipment
  • Reduced exhaust gas toxicity
  • Transmission
  • Automatic gearbox
  • Drive shafts
  • Chassis
  • Brake system
  • Car suspension
  • Steering
  • Body
  • Heating and air conditioning
  • Repair of body elements
  • Doors, covers and windows
  • Interior (internal elements)
  • Electrical equipment
  • Equipment and devices
  • Electrical circuits


ChevyMan.ru © 2017-2026 · Mobile version · Feedback · Site search · Interesting to read · Sitemap: EN BG BY UA RS HR RO PL SK HU

Aveo 2003-2008 · Aveo 2006-2011 · Aveo 2012-2018 · Captiva 2006-2018 · Cruze 2008-2016 · Lacetti 2002-2009 · Lanos 2002-2009 · Niva 2002-2016 · Tahoe 1992-2000 · Tahoe 2000-2014 · Lumina 1 1989-1994 · Trailblazer 1 2001-2008 · Orlando 1 2010-2018 ·
🛡️ For your security and to improve our service, this site uses cookies. You can disable them in your browser.