ChevyMan.ru
Mazda Mitsubishi Toyota Land Rover Honda Kia Nissan
English Русский
Български
Беларускі
Український
Српски
Hrvatski
Română
Polski
Slovenský
Magyar
|
Articles | Sitemap | Contacts |


Home   Aveo   Captiva   Cruze   Lacetti   Lanos   Niva   Tahoe   Others  
Orlando 1 (2010-2018) Trailblazer 1 (2001-2008, petrol) Lumina 1 (1989-1994)
  • Home
  • Chevrolet
  • Lumina 1
  • Power unit
  • Engine overhaul
  • Cylinder honing

Cylinder honing (Chevrolet Lumina 1)

            0

1. Before engine assembly, the cylinders must be honed to ensure the required piston ring fit and, accordingly, the best possible sealing of the combustion chambers. If you do not have the appropriate tools or do not want to deal with this procedure, you can have honing done at an auto repair shop.

2. Before honing the cylinders, install the main bearing caps and tighten the bolts to the torques given in "Technical data" at the beginning of the chapter.

3. There are two types of cylinder hones commonly used - a glass bead ("bottle brush") hone or a traditional surface hone with abrasive bars on springs. You will also need some honing oil (if there is no special oil, kerosene will do), rags and an electric drill. Proceed as follows.
  • a) Install the hone in an electric drill, compress the bars and insert it into the first cylinder (see illustration). Be sure to wear protective glasses or a mask.
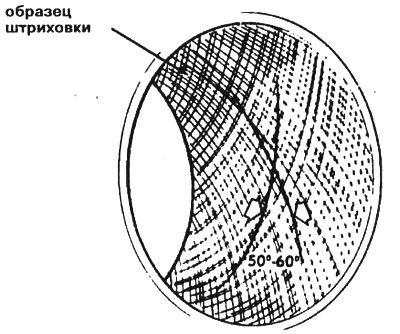
  • b) Lubricate the cylinder with a generous amount of honing oil, turn on the drill and move the hone up and down the cylinder at a speed that will produce the desired crosshatch pattern on the cylinder walls. Ideally, the hatching lines should intersect at a 45° angle (see illustration). Be sure to apply plenty of oil and select more surface material than is required to achieve the desired wall condition.

Note: Piston ring manufacturers may specify different crosshatch angles. Follow the instructions included with your new rings.

  • c) Do not remove the moving hone from the cylinder. Turn off the drill and continue to move the hone up and down the cylinder until it stops completely, then squeeze the hone and remove it. If you are using a bottle brush type hone, turn off the drill and, while rotating the drill chuck in the direction of normal rotation, remove the hone from the cylinder.
  • d) Remove oil from the cylinder walls and repeat the procedure for the remaining cylinders.
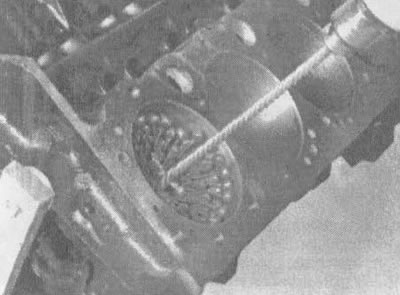
17.3a. If you have never honed cylinders before, it is preferable to use a «bottle brush» type hon

17.3a. If you have never honed cylinders before, it is preferable to use a "bottle brush" type hon
17.3b. The hone for the cylinder should leave a smooth net-like hatching, the lines in which…

17.3b. The hone for the cylinder should leave a smooth net-like hatching, the lines in which intersect at an angle of approximately 90°


4. After completing the honing procedure, file the top edges of the cylinders with a fine-grain file to prevent the pistons from sticking during installation. Be careful not to scratch the cylinder walls with the end of the file.

5. The cylinder block must then be thoroughly washed again with warm soapy water to remove all traces of abrasive dust created during honing.

Note: Cylinders can be considered clean if, after wiping the walls with a white, lint-free cloth soaked in clean motor oil, no honing residue collects on the cloth, which appears as gray spots. Don't forget to brush out all oil holes and lines and rinse them with running water.


6. After washing, dry the block and cover all treated surfaces with light anti-corrosion oil. Place a plastic film over the block to keep it clean until assembly begins.

The article was checked: Vladimir Romannikov
This article is available at russian, bulgarian, belarusian, ukrainian, serbian, croatian, romanian, polish, slovak, hungarian

Share information:

Previous articles
Lumina 1: Engine overhaul
Next articles

Checking the cylinder block
Cleaning the cylinder block
Removal the crankshaft
Removal pistons and connecting rods
Removal and checking the camshaft, balance shaft and bearings
Checking pistons and connecting rods
Checking the crankshaft
Checking main bearings and upper connecting rod bearings
Engine Overhaul — Assembly Sequence
Installing piston rings


See similar articles on the topic of Chevrolet cars:
Setting the piston of the first cylinder to the TDC position Chevrolet Aveo T300 (2012-2018)
Cylinder head cover Chevrolet Captiva 1 (2006-2018)
Checking the level and adding fluid to the brake master cylinder reservoir Chevrolet Cruze 1 (2008-2016)
Replacing the cylinder head cover gasket Chevrolet Lacetti 1 (2002-2009)
Replacing the cylinder head cover gasket Chevrolet Lanos T150 (2002-2009)
Cylinder block Chevrolet Niva 1 (2002-2016)
Cylinder honing Chevrolet Tahoe 1 (1992-2000)
Link in different formats to this page


Visitor comments

No comments yet


How much will 49 + 40 =


Orlando 1 (2010-2018) 
  • General information
  • Introduction to manual
  • User manual
  • Maintenance
  • Troubleshooting
  • Power unit
  • Engine repair
  • Fuel and control system
  • Cooling and lubrication system
  • Ignition system
  • Transmission
  • Clutch
  • Gearbox
  • Drive shafts
  • Chassis
  • Car suspension
  • Steering
  • Brake system
  • Body
  • Exterior (external elements)
  • Doors, locks and windows
  • Electrical equipment
  • Equipment and devices
  • Windscreen wipers
  • Power devices
  • Electrical diagrams


Trailblazer 1 (2001-2008) 
  • General information
  • User manual
  • Troubleshooting
  • Maintenance
  • Power unit
  • Engine in a car
  • Engine overhaul
  • Cooling and heating
  • Fuel and exhaust system
  • Engine electrical equipment
  • Engine control
  • Transmission
  • Automatic gearbox
  • Transfer case
  • Drive shafts and cardan
  • Chassis
  • Brake system
  • Car suspension
  • Steering
  • Body
  • Exterior (external elements)
  • Interior (internal elements)
  • Doors, locks and windows
  • Electrical equipment
  • Equipment and devices
  • Electrical circuits


Lumina 1 (1989-1994) 
  • General information
  • Maintenance
  • Power unit
  • Engine 3.1L V6
  • Engine 3.8L V6
  • Engine overhaul
  • Cooling system
  • Power and exhaust system
  • Fuel injection
  • Engine electrical equipment
  • Reduced exhaust gas toxicity
  • Transmission
  • Automatic gearbox
  • Drive shafts
  • Chassis
  • Brake system
  • Car suspension
  • Steering
  • Body
  • Heating and air conditioning
  • Repair of body elements
  • Doors, covers and windows
  • Interior (internal elements)
  • Electrical equipment
  • Equipment and devices
  • Electrical circuits


ChevyMan.ru © 2017-2026 · Mobile version · Feedback · Site search · Interesting to read · Sitemap: EN BG BY UA RS HR RO PL SK HU

Aveo 2003-2008 · Aveo 2006-2011 · Aveo 2012-2018 · Captiva 2006-2018 · Cruze 2008-2016 · Lacetti 2002-2009 · Lanos 2002-2009 · Niva 2002-2016 · Tahoe 1992-2000 · Tahoe 2000-2014 · Lumina 1 1989-1994 · Trailblazer 1 2001-2008 · Orlando 1 2010-2018 ·
🛡️ For your security and to improve our service, this site uses cookies. You can disable them in your browser.