
Note: Always use new piston rings when reassembling the engine.
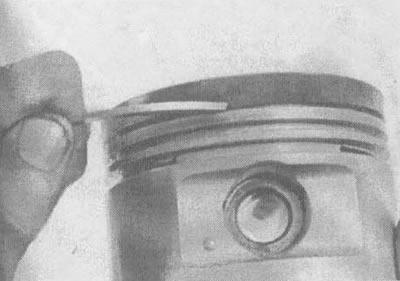
2. Using a piston ring installer, carefully remove the rings from the pistons. Be careful not to scratch the pistons while doing this.
3. Clean all traces of carbon from the top of the piston. Most of the carbon deposits can be removed with a hand brush or a piece of fine-grit sandpaper. Under no circumstances should you use a wire brush attached to a drill to remove carbon deposits. The piston material is soft and can be easily removed with a brush.
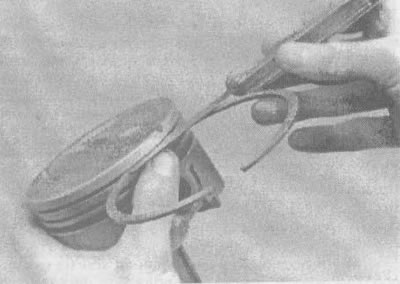
4. Using a piston ring groove cleaning tool, remove carbon deposits from the grooves. If you don't have such a tool, a piece of an old ring will do. Be careful - remove only carbon deposits, but do not remove metal from the surface or scratch the walls of the ring grooves (see illustrations).
18.4a. The piston ring grooves must be cleaned with a special tool, as shown in the illustration... |
18.4b....or a piece of a broken ring |
5. After removing the deposits, clean the pistons together with the connecting rods and dry them with compressed air (if it exists).
Caution! Wear safety glasses. Make sure the oil drain holes on the back of the ring grooves are clean.
6. If the pistons and cylinder walls are not damaged or excessively worn, and if the cylinder block has not been bored, then new pistons are not needed. Normal piston wear is manifested as uniform vertical wear of its thrust surfaces and a small gap of the upper ring in its groove. However, when overhauling an engine, it is always necessary to use new piston rings.
7. Carefully check each piston for cracks around the skirt, near the pin bosses and in the ring areas.
8. Check for scratches or abrasion on the skirt thrust surfaces, piston head holes and burnt areas on the edge of the head. The presence of scratches or abrasions on the skirt indicates that the engine may be overheating and/or not burning properly, resulting in abnormally high operating temperatures. The lubrication and cooling systems must be carefully checked. The presence of a hole in the piston bottom indicates incorrect combustion of the mixture (early ignition). Burnt areas on the edge of the piston crown are usually the result of detonation. If the above problems do occur, their causes must be eliminated, otherwise new damage is inevitable. These reasons may be: air leaks, improper fuel-air mixture, use of fuel with a low octane number, malfunction of the ignition system and EGR system (exhaust gas recirculation).
9. Piston corrosion in the form of small "pits" indicates a coolant leak into the combustion chamber and/or engine crankcase. This fault should be corrected immediately, as similar problems may occur with a rebuilt engine.
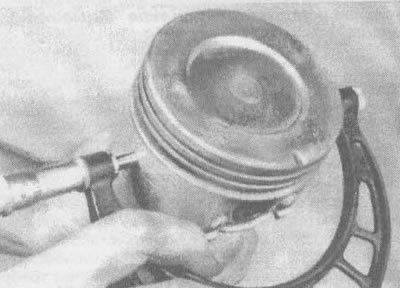
10. Measure the side clearance of the piston rings by installing a new ring in each groove and inserting a feeler gauge into the groove behind it (see illustration). Check the clearance in three or four places around the circumference of the groove. Make sure that the correct rings are installed in the grooves (they are different). If the side clearance exceeds the value given in this chapter, the pistons must be replaced with new ones.
18.10. Check the side clearance of the rings using a feeler gauge at several points around the circumference of the groove
11. Check the piston clearance in the cylinder by measuring the diameters of the cylinder liners (see section 16) and pistons. Make sure the pistons and cylinders match. Measure the piston across the skirt at a 90° angle to the piston pin (see illustration). To obtain an accurate result, the measurement must be taken at a specific location, which depends on the engine type.
- a) Piston diameter for engines with a working volume of 3.8 l (with balance shaft) measured directly along the piston pin centerline.
- b) Pistons for 3.1 liter engines are measured at 5/8 inch (15 mm) from the bottom of the skirt.
18.11 Measure the piston diameter at a 90° angle to the piston pin and also in line with the pin
12. To obtain the clearance value, the piston diameter is subtracted from the cylinder bore diameter. If the clearance exceeds the prescribed value, it is necessary to bore the cylinder block and install new pistons and rings.
13. Check the clearance between the piston and connecting rod by turning the piston and connecting rod in opposite directions. Any noticeable play indicates excessive wear that should be corrected. The pistons together with the connecting rods must be taken to an auto repair shop where the required dimensions will be restored and new pins will be installed.
14. If for any reason the pistons need to be removed from the connecting rods, they must be taken to an auto repair shop. Have the cranks checked for bending and twisting at the workshop, as they have special equipment for this purpose.
Note: Unless new pistons and/or connecting rods are required, do not disassemble the pistons and connecting rods.
15. Check the connecting rods for scratches or other damage. Temporarily remove the connecting rod caps, remove the old bearing shells, wipe clean the bearing contact surfaces of the connecting rods and caps and check for scratches, burrs and abrasions. After checking the connecting rods, replace the old bearings, install the caps in their places and tighten the nuts by hand.
Note: If the engine is overhauled due to connecting rod knocking, be sure to install new connecting rods.