


Contents: Cleaning ↧ Examination ↧
1. A thorough cleaning of the cylinder heads and valve parts followed by a detailed inspection will help to establish the amount of work required for the valve mechanism during an engine overhaul.
Note: If the engine has been severely overheated, the cylinder head may be warped (see point 12).
Cleaning
2. Remove any remaining gaskets and seals from the cylinder head surfaces that are adjacent to the gasket, intake manifold and exhaust manifold. Be careful not to damage the cylinder head. You can use softening pads and special liquids for removing pads that make removal easier, which are sold in auto stores.
3. Remove any deposits that have formed from the coolant passages.
4. Using a stiff wire brush, clean the various openings to remove any deposits that may have built up there.
5. Using a tap of the appropriate size, run the threads and remove rust and thread sealant residue, if any, from all threaded holes. If compressed air is available, use it to remove any dirt that may form.
Caution: Wear safety glasses when using compressed air.
6. Clean the threads of the rocker arm bolts or studs with a wire brush.
7. Wash the cylinder head with solvent and dry it thoroughly. Compressed air will speed up the drying process and ensure that all holes and recessed surfaces are clean.
Note: There are commercially available chemical carbon removers that may be useful in cleaning cylinder heads and valve components. However, they are very caustic and must be used with caution. Follow the instructions on the package carefully.
8. Clean the rocker arms, axles, bolts and pushrods with solvent and dry them thoroughly. Compressed air will speed up the drying process and help clean the oil lines.
9. Clean the valve springs, spring seats, valve turning mechanisms, crackers and spring plates and dry them thoroughly. To avoid mixing up the parts, process the parts of one valve at a time.
10. Remove any visible deposits from the valves, then use the brush on the motor to remove deposits from the valve heads and stems. Again, be careful not to mix up the valves.
Examination
Note: Before deciding on the amount of work to be performed at the auto repair shop, be sure to complete all of the following inspection procedures. Make a list of details that require special attention.
Cylinder head
11. Carefully check the cylinder head for cracks, signs of coolant leakage and other damage. If there are cracks, consult a workshop about the possibility of repair. If repair is not possible, a new cylinder head must be purchased.
12. Using a straight edge and feeler gauge, check for distortion of the cylinder head gasket contact surface (see illustration). If the amount of deformation exceeds the value specified in the technical data at the beginning of the chapter, the surface can be re-treated in a car repair shop.
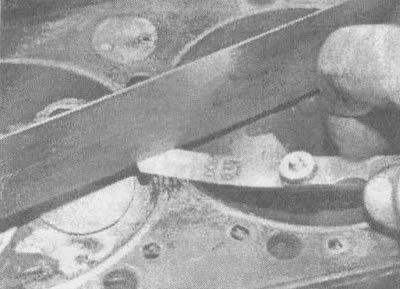
9.12. Check for deformation of the cylinder head gasket contact surface using a feeler gauge and a straight edge (find the maximum allowable deformation value in the technical data of this chapter and use a feeler gauge of this thickness)
Note: If the head surfaces are machined, the intake manifold flanges must also be machined.
13. Check the valve seats in each combustion chamber. If there are traces of corrosion, burnout or cracks, the head cannot be restored at home.
14. Check the valve stem clearance in the guide bushing by measuring the lateral movement of the valve stem using an indicator mounted on the head (see illustration). The valve should be located in the guide sleeve and approximately 1/16 of an inch out of the seat. To obtain the clearance value, the value of the total valve movement indicated by the indicator must be divided by two. If you still have doubts about the condition of the valves, they should be checked at an auto repair shop.
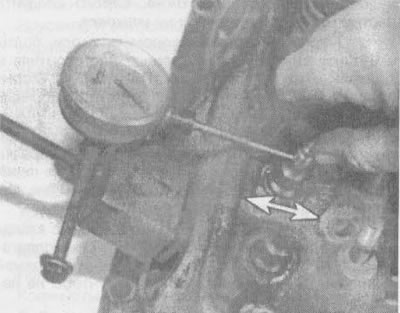
9.14. A micrometer can be used to measure the valve stem clearance in the guide bushing
Valves
15. Carefully inspect the face of each valve, checking for areas of uneven wear, deformation, cracks, corrosion and fading. Check for signs of corrosion, scoring on the valve stem and cracks in the neck. Rotate the valve to detect a visible bend. Check the end of the rod for signs of corrosion or excessive wear. The presence of any of the specified defects (see illustration) indicates the need for valve treatment in an auto repair shop.
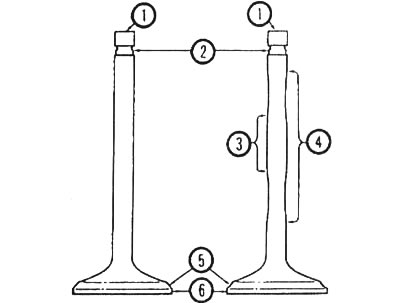
9.15. Check the valve wear at the points indicated here: 1 - valve stop, 2 - cracker grooves, 3 - rod (area of minimal wear), 4 - rod (area of maximum wear), 5 - valve chamfer, 6 - edge
16. Measure the edge thickness of each valve (see illustration). If the edge width is less than the value specified in the technical data, the valve must be replaced with a new one.
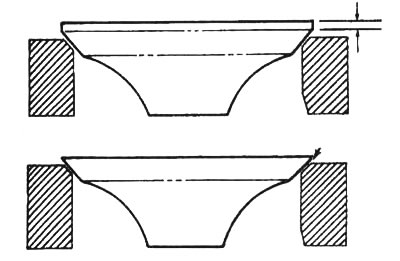
9.16. The width of the edge on each valve must be equal to the prescribed value (if the edge is missing, the valve cannot be reused)
Valve parts
17. Check each valve spring (at the ends) for signs of corrosion and wear. Measure the free (unloaded) length and compare with the technical data at the beginning of the chapter (see illustration). Any springs found to be shorter than the specified value must be replaced. Before deciding whether to use springs in a rebuilt engine, check their tension using a special device (take the springs to a workshop to check).
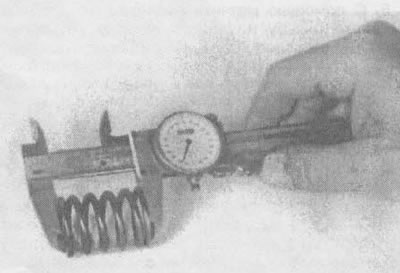
9.17. Measure the free length of each valve spring using a caliper
18. Place each spring on a flat surface and check for straightness (perpendicularity) (see illustration). If any spring is bent or sags, replace it with a new one.
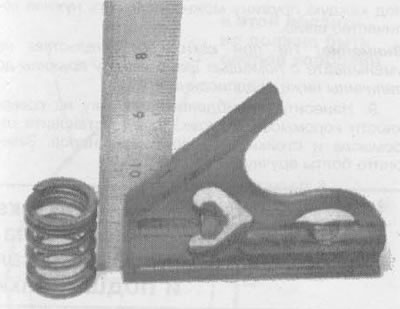
9.18. Check the verticality of the spring of each valve
19. Check the plates and crackers for visible signs of wear or cracks. All questionable parts must be replaced with new ones, since their failure during engine operation will lead to serious damage.
Valve rocker arm parts
20. Check if there are any marks on the rocker arms' faces (in areas that come into contact with the ends of the pushrods and valve stems) traces of corrosion, wear, abrasion, scratches, roughness. Also check the contact surfaces of the rocker arms, struts and the struts themselves. Check each rocker arm and bolt for cracks.
21. Check the ends of the rods for signs of scoring or excessive wear. Roll each barbell on a smooth surface (for example, on glass), to determine if it is bent.
22. Check the condition of the threads in all holes for the rocker arm bolts in the cylinder heads.
23. All damaged and excessively worn parts must be replaced with new ones.
All details
24. If the inspection results indicate a general unsatisfactory condition of the valve parts and their wear exceeding the permissible limits (which usually occurs when a major engine overhaul is required), valves need to be reground or replaced (recommendations for valve maintenance are given in section 10).