
2. If you are going to buy a rebuilt engine, all external parts should be removed first (see illustrations), which will be installed on the new engine; they are removed in the same way as in the case of independent major repairs. These external parts include:
- Generator and brackets
- Emission Control System Details
- Ignition coil, spark plug wires and spark plugs
- Thermostat and housing cover
- Coolant pump
- EFI System Parts
- Intake/Exhaust Manifolds
- Oil filter
- Engine mounts
- Flywheel
Note: When removing external parts from the engine, pay special attention to those points that may be useful or important during installation. Remember the installation positions of gaskets, seals, spacers, studs, brackets, washers, bolts and other small parts.
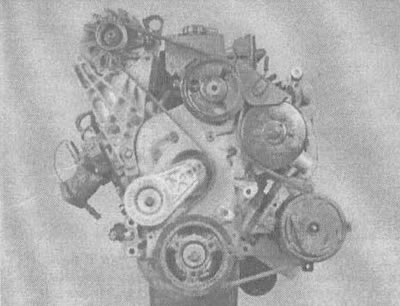
7.3a. 3.1L engine - view from the drive belt side |
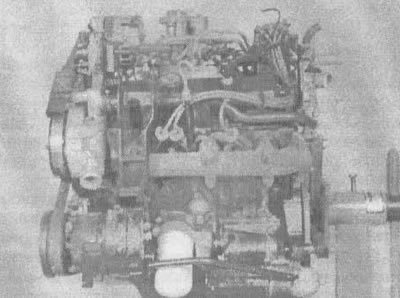
7.3b. 3.1L engine - view from the radiator side |

7.3v. 3.1 l engine - view from the side of the heat-insulating wall
4. If you are purchasing a "short block" which includes the cylinder block with crankshaft and pistons assembled with connecting rods, you will also need to remove the cylinder heads, oil pan and oil pump. Additional information related to the various repair options can be found in the section "Engine Overhaul Options".
5. If you are planning to carry out a complete overhaul, the engine must be disassembled, and the following general sequence for removing internal parts must be observed: (see illustration).
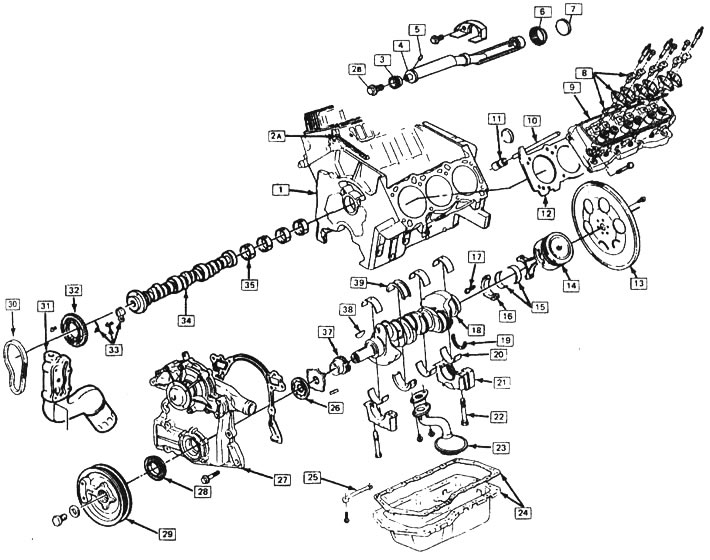
7.5. 3.8L V6 engine parts: 1 - cylinder block; 2A - Front sealing gasket for fastening the intake manifold to the cylinder block; 2B - balance shaft gear mounting bolt to balance shaft; 3 - balance shaft gear; 4 - balancing shaft; 5 - balance shaft gear pin; 6 - balance shaft bearing; 7 - balance shaft bearing hole cover; 8 - valve rocker arm stand; 9 - cylinder head; 10 - push rod; 11 - pusher; 12 - cylinder head gasket; 13 - flywheel; 14 - piston with connecting rod; 15 - lower connecting rod head liners; 16 - connecting rod bearing cover; 17 - connecting rod bolt; 18 - crankshaft; 19 - rear oil seal; 20 - main bearing shell; 21 - main bearing cap; 22 - main bearing cap bolt; 23 - oil intake; 24 - oil pan with gasket; 25 - oil pan tensioner spring; 26 - oil pump; 27 - front cover; 28 - Front cover seal; 29 - antivibrator; 30 - gas distribution mechanism drive chain; 31 - oil filter flange; 32 - camshaft sprocket; 33 - timing chain tensioner; 34 - camshaft; 35 - camshaft bearings; 36 - not used; 37 - crankshaft sprocket; 38 - cotter pin; 39 - thrust main bearing
- Valve covers
- Intake and exhaust manifolds
- Rocker arms and valve pushrods
- Valve lifters
- Cylinder heads
- Timing Chain Cover and Oil Pump
- Timing chain and sprockets
- Camshaft
- Balance shaft (only for 3.8L engine)
- Oil pan
- Pistons with connecting rods
- Crankshaft with main bearings
6. Before you begin disassembling and overhauling, make sure you have the following tools and materials. Also, study the list of tools and materials required for assembly, which is given in the section "Engine Overhaul - Assembly Sequence".
- Common hand tools
- Small cardboard boxes or plastic bags for storing parts
- Gasket Scraper
- Ledge removal tool
- Anti-vibration remover
- Micrometers
- Set of micrometers with indicator head
- Valve Spring Compressor
- Hone for processing cylinder surfaces
- Piston Ring Groove Cleaning Tool
- Electric drill
- Set of taps and dies
- Wire brushes
- Brushes for cleaning oil lines
- Cleaning solvent