
ChevyMan.ru
Mazda Mitsubishi Toyota Land Rover Honda Kia Nissan
English Русский
Български
Беларускі
Український
Српски
Hrvatski
Română
Polski
Slovenský
Magyar
|
Articles | Sitemap | Contacts |


Home   Aveo   Captiva   Cruze   Lacetti   Lanos   Niva   Tahoe   Others  
Tahoe 2 and 3 (2000-2014) Tahoe 1 (1992-2000)
  • Home
  • Tahoe
  • 1 (1992-2000)
  • Power unit
  • Engine removed
  • Connecting rods and pistons — checking condition

Connecting rods and pistons — checking condition (Chevrolet Tahoe 1)

            0

1. Carefully clean the pistons from carbon deposits and carefully remove the rings.

Attention! When completely disassembling the engine, the piston rings must be replaced, regardless of their condition.


2. Remove carbon deposits from piston ring grooves (see photo).
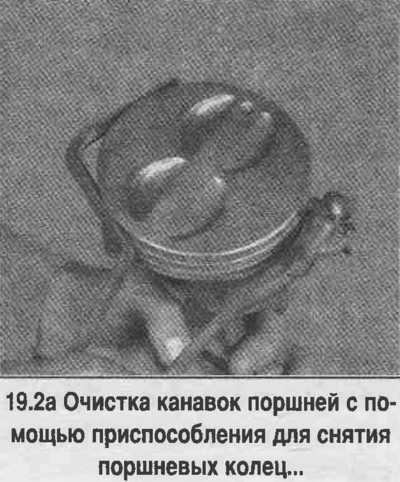
2. Remove carbon deposits from piston ring grooves (see photo).
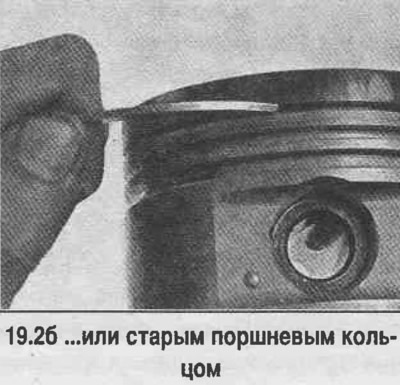

2. Remove carbon deposits from piston ring grooves (see photo).


3. Wash the pistons and connecting rods with solvent, thoroughly clean the oil drainage holes in the piston grooves and the hole in the connecting rod.

4. If there are no significant signs of wear and if the cylinders do not require boring, then the pistons should not be replaced. Normal wear is shown as traces of uniform vertical wear on the piston friction surface and as a slight weakening of the upper compression ring fit. However, replacement of piston rings is mandatory.


5. Carefully check for cracks on the piston skirt, piston pin bosses and piston ring seats.

6. If there are chips and scuffs on the piston, this indicates frequent overheating of the engine. In this case, a thorough check of the lubrication and cooling systems is required. Burning of the piston bottom indicates that the engine is operating with an incorrect ignition timing setting.

7. The cause of piston bottom burning at the edges is usually abnormal combustion (detonation). If the above defects are detected, their cause must be determined and eliminated, (as a rule, the cause is air suction in the manifold through a leaky gasket, a malfunction of the devices for preparing the combustible mixture or the recirculation system).

8. Piston corrosion in the form of small pits (pitting) indicates penetration into the combustion chamber (and also in the crankshaft housing) Coolant.

9. Measure the gap between the groove and the new ring (see photo). If the clearance exceeds the established limit, the piston should be replaced.
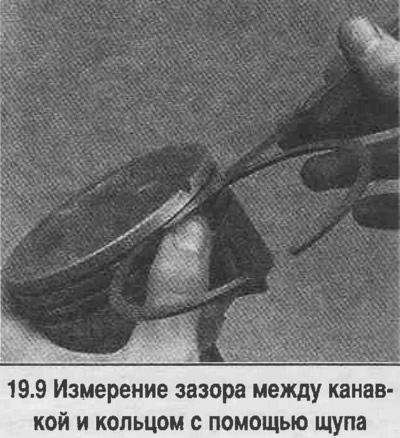
9. Measure the gap between the groove and the new ring (see photo). If the clearance exceeds the…


10. Check the clearance between the piston and the cylinder by measuring the cylinder diameter (see above) and the diameter of the piston from this cylinder (see photo). If the gap, which is calculated as the difference between these diameters, exceeds the established limit, then the cylinder block must be bored, and the pistons and rings must be replaced with repair ones.
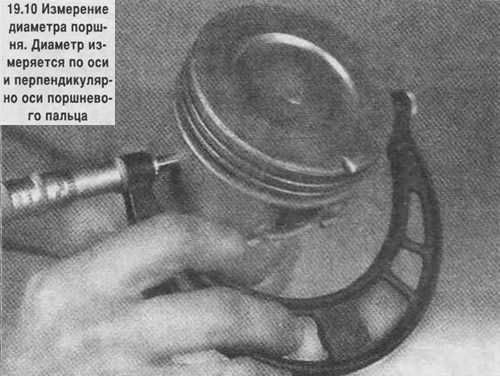


10. Check the clearance between the piston and the cylinder by measuring the cylinder diameter (see…


11. Check the clearance between the piston pin and the connecting rod head by rocking the piston and connecting rod in opposite directions. If the clearance is noticeable, then this connection needs to be repaired at a car service center.

12. Checking the connecting rod heads and their deformation, as well as replacing pistons and connecting rods, is only performed in a car service center.

Attention! If the pistons or connecting rods will not be changed, then disassembling this connection is not allowed.


13. Check the connecting rods for cracks and other damage. Remove the connecting rod bearing caps, take out the bearings, wipe the seating surfaces on the cap and on the connecting rod, check for cracks, scratches and burrs. After checking, assemble the connecting rod, install the bearings in place, tighten the nuts by hand.

The article was checked: Vladimir Romannikov
This article is available at russian, bulgarian, belarusian, ukrainian, serbian, croatian, romanian, polish, slovak, hungarian

Share information:

Previous articles
Tahoe 1: Engine removed
Next articles

Cylinder honing
Cylinder Block — Check
Cylinder Block — Cleaning
Crankshaft — dismantling
Connecting rod and piston group — dismantling
Crankshaft — checking condition
Main and connecting rod bearings — inspection
Engine Overhaul — Assembly Procedure
Piston rings — installation
Crankshaft — installation and checking of clearances in main bearings


See similar articles on the topic of Chevrolet cars:
Checking the technical condition of the front wheel drives Chevrolet Aveo T300 (2012-2018)
Pistons and connecting rods Chevrolet Captiva 1 (2006-2018)
Checking the technical condition of the front suspension parts on the car Chevrolet Cruze 1 (2008-2016)
Checking the condition of wheels and tires Chevrolet Lacetti 1 (2002-2009)
Checking the condition of wheels and tires Chevrolet Lanos T150 (2002-2009)
Checking the technical condition and checking the clutch Chevrolet Niva 1 (2002-2016)
Checking pistons and connecting rods Chevrolet Lumina 1 (1989-1994)
Link in different formats to this page


Visitor comments

No comments yet


How much will 22 + 31 =


Tahoe 2 and 3 (2000-2014) 
  • General information
  • Vehicle characteristics
  • Vehicle device
  • Manual
  • Maintenance
  • Power unit
  • Engine repair
  • Engine overhaul
  • Cooling system
  • Injection and control system
  • Exhaust system
  • Engine electrical equipment
  • Transmission
  • Automatic gearbox 4L60, 4L65, 4L70
  • Automatic gearbox 6L50, 6L80, 6L90
  • Transfer case
  • Drive shafts and cardan
  • Front drive axle
  • Rear drive axle
  • Chassis
  • Car suspension
  • Steering
  • Brake system
  • Body (until 2007)
  • Exterior (external elements)
  • Interior (internal elements)
  • Doors, locks and windows
  • Heating and air conditioning
  • Security System (SRS)
  • Body (since 2007)
  • Exterior (external elements)
  • Doors, locks and windows
  • Interior (internal elements)
  • Electrical equipment
  • Electrical appliances (until 2007)
  • Lighting and lamps (until 2007)
  • Audio system (until 2007)
  • Electrical appliances (since 2007)
  • Lighting and lamps (since 2007)
  • Audio system (since 2007)
  • Wiring diagrams (2000-2005)
  • Wiring diagrams (2005-2007)
  • Wiring diagrams (since 2007)


Tahoe 1 (1992-2000) 
  • General information
  • User manual
  • Maintenance
  • Power unit
  • Engine in a car
  • Engine removed
  • Cooling system
  • Heating and air conditioning
  • Fuel and exhaust systems
  • Decreased toxicity
  • Transmission
  • Manual gearbox
  • Automatic gearbox
  • Transfer case
  • Clutch and drive shafts
  • Chassis
  • Brake system
  • Car suspension
  • Steering
  • Body
  • Repair of body elements
  • Electrical equipment
  • Engine electrics
  • Equipment and devices
  • Electrical circuits


ChevyMan.ru © 2017-2026 · Mobile version · Feedback · Site search · Interesting to read · Sitemap: EN BG BY UA RS HR RO PL SK HU

Aveo 2003-2008 · Aveo 2006-2011 · Aveo 2012-2018 · Captiva 2006-2018 · Cruze 2008-2016 · Lacetti 2002-2009 · Lanos 2002-2009 · Niva 2002-2016 · Tahoe 1992-2000 · Tahoe 2000-2014 · Lumina 1 1989-1994 · Trailblazer 1 2001-2008 · Orlando 1 2010-2018 ·
🛡️ For your security and to improve our service, this site uses cookies. You can disable them in your browser.