
ChevyMan.ru
Mazda Mitsubishi Toyota Land Rover Honda Kia Nissan
English Русский
Български
Беларускі
Український
Српски
Hrvatski
Română
Polski
Slovenský
Magyar
|
Articles | Sitemap | Contacts |


Home   Aveo   Captiva   Cruze   Lacetti   Lanos   Niva   Tahoe   Others  
Tahoe 2 and 3 (2000-2014) Tahoe 1 (1992-2000)
  • Home
  • Tahoe
  • 1 (1992-2000)
  • Power unit
  • Engine removed
  • Connecting rod and piston group — dismantling

Connecting rod and piston group — dismantling (Chevrolet Tahoe 1)

            0

Caution! Before removing the pistons and connecting rods, remove the cylinder head, oil pan and oil pump, following the relevant sections in Chapter 2, Part A.


1. Use your fingernail to check for a ridge formed as a result of wear on the cylinder from the piston ring. The ridge is removed with a reamer (see photo). If this operation is not performed, then when removing the piston with the connecting rod from the cylinder, the piston may break.
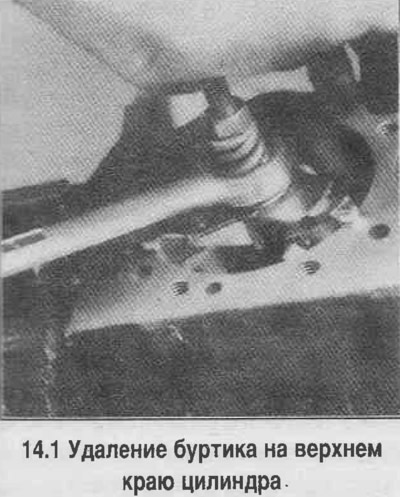
1. Use your fingernail to check for a ridge formed as a result of wear on the cylinder from the…


2. Turn the engine over so that the crankshaft is at the top.

3. Before removing the connecting rods, check their axial play using a set of feeler gauges. Place the feeler gauge between the connecting rod and the crankshaft cheek. By selecting the thickness of the feeler gauges, achieve the disappearance of play (see photo). The axial play will be equal to the total thickness of the feeler gauges, at which the play disappears. If the axial play of the connecting rod exceeds the standard value, then the connecting rod should be replaced. Measure the axial play of the other connecting rods in exactly the same way. If new connecting rods are installed (or crankshaft), then the axial play may be below normal (in this case, it is necessary to grind the connecting rods).
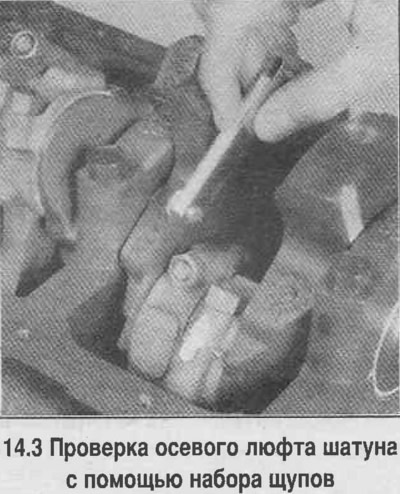


3. Before removing the connecting rods, check their axial play using a set of feeler gauges. Place…


4. Check for marks on the connecting rods and connecting rod caps. If there are no marks, punch them so that the number of punches corresponds to the number of the cylinder in which the connecting rod is installed (see photo).

5. Loosen the nuts by turning them 1/2 turn at a time until the nuts can be turned by hand. Remove the cover from the connecting rod of the first cylinder together with the connecting rod bearing. Do not remove the connecting rod bearing from the cover. Put sections of hose on the connecting rod cover bolts to avoid damaging the crankshaft journal and cylinder walls when removing the connecting rod (see photo). Push the piston assembly with the connecting rod and the upper connecting rod bearing shell out through the top of the cylinder, using the handle of a hammer to support the upper connecting rod shell. If you feel resistance to the piston coming out, check again that the flange at the top of the cylinder has been completely removed.
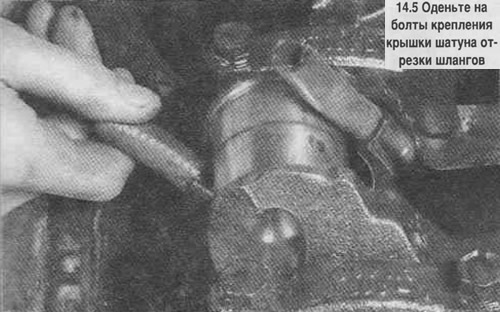
5. Loosen the nuts by turning them 1/2 turn at a time until the nuts can be turned by hand. Remove…


6. Repeat the procedure for all other cylinders. Assemble the connecting rod caps with the connecting rods, tighten the cap bolt nuts by hand. Keep the liners in their previous installation location until assembly.

The article was checked: Vladimir Romannikov
This article is available at russian, bulgarian, belarusian, ukrainian, serbian, croatian, romanian, polish, slovak, hungarian

Share information:

Previous articles
Tahoe 1: Engine removed
Next articles

Cylinder head — assembly
Valve mechanism — maintenance and repair
Cylinder head — cleaning and checking condition
Cylinder head — disassembly
Engine disassembly procedure
Crankshaft — dismantling
Cylinder Block — Cleaning
Cylinder Block — Check
Cylinder honing
Connecting rods and pistons — checking condition


See similar articles on the topic of Chevrolet cars:
Assembly of the cylinder-piston group Chevrolet Aveo T250 (2006-2011)
Connecting rod and piston group components Chevrolet Captiva 1 (2006-2018)
Setting the piston of the first cylinder to the TDC position of the compression stroke Chevrolet Cruze 1 (2008-2016)
Replacing the contact group, immobilizer control unit and ignition switch Chevrolet Lacetti 1 (2002-2009)
Replacing the protective cover and sealing ring of the front wheel brake piston Chevrolet Lanos T150 (2002-2009)
Connecting rod and piston group Chevrolet Niva 1 (2002-2016)
Setting piston N1 to TDC position Chevrolet Lumina 1 (1989-1994)
Link in different formats to this page


Visitor comments

No comments yet


How much will 18 + 13 =


Tahoe 2 and 3 (2000-2014) 
  • General information
  • Vehicle characteristics
  • Vehicle device
  • Manual
  • Maintenance
  • Power unit
  • Engine repair
  • Engine overhaul
  • Cooling system
  • Injection and control system
  • Exhaust system
  • Engine electrical equipment
  • Transmission
  • Automatic gearbox 4L60, 4L65, 4L70
  • Automatic gearbox 6L50, 6L80, 6L90
  • Transfer case
  • Drive shafts and cardan
  • Front drive axle
  • Rear drive axle
  • Chassis
  • Car suspension
  • Steering
  • Brake system
  • Body (until 2007)
  • Exterior (external elements)
  • Interior (internal elements)
  • Doors, locks and windows
  • Heating and air conditioning
  • Security System (SRS)
  • Body (since 2007)
  • Exterior (external elements)
  • Doors, locks and windows
  • Interior (internal elements)
  • Electrical equipment
  • Electrical appliances (until 2007)
  • Lighting and lamps (until 2007)
  • Audio system (until 2007)
  • Electrical appliances (since 2007)
  • Lighting and lamps (since 2007)
  • Audio system (since 2007)
  • Wiring diagrams (2000-2005)
  • Wiring diagrams (2005-2007)
  • Wiring diagrams (since 2007)


Tahoe 1 (1992-2000) 
  • General information
  • User manual
  • Maintenance
  • Power unit
  • Engine in a car
  • Engine removed
  • Cooling system
  • Heating and air conditioning
  • Fuel and exhaust systems
  • Decreased toxicity
  • Transmission
  • Manual gearbox
  • Automatic gearbox
  • Transfer case
  • Clutch and drive shafts
  • Chassis
  • Brake system
  • Car suspension
  • Steering
  • Body
  • Repair of body elements
  • Electrical equipment
  • Engine electrics
  • Equipment and devices
  • Electrical circuits


ChevyMan.ru © 2017-2026 · Mobile version · Feedback · Site search · Interesting to read · Sitemap: EN BG BY UA RS HR RO PL SK HU

Aveo 2003-2008 · Aveo 2006-2011 · Aveo 2012-2018 · Captiva 2006-2018 · Cruze 2008-2016 · Lacetti 2002-2009 · Lanos 2002-2009 · Niva 2002-2016 · Tahoe 1992-2000 · Tahoe 2000-2014 · Lumina 1 1989-1994 · Trailblazer 1 2001-2008 · Orlando 1 2010-2018 ·
🛡️ For your security and to improve our service, this site uses cookies. You can disable them in your browser.