
ChevyMan.ru
Mazda Mitsubishi Toyota Land Rover Honda Kia Nissan
English Русский
Български
Беларускі
Український
Српски
Hrvatski
Română
Polski
Slovenský
Magyar
|
Articles | Sitemap | Contacts |


Home   Aveo   Captiva   Cruze   Lacetti   Lanos   Niva   Tahoe   Others  
Tahoe 2 and 3 (2000-2014) Tahoe 1 (1992-2000)
  • Home
  • Tahoe
  • 1 (1992-2000)
  • Power unit
  • Engine removed
  • Cylinder head — assembly

Cylinder head — assembly (Chevrolet Tahoe 1)

            0

1. Before starting assembly, it is necessary to make sure that the cylinder head and its parts are clean, regardless of whether this part was repaired in a car service workshop or not.

2. If the cylinder head was submitted to a workshop for valve repair, the valves will already be installed in place, complete with all the parts.

3. Lubricate the valve stem with engine oil or moly grease and install the first valve, starting from either end on the cylinder head.

4. Three different types of caps are used on the engines in question, depending on the year of manufacture, displacement and power. As a rule, ring caps are installed, which are put on the guide sleeve. Flat seals are also used, which are inserted into the groove on the valve stem directly under the groove for crackers. Some engines are equipped with umbrella caps. Most often, umbrella caps are installed together with flat seals. Install the oil scraper cap on the valve guide sleeve (see photo).
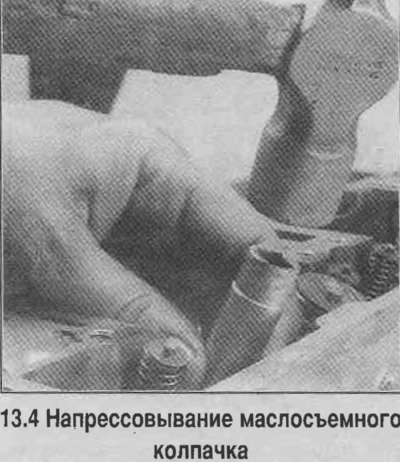
4. Three different types of caps are used on the engines in question, depending on the year of…


5. Install the spring support washer (or a pack of washers), install the spring (or both springs) valves, oil deflector, plate (or valve rotator) (see photo).
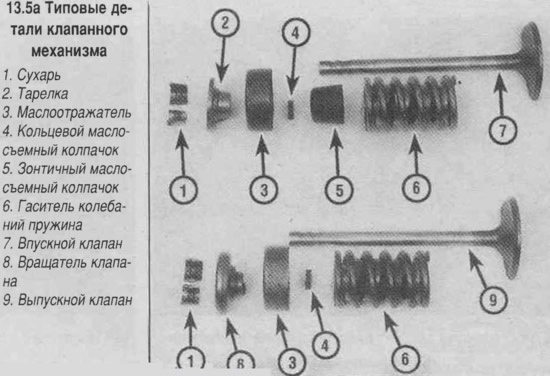
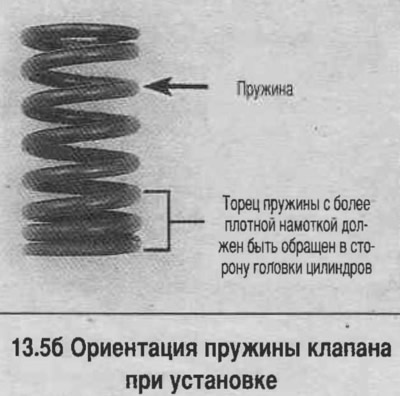

5. Install the spring support washer (or a pack of washers), install the spring (or both springs)…


5. Install the spring support washer (or a pack of washers), install the spring (or both springs)…


6. Compress the valve spring with the tool and install the crackers into the groove on the valve stem. If the valve stem is sealed with an O-ring, carefully install it into the lower groove on the valve stem, avoiding twisting. Carefully release the spring, making sure that the crackers enter the upper groove of the valve stem. If necessary, lubricate the crackers with grease before releasing the valve spring to temporarily secure them to the valve stem (see photo).
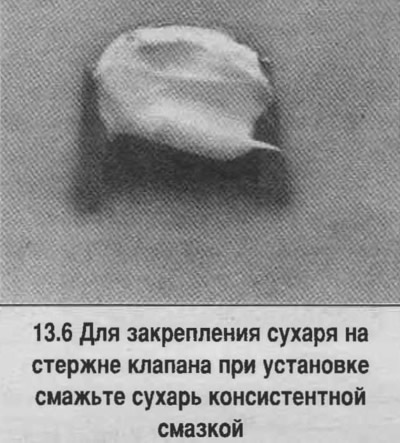
6. Compress the valve spring with the tool and install the crackers into the groove on the valve…


7. Repeat all steps for the remaining valves. Make sure that the entire set of valve parts is installed in the same place. After assembly, check the tightness of the sealing rings. To do this, put the vacuum pump adapter on the valve plate or rotating device and create a vacuum (see photo). If a vacuum cannot be created, the seal is not airtight and should be replaced before installing the head on the engine.
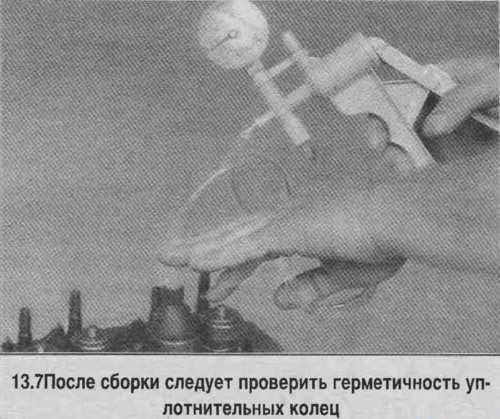


7. Repeat all steps for the remaining valves. Make sure that the entire set of valve parts is…


8. Check the height of the spring in the loaded state using a ruler, a caliper with a depth gauge, or an indicator head (look at the photo). The spring length is measured from the spring support washer, or adjusting washer, to the top of the oil deflector (or the base of the plate or rotating device). If the height is greater than that specified in the Technical Data, add adjusting washers to the package under the springs.
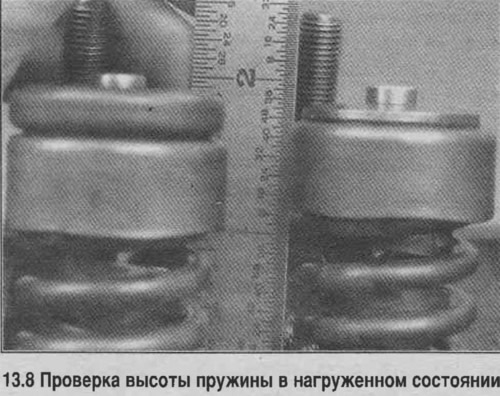
8. Check the height of the spring in the loaded state using a ruler, a caliper with a depth gauge,…


Attention! It is strictly forbidden to reduce the length of the spring under load against the standard.


9. Lubricate the rocker arms and ball joints with molybdenum grease and install the rocker arm in place. Tighten the rocker arm nuts 3-4 turns.

[The article was reprinted from the website «CHEVYMAN.RU»]

The article was checked: Vladimir Romannikov
This article is available at russian, bulgarian, belarusian, ukrainian, serbian, croatian, romanian, polish, slovak, hungarian

Share information:

Previous articles
Tahoe 1: Engine removed
Next articles

Valve mechanism — maintenance and repair
Cylinder head — cleaning and checking condition
Cylinder head — disassembly
Engine disassembly procedure
Engine Overhaul — Alternatives
Connecting rod and piston group — dismantling
Crankshaft — dismantling
Cylinder Block — Cleaning
Cylinder Block — Check
Cylinder honing


See similar articles on the topic of Chevrolet cars:
Replacing the cylinder head cover gasket Chevrolet Aveo T300 (2012-2018)
Cylinder head cover Chevrolet Captiva 1 (2006-2018)
Replacing the cylinder head gasket Chevrolet Cruze 1 (2008-2016)
Replacing the cylinder head cover gasket Chevrolet Lacetti 1 (2002-2009)
Replacing the cylinder head cover gasket Chevrolet Lanos T150 (2002-2009)
Cylinder head and valve mechanism Chevrolet Niva 1 (2002-2016)
Removal and installation the cylinder head Chevrolet Lumina 1 (1989-1994)
Link in different formats to this page


Visitor comments

No comments yet


How much will 48 + 44 =


Tahoe 2 and 3 (2000-2014) 
  • General information
  • Vehicle characteristics
  • Vehicle device
  • Manual
  • Maintenance
  • Power unit
  • Engine repair
  • Engine overhaul
  • Cooling system
  • Injection and control system
  • Exhaust system
  • Engine electrical equipment
  • Transmission
  • Automatic gearbox 4L60, 4L65, 4L70
  • Automatic gearbox 6L50, 6L80, 6L90
  • Transfer case
  • Drive shafts and cardan
  • Front drive axle
  • Rear drive axle
  • Chassis
  • Car suspension
  • Steering
  • Brake system
  • Body (until 2007)
  • Exterior (external elements)
  • Interior (internal elements)
  • Doors, locks and windows
  • Heating and air conditioning
  • Security System (SRS)
  • Body (since 2007)
  • Exterior (external elements)
  • Doors, locks and windows
  • Interior (internal elements)
  • Electrical equipment
  • Electrical appliances (until 2007)
  • Lighting and lamps (until 2007)
  • Audio system (until 2007)
  • Electrical appliances (since 2007)
  • Lighting and lamps (since 2007)
  • Audio system (since 2007)
  • Wiring diagrams (2000-2005)
  • Wiring diagrams (2005-2007)
  • Wiring diagrams (since 2007)


Tahoe 1 (1992-2000) 
  • General information
  • User manual
  • Maintenance
  • Power unit
  • Engine in a car
  • Engine removed
  • Cooling system
  • Heating and air conditioning
  • Fuel and exhaust systems
  • Decreased toxicity
  • Transmission
  • Manual gearbox
  • Automatic gearbox
  • Transfer case
  • Clutch and drive shafts
  • Chassis
  • Brake system
  • Car suspension
  • Steering
  • Body
  • Repair of body elements
  • Electrical equipment
  • Engine electrics
  • Equipment and devices
  • Electrical circuits


ChevyMan.ru © 2017-2026 · Mobile version · Feedback · Site search · Interesting to read · Sitemap: EN BG BY UA RS HR RO PL SK HU

Aveo 2003-2008 · Aveo 2006-2011 · Aveo 2012-2018 · Captiva 2006-2018 · Cruze 2008-2016 · Lacetti 2002-2009 · Lanos 2002-2009 · Niva 2002-2016 · Tahoe 1992-2000 · Tahoe 2000-2014 · Lumina 1 1989-1994 · Trailblazer 1 2001-2008 · Orlando 1 2010-2018 ·
🛡️ For your security and to improve our service, this site uses cookies. You can disable them in your browser.