
Checking the clearance in the main bearings
Attention! Do not touch the liners with your fingers, as this may cause premature corrosion.
2. Clean the outer surface of the new main bearings with oil grooves, and carefully insert them into the cylinder block beds (grooved liners are placed in the cylinder block, the lubrication holes in the bearing liners must be aligned with the holes in the cylinder block). Do not lubricate the bearings.
3. Insert the thrust bearings into the cover and into the groove of the cylinder block bed of the extreme rear journal of the crankshaft.
4. Wipe the surface of the earbuds with a clean, lint-free cloth.
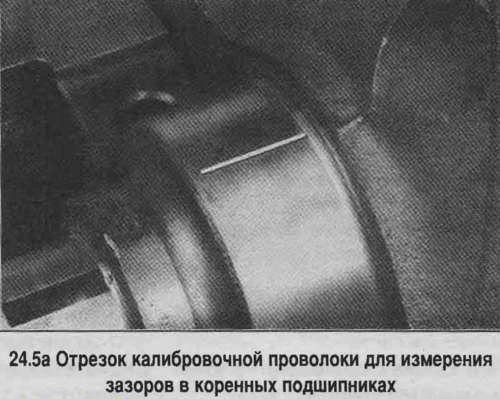
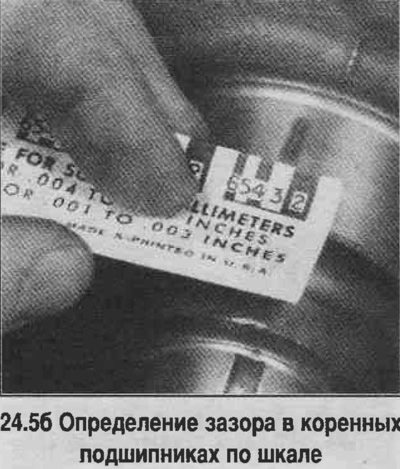
5. Install the crankshaft in place and measure the clearances in the main journals. To do this, place a piece of plastic calibration wire on each main journal of the crankshaft parallel to its axis (see photo). Clean the surfaces of the liners in the caps, install the caps and tighten the bolts evenly in three stages to the specified torque. Loosen the bolts and carefully lift the caps, compare the thickness of each of the crushed wires with the scale on the package and determine the gap size (see photo).
6. If the clearance is not within the norm, the reason may be the incorrect selection of the size group of liners. Make sure that there is no dirt or oil between the bearings and the surfaces of the covers during measurements (please note that oil dissolves wire!). If the width of the crushed wire at the ends differs greatly, then the crankshaft main journal is tapered.
Final installation of the crankshaft
7. Remove any remaining wire from the journals and remove the crankshaft.
8. Lubricate the main journals and thrust surfaces of the crankshaft with molybdenum grease. Install the crankshaft in the cylinder block. Lubricate the liners in the caps and install the caps with the liners in their original places so that the arrows are facing the front of the engine. Also lubricate the thrust surface of the rear main bearing.
9. On a 7.4L engine before 1990, install the rear oil seal halves into the block bed and the rear main bearing cap.
10. Tighten the bolts of all covers except the rear cover evenly in 3 stages. Start tightening with the central bolts and move towards the periphery. Tighten the rear cover bolts to a torque of 12-14 N·m. Using light blows of a hammer with a lead or copper striker on the end of the crankshaft in both directions, move the crankshaft so that the thrust surfaces of the main bearings and the crankshaft are aligned. Loosen the cover bolts and tighten again to the specified torque in 3 stages, in the same order as during the first tightening. If 4 bolts are provided for fastening the covers, first tighten the inner bolts, and then the outer ones.
11. On models with manual transmission, install the guide bearing into the end of the crankshaft.
12. Turn the crankshaft a few revolutions - the crankshaft should rotate freely, without jamming.
13. Check the crankshaft axial clearance (see above). If the crankshaft thrust surfaces are not worn and new bearings are installed, then the clearance should be within the norm.
14. On V6, V8 5.0 and 5.7 liter engines, and 7.4 liter engines since 1991, install the rear crankshaft oil seal.
The article was borrowed from the website «ChevyMan»