
ChevyMan.ru
Mazda Mitsubishi Toyota Land Rover Honda Kia Nissan
English Русский
Български
Беларускі
Український
Српски
Hrvatski
Română
Polski
Slovenský
Magyar
|
Articles | Sitemap | Contacts |


Home   Aveo   Captiva   Cruze   Lacetti   Lanos   Niva   Tahoe   Others  
Orlando 1 (2010-2018) Trailblazer 1 (2001-2008, petrol) Lumina 1 (1989-1994)
  • Home
  • Chevrolet
  • Lumina 1
  • Power unit
  • Engine overhaul
  • Installation of camshaft and balance shaft

Installation of camshaft and balance shaft (Chevrolet Lumina 1)

            0

Contents: Camshaft ↧ Balance shaft ↧

Camshaft


1. Lubricate the bearing journals and camshaft lobes with molybdenum-based grease or a special grease for camshaft parts (see illustration).
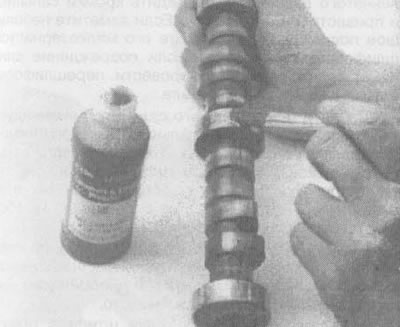
24.1. Be sure to apply lubricant to the journals and camshaft lobes before installing it

24.1. Be sure to apply lubricant to the journals and camshaft lobes before installing it


2. Insert the camshaft into the engine. Support the eccentric next to the block and be careful not to scratch or nick the bearings. Insert the thrust plate and tighten to the torque specified in the specifications in section 2.1.

3. Complete the installation of the timing chain and sprockets (3.1L engine: see part 2.1, section 14; 3.8L engine: see part 2.2, section 16).

Balance shaft


4. If the balance shaft synchronization was disturbed during engine repair, turn the camshaft so that (the camshaft sprocket is temporarily installed in its place), so that the mark is pointing straight down.

5. With the camshaft sprocket and gear removed, rotate the balance shaft so that the mark on the gear points straight down.

6. Align the marks on the balance shaft gear and the camshaft gear (see illustration), rotating the balance shaft.
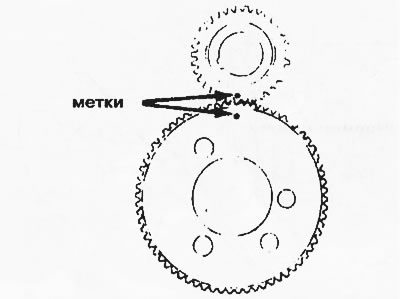


24.6. Align the marks on the gears as shown in the figure

24.6. Align the marks on the gears as shown in the figure


7. Install the timing chain and sprockets (3.1L engine: see part 2.1, section 14; 3.8L engine; see part 2.2, section 16).

(The article was borrowed from the website CHEVYMAN.RU)

The article was checked: Vladimir Romannikov
This article is available at russian, bulgarian, belarusian, ukrainian, serbian, croatian, romanian, polish, slovak, hungarian

Share information:

Previous articles
Lumina 1: Engine overhaul
Next articles

Installing the crankshaft and checking the crankshaft main bearing clearance
Installing piston rings
Engine Overhaul — Assembly Sequence
Checking main bearings and upper connecting rod bearings
Checking the crankshaft
Replacing the rear crankshaft oil seal
Installing and checking oil clearances of the lower connecting rod head liners
Removal and installation the flywheel
Initial start-up and running-in after major repairs


See similar articles on the topic of Chevrolet cars:
Replacing camshaft seals Chevrolet Aveo T300 (2012-2018)
Camshaft Position (CMP) Sensor Chevrolet Captiva 1 (2006-2018)
Replacing camshaft seals Chevrolet Cruze 1 (2008-2016)
Replacing the camshaft seal Chevrolet Lacetti 1 (2002-2009)
Replacing the camshaft seal Chevrolet Lanos T150 (2002-2009)
Camshaft and its drive Chevrolet Niva 1 (2002-2016)
Balance shaft — removal and installation (V6 engines since 1994) Chevrolet Tahoe 1 (1992-2000)
Link in different formats to this page


Visitor comments

No comments yet


How much will 45 + 32 =


Orlando 1 (2010-2018) 
  • General information
  • Introduction to manual
  • User manual
  • Maintenance
  • Troubleshooting
  • Power unit
  • Engine repair
  • Fuel and control system
  • Cooling and lubrication system
  • Ignition system
  • Transmission
  • Clutch
  • Gearbox
  • Drive shafts
  • Chassis
  • Car suspension
  • Steering
  • Brake system
  • Body
  • Exterior (external elements)
  • Doors, locks and windows
  • Electrical equipment
  • Equipment and devices
  • Windscreen wipers
  • Power devices
  • Electrical diagrams


Trailblazer 1 (2001-2008) 
  • General information
  • User manual
  • Troubleshooting
  • Maintenance
  • Power unit
  • Engine in a car
  • Engine overhaul
  • Cooling and heating
  • Fuel and exhaust system
  • Engine electrical equipment
  • Engine control
  • Transmission
  • Automatic gearbox
  • Transfer case
  • Drive shafts and cardan
  • Chassis
  • Brake system
  • Car suspension
  • Steering
  • Body
  • Exterior (external elements)
  • Interior (internal elements)
  • Doors, locks and windows
  • Electrical equipment
  • Equipment and devices
  • Electrical circuits


Lumina 1 (1989-1994) 
  • General information
  • Maintenance
  • Power unit
  • Engine 3.1L V6
  • Engine 3.8L V6
  • Engine overhaul
  • Cooling system
  • Power and exhaust system
  • Fuel injection
  • Engine electrical equipment
  • Reduced exhaust gas toxicity
  • Transmission
  • Automatic gearbox
  • Drive shafts
  • Chassis
  • Brake system
  • Car suspension
  • Steering
  • Body
  • Heating and air conditioning
  • Repair of body elements
  • Doors, covers and windows
  • Interior (internal elements)
  • Electrical equipment
  • Equipment and devices
  • Electrical circuits


ChevyMan.ru © 2017-2026 · Mobile version · Feedback · Site search · Interesting to read · Sitemap: EN BG BY UA RS HR RO PL SK HU

Aveo 2003-2008 · Aveo 2006-2011 · Aveo 2012-2018 · Captiva 2006-2018 · Cruze 2008-2016 · Lacetti 2002-2009 · Lanos 2002-2009 · Niva 2002-2016 · Tahoe 1992-2000 · Tahoe 2000-2014 · Lumina 1 1989-1994 · Trailblazer 1 2001-2008 · Orlando 1 2010-2018 ·
🛡️ For your security and to improve our service, this site uses cookies. You can disable them in your browser.