
ChevyMan.ru
Mazda Mitsubishi Toyota Land Rover Honda Kia Nissan
English Русский
Български
Беларускі
Український
Српски
Hrvatski
Română
Polski
Slovenský
Magyar
|
Articles | Sitemap | Contacts |


Home   Aveo   Captiva   Cruze   Lacetti   Lanos   Niva   Tahoe   Others  
Orlando 1 (2010-2018) Trailblazer 1 (2001-2008, petrol) Lumina 1 (1989-1994)
  • Home
  • Chevrolet
  • Lumina 1
  • Power unit
  • Engine 3.8L V6
  • Removal and installation the camshaft drive chain and sprockets

Removal and installation the camshaft drive chain and sprockets (Chevrolet Lumina 1)

            0

Contents: Removal ↧ Installation ↧

Removal


1. Remove the camshaft timing chain cover (see section 13), then remove the washer from the nose of the crankshaft (see illustration).
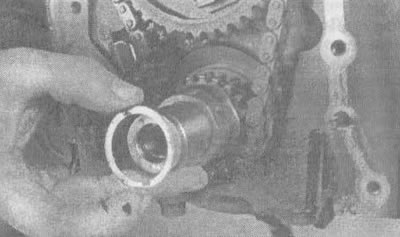
16.1 The washer has a cutout for the crankshaft key

16.1 The washer has a cutout for the crankshaft key


2. The timing chain must be replaced with a new one if the total free play between the sprockets exceeds one inch. Failure to replace a worn chain in a timely manner may result in engine malfunction, loss of power and increased fuel consumption. A loose chain can slip off the sprockets. In the worst case, a chain jumping or breaking can cause serious damage to the engine.

3. Temporarily tighten the anti-vibration mounting bolt into the crankshaft and turn the crankshaft clockwise so that the marks on the crankshaft and camshaft sprockets line up exactly opposite each other (see illustration).
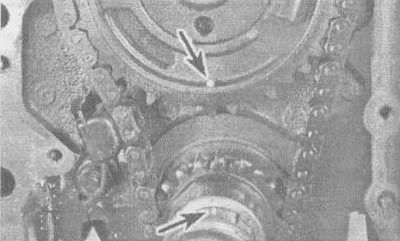
16.3. Ignition timing marks (shown by arrows) on the crankshaft and camshaft sprockets must be…

16.3. Ignition timing marks (shown by arrows) on the crankshaft and camshaft sprockets must be aligned as shown in the photograph. The mark on the camshaft sprocket is a recess, and the mark on the crankshaft sprocket is a raised dot


4. Remove the timing chain tensioner.
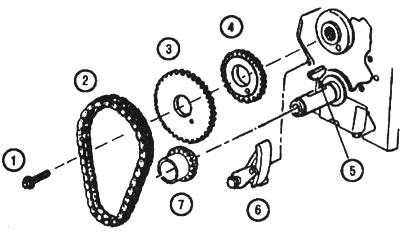
16.4. Timing chain and related components: 1 - camshaft sprocket bolt, 2 - timing chain, 3 -…

16.4. Timing chain and related components: 1 - camshaft sprocket bolt, 2 - timing chain, 3 - camshaft sprocket, 4 - camshaft gear, 5 - key, 6 - damper, 7 - crankshaft sprocket


5. Loosen the camshaft sprocket mounting bolt (see illustration). When performing this operation, do not allow the camshaft to turn (if this happens, align the ignition marks again and only then unscrew the bolts).
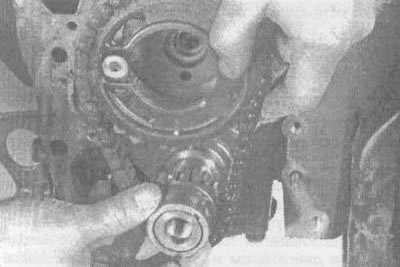
16.6. Move the chain and sprockets as an assembly

16.6. Move the chain and sprockets as an assembly


6. Another way to do it is to pull the camshaft sprocket forward and then the crankshaft sprocket forward and remove the sprockets and chain assembly.

7. Clean the timing chain components with solvent and dry them with compressed air if possible.


Attention! Don't forget to protect your eyes.


8. Remove the camshaft gear.

9. Check the parts for cracks and signs of wear. Check to see if there are any damaged, chipped or worn teeth.

Installation


Note: If the crankshaft position has been changed, temporarily install the sprocket and rotate the crankshaft until the mark on the crankshaft sprocket is directly at the top. If the camshaft position has been changed, temporarily install the sprocket and turn the camshaft until the ignition timing mark is at the bottom, opposite the mark on the crankshaft sprocket (see illustration 16.3).


10. Assemble the timing chain on the sprockets, then place the sprockets with the chain on the shafts so that the ignition marks are aligned (see illustration 16.3). Don't forget to install the camshaft gear. The alignment of the camshaft gear with the balance shaft gear is described in Chapter 2, part 2.3, Section 24).

11. Insert the camshaft sprocket bolt and tighten it to the specified torque.

12. Install the timing chain tensioner.

13. Lubricate the chain and camshaft sprocket with clean engine oil and reinstall the chain cover (see section 13).

[The text of the article was obtained from the website: chevyman.ru]

The article was checked: Vladimir Romannikov
This article is available at russian, bulgarian, belarusian, ukrainian, serbian, croatian, romanian, polish, slovak, hungarian

Share information:

Previous articles
Lumina 1: Engine 3.8L V6
Next articles

Removal and installation the oil pump
Removal and installation the oil filter flange and pressure regulator valve
Removal and installation the timing chain cover
Replacing the front crankshaft oil seal
Removal and installation the anti-vibrator
Removal and installation the oil pan
Removal and installation the oil pump inlet pipe and oil intake
Checking and replacing engine mounts


See similar articles on the topic of Chevrolet cars:
Replacement of auxiliary drive belts Chevrolet Aveo T300 (2012-2018)
Camshaft Drive Chain Components Chevrolet Captiva 1 (2006-2018)
Checking the accessory drive belt Chevrolet Cruze 1 (2008-2016)
Replacement of auxiliary drive belt Chevrolet Lacetti 1 (2002-2009)
Replacing the alternator drive belt Chevrolet Lanos T150 (2002-2009)
Camshaft and its drive Chevrolet Niva 1 (2002-2016)
Timing Gear Cover, Chain and Sprockets — Removal and Installation Chevrolet Tahoe 1 (1992-2000)
Link in different formats to this page


Visitor comments

No comments yet


How much will 25 + 24 =


Orlando 1 (2010-2018) 
  • General information
  • Introduction to manual
  • User manual
  • Maintenance
  • Troubleshooting
  • Power unit
  • Engine repair
  • Fuel and control system
  • Cooling and lubrication system
  • Ignition system
  • Transmission
  • Clutch
  • Gearbox
  • Drive shafts
  • Chassis
  • Car suspension
  • Steering
  • Brake system
  • Body
  • Exterior (external elements)
  • Doors, locks and windows
  • Electrical equipment
  • Equipment and devices
  • Windscreen wipers
  • Power devices
  • Electrical diagrams


Trailblazer 1 (2001-2008) 
  • General information
  • User manual
  • Troubleshooting
  • Maintenance
  • Power unit
  • Engine in a car
  • Engine overhaul
  • Cooling and heating
  • Fuel and exhaust system
  • Engine electrical equipment
  • Engine control
  • Transmission
  • Automatic gearbox
  • Transfer case
  • Drive shafts and cardan
  • Chassis
  • Brake system
  • Car suspension
  • Steering
  • Body
  • Exterior (external elements)
  • Interior (internal elements)
  • Doors, locks and windows
  • Electrical equipment
  • Equipment and devices
  • Electrical circuits


Lumina 1 (1989-1994) 
  • General information
  • Maintenance
  • Power unit
  • Engine 3.1L V6
  • Engine 3.8L V6
  • Engine overhaul
  • Cooling system
  • Power and exhaust system
  • Fuel injection
  • Engine electrical equipment
  • Reduced exhaust gas toxicity
  • Transmission
  • Automatic gearbox
  • Drive shafts
  • Chassis
  • Brake system
  • Car suspension
  • Steering
  • Body
  • Heating and air conditioning
  • Repair of body elements
  • Doors, covers and windows
  • Interior (internal elements)
  • Electrical equipment
  • Equipment and devices
  • Electrical circuits


ChevyMan.ru © 2017-2026 · Mobile version · Feedback · Site search · Interesting to read · Sitemap: EN BG BY UA RS HR RO PL SK HU

Aveo 2003-2008 · Aveo 2006-2011 · Aveo 2012-2018 · Captiva 2006-2018 · Cruze 2008-2016 · Lacetti 2002-2009 · Lanos 2002-2009 · Niva 2002-2016 · Tahoe 1992-2000 · Tahoe 2000-2014 · Lumina 1 1989-1994 · Trailblazer 1 2001-2008 · Orlando 1 2010-2018 ·
🛡️ For your security and to improve our service, this site uses cookies. You can disable them in your browser.