
Note: This procedure requires a special tool. Before you start working, please read the entire section to the end.
1. Disconnect the cable from the negative terminal of the battery.
2. Set the vehicle's parking brake and move the automatic transmission lever to the Park position. Raise the vehicle and support it securely on stands. Remove the mudguard from the right inner fender.
3. Drain the oil and coolant (see chapter 1, sections 12 and 29). Remove the coolant hoses from the timing cover.
4. Remove the right engine mount (from the passenger side) (see section 19).
5. Remove the poly V-belt (see chapter 1, section 21).
6. Remove the anti-vibrator (see section 11) and the sensor shield.
7. Disconnect the connectors from the oil pressure, camshaft and crankshaft sensors.
8. Loosen the oil pan mounting bolts (see section 17).
9. Loosen the timing cover mounting bolts (see illustration). Note that two of these bolts also secure the crankshaft position sensor. By unscrewing these bolts, the sensor will be removed.
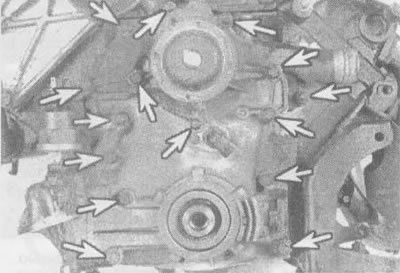
13.9. Location of timing cover bolts (indicated by arrows)
10. Remove the cover.
11. Using a special scraper, remove any remaining old gasket and sealant from the mating surfaces of the cover and cylinder block (see illustration). The lid is made of aluminum, so be careful not to dent it. Clean the gasket sealing surfaces with lacquer thinner or acetone.
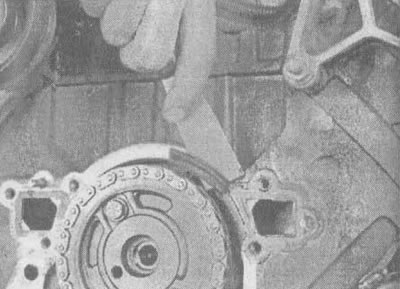
13.11 Remove all remnants of the old gasket material
12. Before installing the cover back, remove the oil pump cover and place technical petroleum jelly into the cavity.
13. After applying a thin coat of room temperature curing (RTV) sealant to both sides of the new gasket, install it onto the cylinder block (the gasket should be held in place by dowel pins). Attach the cover to the engine. The oil pump drive must engage with the crankshaft.
₂ sealant (or similar) on the bolt threads, insert the bolts and tighten them by hand. Install the crankshaft position sensor, but leave them tightened by hand until step 16. Install the remaining bolts in a diagonal sequence and tighten them in three stages to the torque specified in the specifications given in this chapter to avoid distortion of the cover.
15. To position the crankshaft position sensor on the timing cover, use the special General Motors tool N J-37087 (or its equivalent). Tighten the bolts to the torque specified in the technical data given at the beginning of the chapter.
16. The remaining parts are installed in the reverse order.
17. Fill the engine with coolant and oil, start the engine and check for leaks.
(The original material is located on the website: ChevyMan.ru)