


Attention! Since 1995, a single-use plastic front cover has been installed on V6 and V8 5.0 and 5.7 liter engines. The cover must be replaced after removal to prevent oil leakage. Since 1996, the front cover gasket and the cover itself on V8 7.4 liter engines are reusable. The gasket on these engines is replaced only if damage is detected.
1. Remove the coolant pump.
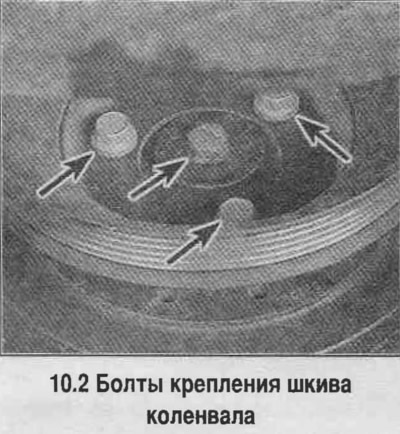
2. Unscrew the bolts (see photo) and remove the drive belt pulley.
3. Set the piston of the 1st cylinder to TDC of the compression stroke. Then turn the crankshaft by 1 revolution.
Caution: After this procedure, do not rotate the crankshaft until all drive sprockets are installed in place.
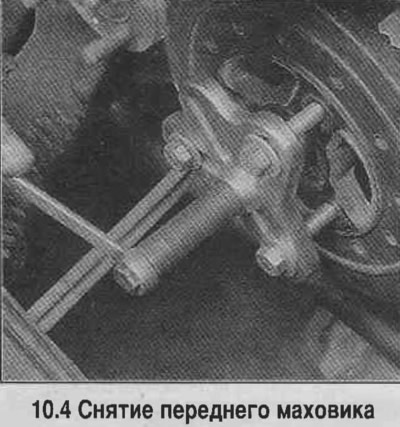
4. Loosen the front flywheel mounting bolt and press the front flywheel off the crankshaft nose using a screw puller (see photo).
5. On most 5.0L and 5.7L V6 and V8 engines, the timing belt cover is removed only after the oil pan has been separated. The oil pan bolts should be loosened and the pan lowered slightly. If the pan, removed in this manner, remains unfastened for a long time, the gasket will lose its elasticity. In this case, the pan should be removed and the gasket replaced.
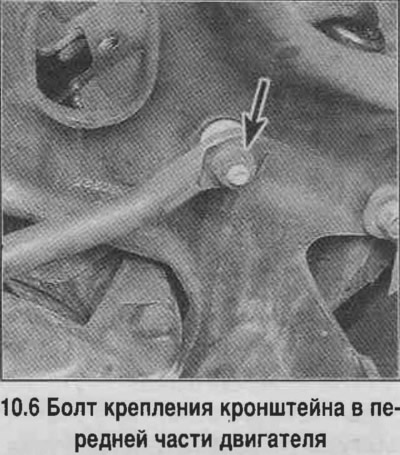
6. To access the timing chain cover, remove the power steering pump, alternator and air conditioning compressor. Do not disconnect the hoses/wires, move the units to the side and secure them. The removal procedure is discussed in Chapter 3, 5 and 10. Remove the support bracket at the front of the engine (see photo).
7. Unscrew the bolts and remove the timing chain cover from the cylinder block. If the cover is stuck and cannot be removed, open the seal with a blunt knife or spatula.
Attention! On some engines the adjustment scale is secured with cover bolts. Pay attention to the orientation of the scale and set it in its original position during assembly.
8. On 7.4L engines, push the cover forward and cut the front of the oil pan gasket on both sides, then remove the cover.
9. On 1995 and later models, remove the crankshaft position sensor ring.
Attention! On 7.4 engines, a special puller is required to remove the ring; the removed ring is replaced with a new one.
10. Check the timing chain deflection. If the deflection exceeds 15.5 mm, replace the chain and sprockets.
11. On all engines except V6 engines since 1994, remove three bolts, or two bolts and a nut (on 4.3L V6 models since 1994) camshaft sprocket fasteners and remove the camshaft sprocket together with the chain.
Caution! On 4.3L V6 engines since 1994, the leading gear of the balance shaft drive remains on the camshaft, and the driven gear also remains on the balance shaft. The crankshaft sprocket can be pressed off with a puller. If traces of oil leakage are found on the oil seal in the timing chain cover, replace the oil seal.
12. Clean the cover and the area where the cover fits on the cylinder block.
13. Check the condition of the flange part of the cover, especially around the bolt holes, where there may be bent areas. If necessary, straighten the flange of the cover on a wooden board.
14. If new parts are being installed, make sure that the keyway in the sprocket is aligned with the crankshaft key.
Attention! The timing chain is changed together with the crankshaft and camshaft sprockets. The sprocket is pressed onto the crankshaft nose by tightening the front flywheel bolt or by hammering through a soft spacer. Do not press the sprocket if you feel resistance (for example, in case of distortion).
15. Place the chain on the camshaft sprocket, then turn the sprocket so that the timing mark is exactly at 6 o'clock (see photo). Engage the chain with the crankshaft sprocket and install the sprocket on the camshaft. If necessary, turn the camshaft so that the pin enters the sprocket hole and the timing mark points to 6 o'clock.
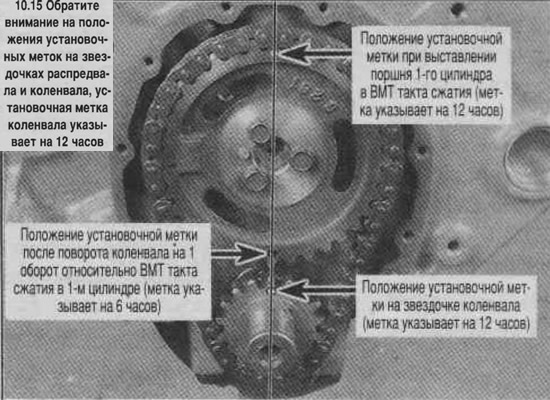
Caution: When installing the chain and sprocket, the piston of the 4th cylinder on a V6 engine, or the piston of the 6th cylinder on a V8 engine, must be at TDC of the compression stroke.
16. Lubricate the threads of the camshaft sprocket with a locking compound, tighten the bolts to the specified torque. Lubricate the chain with clean engine oil.
17. Apply RTV sealant to the U-shaped channel at the bottom of the timing chain cover.
18. On 7.4L V8 engines, cut tabs from a new oil pan gasket and seal them to the lower split surface of the cover. Apply a 3mm bead of RTV sealant to the joint between the pan and the cylinder block on both sides.
19. On V6 and V8 5.0 and 5.7 liter engines, a one-piece oil pan gasket is used to seal the joint between the cover and the engine. The condition of the gasket should be checked. If cracks or deformations are detected, replace the gasket.
20. Apply a thin coat of RTV sealant to both sides of the new cover gasket and install the gasket in place on the cylinder block. The gasket should be held in place by the pins and sealant.
21. Install the timing chain cover on the cylinder block, tighten the pan bolts.
22. If the oil pan was removed on a V6 engine, or 5.0L or 5.7L V8 engines, reinstall it. If the oil pan bolts were loosened, tighten the bolts after lifting the oil pan and resting it against the timing chain cover.
23. Tighten the timing chain cover bolts to the specified torque.
24. Lubricate the working lips of the front flywheel seal with molybdenum grease or clean engine oil and install the flywheel in place, aligning the groove with the key.
If the front flywheel does not fit onto the crankshaft by hand, press it on by tightening the flywheel mounting bolt through a washer of a sufficiently large diameter. Then remove the washer and tighten the bolt to the specified torque.
25. Then assembly is carried out in reverse order.