
Contents: Removal ↧ Installation ↧
Removal
1. Disconnect the cable from the negative terminal of the battery.
2. Loosen, without completely unscrewing, the coolant pump pulley mounting bolts, then remove the poly V-belt (see chapter 1, section 21).
3. Remove the coolant pump (see chapter 3, section 8).
4. Remove the anti-vibrator (see section 11).
5. After unscrewing the bolts, remove the poly V-belt tensioner (see illustration).
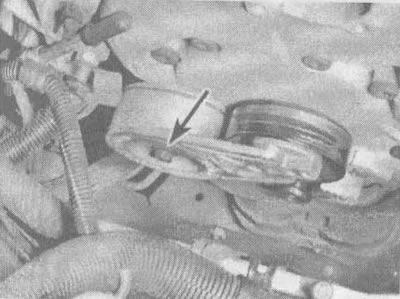
13.5. The tensioner mechanism of the poly V-belt is attached to the timing chain cover with a bolt (shown by arrow)
6. Drain the coolant and oil from the engine (see chapter 1, sections 29 and 12).
7. Remove the generator together with the mounting bracket (see illustrations 4.16a and 4.16b).
8. After unscrewing the power steering pump mounting bolts, move it to the side and tie it up (see chapter 10, section 19). Do not disconnect the hoses from the pump.
9. After unscrewing the bolts, remove the flywheel cover.
10. Remove the starter (see chapter 5, section 16).
11. Remove the oil pan (see section 15).
12. Disconnect the hoses coming from the radiator from the coolant pump (see illustration).
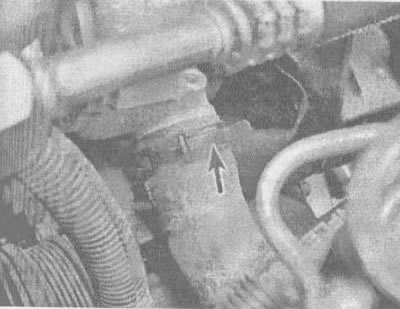
13.12. Loosen the clamp shown by the arrow and disconnect the radiator hose from the coolant pump pipe
13. Loosen the bolts securing the timing chain cover to the engine (see illustration). Please note that some of these bolts have T-40 and T-50 Torx heads.
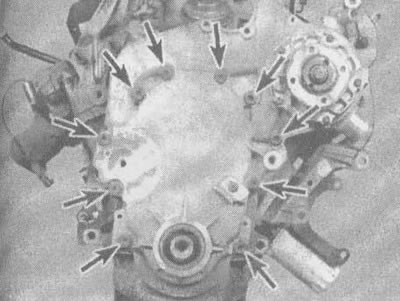
13.13. Timing chain cover bolt installation locations (shown by arrows)
14. Separate the cover from the engine. If the lid is stuck, tap it with a soft-faced hammer. Do not attempt to remove it using a lever.
15. Using a special scraper, remove any remaining old gasket and sealant material from the mating surfaces of the cover and cylinder block. The lid is made of aluminum, so be careful not to dent it. Clean the gasket sealing surfaces with lacquer cleaner or acetone.
Installation
16. After applying a thin coat of room temperature vulcanizing (RTV) sealant to both sides of the new gasket, install it onto the cylinder block (the gasket should be held in place by dowel pins). Install the cover and tighten its mounting bolts (see illustration).
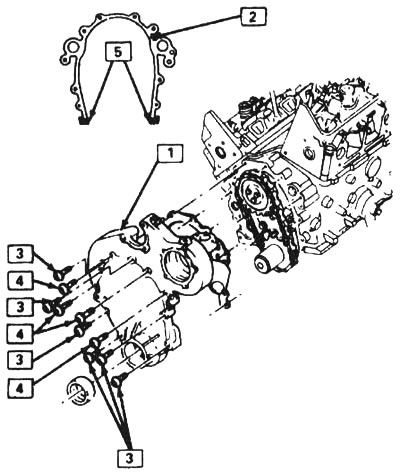
13.16. Gas distribution mechanism drive chain cover: 1 - timing chain cover, 2 - gasket, 3 - 6mm bolt, 4 - 8mm bolt, 5 - apply a drop of sealant to these areas
17. Apply a layer of sealant to the bottom of the gasket (see illustration 13.16). Tighten the bolts in a crisscross pattern in three stages to the torque specified in the specifications given in this chapter.
18. The remaining parts are installed in the reverse order.
19. Fill the engine with coolant and oil, turn on the ignition and check for leaks.
The original article is on the website «chevyman»