
ChevyMan.ru
Mazda Mitsubishi Toyota Land Rover Honda Kia Nissan
English Русский
Български
Беларускі
Український
Српски
Hrvatski
Română
Polski
Slovenský
Magyar
|
Articles | Sitemap | Contacts |


Home   Aveo   Captiva   Cruze   Lacetti   Lanos   Niva   Tahoe   Others  
Orlando 1 (2010-2018) Trailblazer 1 (2001-2008, petrol) Lumina 1 (1989-1994)
  • Home
  • Chevrolet
  • Lumina 1
  • Power unit
  • Engine 3.1L V6
  • Checking and replacing the engine mount

Checking and replacing the engine mount (Chevrolet Lumina 1)

            0

Contents: Examination ↧ Replacement ↧
Attention! When performing the procedures discussed below, it is recommended to use appropriate techniques and devices. Be careful not to get under the engine when it is raised on the jack. Jack failure can result in serious injury or even death.


1. Engine mounts are generally maintenance-free, but if they become damaged or broken, they must be replaced immediately, otherwise the additional load on the transmission may cause damage or premature wear.

Examination


2. During the inspection, the engine should be slightly raised so that the supports are unloaded.

3. Raise the vehicle and securely support it on stands. Place a block of wood between the jack base and the oil pan, then carefully lift the engine just enough to take the weight off the jack mounts.

4. Check the bearings for defects such as hardening, cracking and peeling of the rubber from the metal plates. Sometimes the cracking occurs right in the center of the rubber element.

5. Check for movement of the support plates and the engine or frame (using a large screwdriver as a lever, push down on the rod to see if the support will move). If movement is detected, lower the engine and tighten the mount fasteners.

6. To increase the service life of the supports, put protective rubber covers on them.

Replacement


7. After disconnecting the negative battery cable, lift the vehicle and support it securely on stands.

8. Remove the engine shock absorber (see illustration 4.4).

9. Raise the engine slightly with a jack or lift. Loosen the bolts and separate the support from the frame (see illustration).
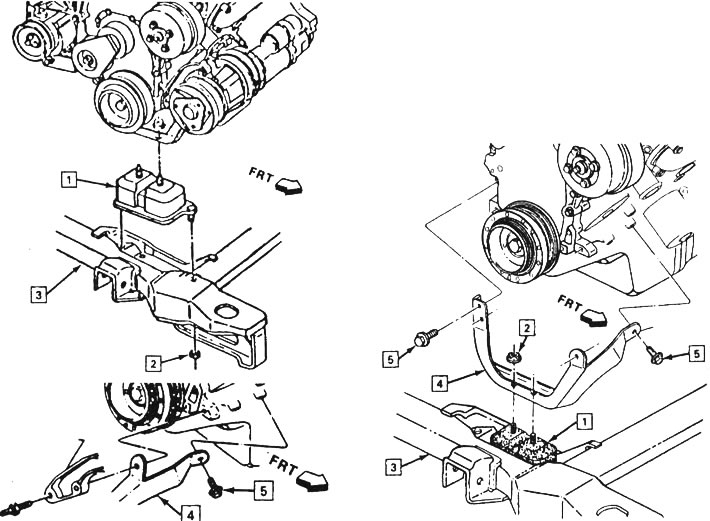


17.9. Engine mount (arrow marked «FRT» points towards the front of the vehicle): 1 - engine…

17.9. Engine mount (arrow marked "FRT" points towards the front of the vehicle): 1 - engine support, 2 - nut, 3 - subframe, 4 - bracket, 5 - bolt


10. After unscrewing the bolts (nuts) securing the support bracket to the cylinder block, remove the support.

11. The support is installed in the reverse order. Apply a coat of sealant to all fasteners and tighten them securely.

The article was checked: Vladimir Romannikov
This article is available at russian, bulgarian, belarusian, ukrainian, serbian, croatian, romanian, polish, slovak, hungarian

Share information:

Previous articles
Lumina 1: Engine 3.1L V6
Next articles

Removal and installation the oil pump
Removal and installation the oil pan
Checking, removing and installing the timing chain and sprocket
Removal and installation the timing chain cover
Replacing the front crankshaft oil seal


See similar articles on the topic of Chevrolet cars:
Checking the level, topping up and replacing the working fluid Chevrolet Aveo T300 (2012-2018)
Engine mount Chevrolet Captiva 1 (2006-2018)
Checking and replacing engine management system sensors Chevrolet Cruze 1 (2008-2016)
Checking the condition and replacing the timing belt Chevrolet Lacetti 1 (2002-2009)
Checking the oil level in the engine oil pan Chevrolet Lanos T150 (2002-2009)
Checking the engine on a car after repair Chevrolet Niva 1 (2002-2016)
Engine Mounts — Checking and Replacing Chevrolet Tahoe 1 (1992-2000)
Link in different formats to this page


Visitor comments

No comments yet


How much will 11 + 16 =


Orlando 1 (2010-2018) 
  • General information
  • Introduction to manual
  • User manual
  • Maintenance
  • Troubleshooting
  • Power unit
  • Engine repair
  • Fuel and control system
  • Cooling and lubrication system
  • Ignition system
  • Transmission
  • Clutch
  • Gearbox
  • Drive shafts
  • Chassis
  • Car suspension
  • Steering
  • Brake system
  • Body
  • Exterior (external elements)
  • Doors, locks and windows
  • Electrical equipment
  • Equipment and devices
  • Windscreen wipers
  • Power devices
  • Electrical diagrams


Trailblazer 1 (2001-2008) 
  • General information
  • User manual
  • Troubleshooting
  • Maintenance
  • Power unit
  • Engine in a car
  • Engine overhaul
  • Cooling and heating
  • Fuel and exhaust system
  • Engine electrical equipment
  • Engine control
  • Transmission
  • Automatic gearbox
  • Transfer case
  • Drive shafts and cardan
  • Chassis
  • Brake system
  • Car suspension
  • Steering
  • Body
  • Exterior (external elements)
  • Interior (internal elements)
  • Doors, locks and windows
  • Electrical equipment
  • Equipment and devices
  • Electrical circuits


Lumina 1 (1989-1994) 
  • General information
  • Maintenance
  • Power unit
  • Engine 3.1L V6
  • Engine 3.8L V6
  • Engine overhaul
  • Cooling system
  • Power and exhaust system
  • Fuel injection
  • Engine electrical equipment
  • Reduced exhaust gas toxicity
  • Transmission
  • Automatic gearbox
  • Drive shafts
  • Chassis
  • Brake system
  • Car suspension
  • Steering
  • Body
  • Heating and air conditioning
  • Repair of body elements
  • Doors, covers and windows
  • Interior (internal elements)
  • Electrical equipment
  • Equipment and devices
  • Electrical circuits


ChevyMan.ru © 2017-2026 · Mobile version · Feedback · Site search · Interesting to read · Sitemap: EN BG BY UA RS HR RO PL SK HU

Aveo 2003-2008 · Aveo 2006-2011 · Aveo 2012-2018 · Captiva 2006-2018 · Cruze 2008-2016 · Lacetti 2002-2009 · Lanos 2002-2009 · Niva 2002-2016 · Tahoe 1992-2000 · Tahoe 2000-2014 · Lumina 1 1989-1994 · Trailblazer 1 2001-2008 · Orlando 1 2010-2018 ·
🛡️ For your security and to improve our service, this site uses cookies. You can disable them in your browser.