
Contents: Removal ↧ Installation ↧
1. If the vehicle's engine has a significant mileage and there is visible damage to the timing chain or if it sags between the sprockets by more than 1 inch (2.54 cm), the chain must be replaced. Failure to replace a worn chain in a timely manner may result in engine malfunction, loss of power and increased fuel consumption. A loose chain can slip off the sprockets. In the worst case, a chain jumping or breaking can cause serious damage to the engine.
Removal
2. Remove the timing chain cover (see section 13).
3. Temporarily tighten the anti-vibrator mounting bolt into the crankshaft and use a wrench to turn the crankshaft by this bolt until the ignition timing marks on the crankshaft and camshaft sprockets align with the marks on the anti-vibrator (see illustrations). In this case, the pistons of the 1st and 4th cylinders must be at TDC, and the piston of the fourth cylinder must be on the compression stroke (this can be verified by checking the position of the distributor rotor, which should point to the spark plug wire of the fourth cylinder on the distributor housing cover).
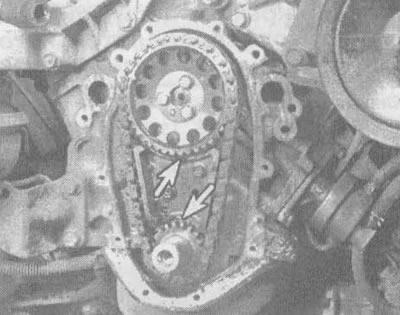
14.3a. Ignition timing marks (shown by arrows) must be aligned as shown in the photograph: a straight line must pass through the center of the camshaft, the mark on the camshaft sprocket, the mark on the crankshaft sprocket and the center of the crankshaft (there are also two marks on the damper that are used for adjustment) |
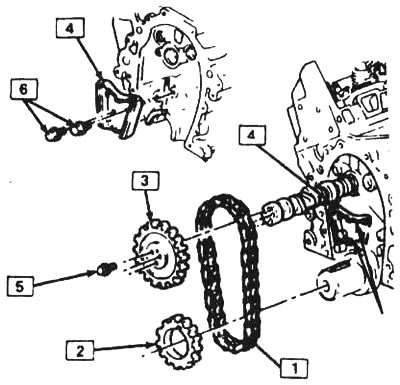
14.3b. Timing chain and related components: 1 - chain, 2 - crankshaft sprocket, 3 - camshaft sprocket, 4 - damper, 5 - camshaft sprocket mounting bolts (3 pieces), 6 - damper mounting bolts (2 pieces) |
Note: Do not attempt to remove the sprockets or chain until this procedure has been completed, and do not rotate the crankshaft or camshaft after the sprockets or chain have been removed.
4. Loosen the camshaft sprocket mounting bolts (see illustration). When performing this operation, do not allow the camshaft to turn (if this happens, align the ignition marks again and only then unscrew the bolts).
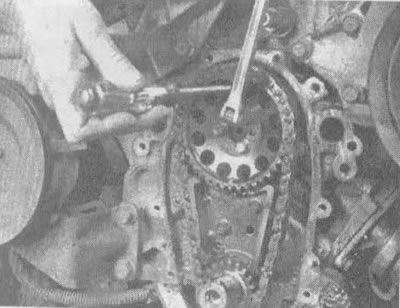
14.4. The screwdriver will prevent the camshaft sprocket from turning when the bolts are loosened
5. Remove the camshaft sprocket. If the sprocket is jammed, gently tap one side of it with a plastic-headed hammer. Remove the camshaft drive chain from the engine together with the sprocket.
6. The chain and camshaft sprocket should be stored in sets. If you are going to install a new chain, use a chain puller to press the sprocket off the camshaft and install the new one. When installing the sprocket, align the keyway machined in it with the key on the camshaft.
7. Check the timing chain guide for cracks and signs of wear and replace it with a new one if necessary. The damper is attached to the cylinder block with two bolts.
8. Clean the chain and sprockets with solvent and dry them with compressed air.
Caution: Always wear safety glasses when using compressed air.
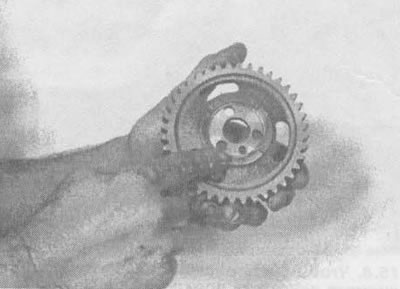
9. Check all parts for signs of wear and damage. Pay attention to the technical condition of the sprocket teeth: they should not have chips, cracks, or signs of chipping or warping.
Installation
10. Lubricate the bearing (rear) surface of the camshaft sprocket with molybdenum grease or engine assembly machine oil (see illustration). Place the drive chain with slack on the sprocket.
14. 10. Before installing the sprocket on the camshaft, apply grease to its supporting (rear) surface
11. Align the ignition timing marks (see illustration 14.3a), pass the chain over the sprocket and install the sprocket onto the camshaft. If necessary, tighten the sprocket onto the shaft by tightening the three bolts. It is not permissible to hammer it in - this may lead to displacement of the concave plug on the other end of the camshaft. Tighten the bolts to the torque specified in the specifications.
12. Again, ensure that the ignition timing marks are aligned. If they do not match, remove the sprocket from the camshaft and pull the chain until they match.
13. If you need to set piston N1 to TDC position on compression stroke (for example, to simplify the procedure of installing the ignition distributor after replacing the camshaft), rotate the crankshaft one full revolution (360°): the marks on the crankshaft and camshaft will be in the position of the 12 o'clock hands. However, if the ignition distributor has not been replaced, this operation is not necessary.
14. Lubricate the chain and camshaft sprocket with clean engine oil. Replace the chain cover (see section 13).
15. The remaining operations are performed in reverse order.
(The article was reprinted from the website ChevyMan)