
Contents: Removal ↧ Installation ↧
Removal
1. Disconnect the cable from the negative terminal of the battery.
2. Remove the poly V-belt (see chapter 1, section 21).
3. Raise the front of the vehicle and support it securely on jack stands. To prevent the vehicle from falling off the stands, apply the parking brake and block the rear wheels.
4. Remove the shock absorber (see section 11).
5. Drain the oil from the engine (see chapter 1, section 12).
6. Remove the flywheel cover (see chapter 2, part 2.3, illustrations 5.13a, 5.13b and 5.13c).
7. Remove the starter (see chapter 5, section 16).
8. Support the engine from below with a jack. Position the jack support pad directly under the rear axle mounting bracket (see illustration).
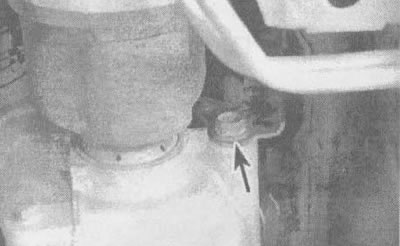
15.8. To remove the oil pan, lift the engine with a jack, positioning its support pad directly under the support
9. Loosen the engine mounting bolts to the support (see illustration).
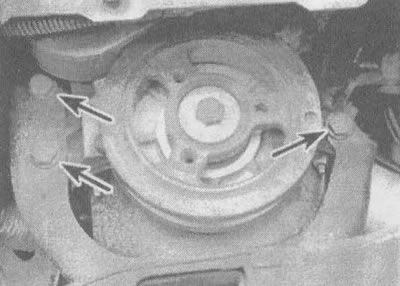
15.9. Having unscrewed these three bolts (shown by arrows) from the engine support, lift the engine enough to gain access to the oil pan mounting bolts
10. Raise the engine slightly with a jack. Loosen the oil pan mounting bolts (see illustration), then carefully separate it from the cylinder block. To avoid damage to the sealing surface on the flange and, as a result, oil leakage from the engine, do not insert a lever between the mating surfaces of the crankcase and block. If necessary, tap the crankcase with a soft-faced hammer to separate it from the cylinder block.
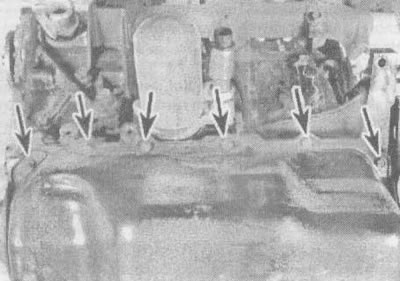
15.11. Oil pan mounting bolts (shown by arrows) on the front of the flange (from the radiator side); the bolts on the back of the flange have a similar arrangement
Installation
12. Clean the crankcase with solvent and remove any remaining old gasket and sealant material from the mating surfaces, check the cleanliness of the bolt holes in the cylinder block. Check the flange for warpage, especially around the bolt holes. If necessary, support the tray on a wooden block and use a hammer to level the flange surface.
13. When installing the oil pan, be sure to replace the old gasket. Apply a coat of room temperature sealant to the front of the gasket where it meets the front cap.
14. Install the crankcase on the cylinder block and tighten the bolts (nuts) (see illustration).
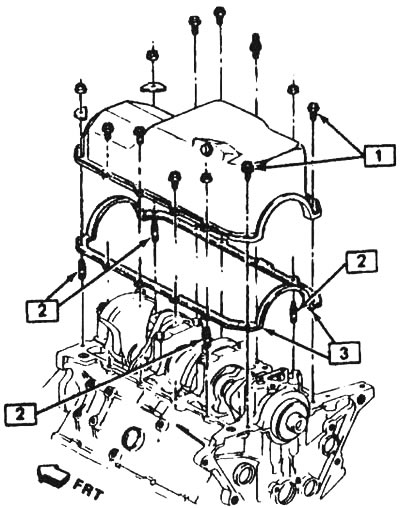
15.14. Oil pan assembly: 1 - Tighten to 18 ft-lbs; 2 - Tighten to 13 ft-lbs (other bolts - 89 in-lbs); 3 - Apply a drop of room temperature sealant to this area
15. Tighten the bolts to the torque specified in the specifications given in this chapter. The final tightening is done in three stages, starting from the center, crosswise.
16. The remaining operations are performed in reverse order.
17. Fill the engine with oil, start it, let it warm up to normal operating temperature and check for leaks.