
Contents: Front manifold ↧ Rear manifold ↧
1. Disconnect the cable from the negative terminal of the battery.
2. Remove the air filter (see chapter 4, section 8).
Front manifold
3. Allow the engine to cool completely, then drain the coolant (see chapter 1, part 29).
4. Disconnect the cooling system pipe (see section 4).
5. Unscrew the bypass valve from the flange (U-shaped) pipes (see illustration) bolts and disconnect the bypass pipe from the front exhaust manifold.
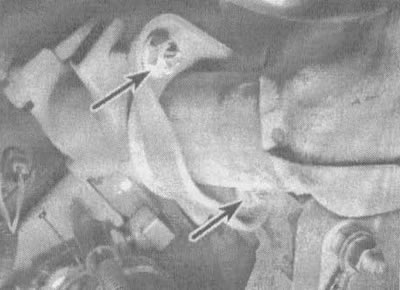
8.5. To disconnect the cross pipe of the exhaust system from any of the exhaust manifolds, it is enough to unscrew the two nuts located on its flange (shown by arrows)
6. Remove the air conditioning compressor, leaving the hoses connected (see chapter 3, section 15).
7. Remove the shock absorber (see section 4).
8. Remove the air conditioning compressor bracket and strut (see illustration).
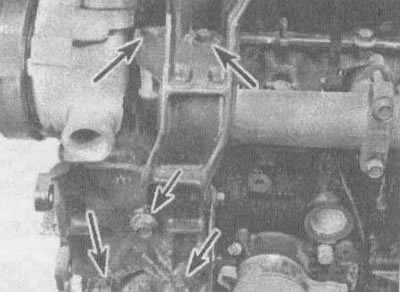
8.8. To remove the air conditioning compressor bracket and shock absorber, unscrew the five bolts shown by the arrows (the upper left bolt is recessed; it has a head for a Torx key)
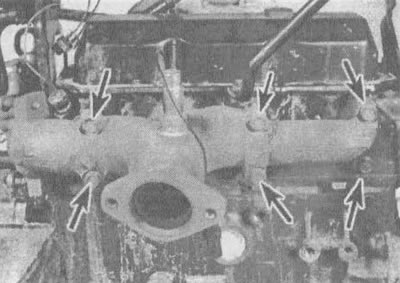
9. Loosen the exhaust manifold mounting bolts and disconnect the manifold from the cylinder head.
8.9. Front exhaust manifold mounting bolts (shown by arrows)
10. Clean the mating surfaces of the exhaust manifold from any remaining old gasket material, then check the manifold for deformations and cracks. You can determine whether the manifold flange is warped using a ruler attached to it. If the feeler gauge fits between the edge of the straightedge and the flange surface and is more than 0.030 in. (0.75 mm), take the manifold to a repair shop to have its surface resurfaced.
11. Install the manifold in place with a new gasket and tighten its mounting bolts by hand.
12. Starting from the centre and working towards the edges, tighten the bolts one by one until they are all tightened to the required tightening torque specified in the specifications given in this chapter.
13. Install the remaining parts in reverse order.
14. After starting the engine, check the joints between the manifold and the cylinder head and between the manifold and the exhaust pipe for exhaust gas leaks.
Rear manifold
15. Access to the rear exhaust manifold Opens from below the vehicle. Apply the parking brake, block the rear wheels, raise the front of the car with a jack and support it on stands.
16. Disconnect the oxygen sensor wire (see chapter 6, section 4).
17. After unscrewing the lock nuts from the flange of the bypass pipe, disconnect the pipe from the rear exhaust manifold (see illustration 8.5).
18. Unscrew the two bolts securing the exhaust pipe to the manifold. It may be necessary to lubricate the threads of the fasteners with a corrosion inhibitor. Disconnect the exhaust pipe from the exhaust manifold (see chapter 4, section 14).
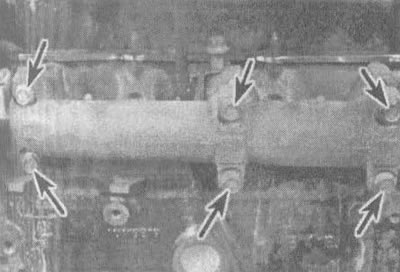
19. Loosen the exhaust manifold mounting bolts (see illustration).
8.19. Rear exhaust manifold bolts (shown by arrows)
20. Clean the mating surfaces of the exhaust manifold from any remaining old seal material, then check the manifold for deformations and cracks. You can determine whether the manifold flange is warped using a ruler attached to it. If the feeler gauge fits between the edge of the straightedge and the flange surface and is more than 0.030 in. (0.75 mm), take the manifold to a repair shop to have its surface resurfaced.
21. Install the manifold in place with a new gasket and tighten the bolts by hand.
22. Starting from the center and working towards the edges, tighten the bolts one by one until all of them are tightened to the required tightening torque specified in technical conditions, given in this chapter.
23. Install the remaining parts in reverse order.
24. After starting the engine, check the joints between the manifold and the cylinder head and between the manifold and the exhaust pipe for exhaust gas leaks.
The text of the article was obtained from the website chevyman.ru