


Contents: Removal ↧ Installation ↧
Removal
1. Disconnect the cable from the negative terminal of the battery.
2. Remove the air filter (see chapter 4, section 8).
Front valve cover
3. Disconnect the electrical connector of the idling air supply control (IAC) motor (see chapter 4, section 12).
4. Remove the engine mount shock absorber (see illustration).
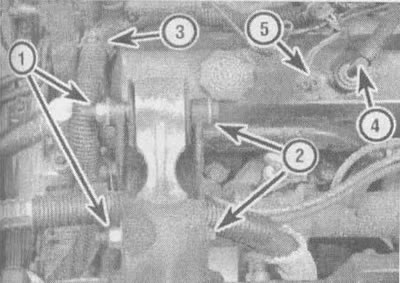
4.4 To access the valve cover, remove and disconnect the following components:
1 - Loosen the shock absorber nuts
2 - Remove the shock absorbers by unscrewing the bolts
3 - Release the wire harness from the clamp
4 - Disconnect the crankcase ventilation tube from the valve cover
5 - Disconnect the IAC valve electrical connector (in the photo it is already disconnected)
5. Release the wire harness from the clamp located on the valve cover on the camshaft cover side.
6. Disconnect the wires from the spark plugs (see chapter 1, section 33). To avoid mistakes during assembly, mark each of them.
7. Remove the crankcase ventilation tube from the valve cover (see chapter 1, section 30).
8. Drain the coolant (see chapter 1, section 29).
9. After unscrewing the bolts, remove the cooling system pipe and thermostat housing from the cylinder head, disconnect the cooling system hose from the coolant pump and remove the pipe (see illustrations).
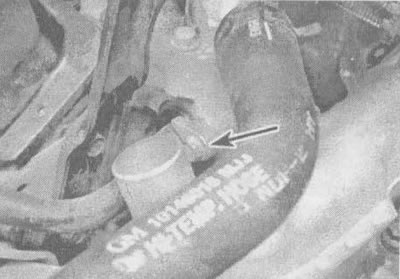
4.9a. To remove the front valve cover, unscrew this bolt from the thermostat housing (shown by arrow), which secures the cooling system pipe,... |
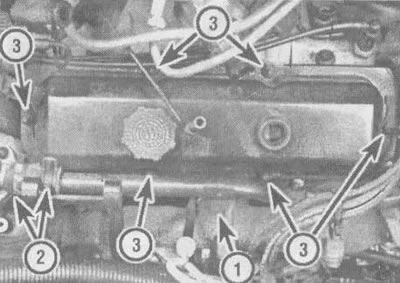
4.9b.... unscrew the cooling pipe bracket mounting bolt (1), tighten the clamps (clamps) (2) of the cooling hose, disconnect the hose from the cooling system pump, disconnect the cooling pipe from the thermostat housing and unscrew the nuts or bolts (3) securing the valve mechanism cover (on some car models you may need a Torx head for this) |
10. Unscrew the bolts and nuts of the valve cover.
Note: Some vehicle models have special bolts. Unscrew them using a Torx T-30 head.
11. Remove the valve cover.
Note: If the cover is stuck to the cylinder head, try to pry it loose using a wooden block and a hammer. If the cover still does not come off, separate it by carefully prying it off with a suitable tool, being careful not to damage the sealing flange.
Rear valve cover
12. Disconnect the coolant temperature sensor and the oxygen sensor (see chapter 6, section 4).
13. Disconnect the wires from the spark plugs (see chapter 1, section 33). To avoid mistakes during assembly, mark each of them.
14. Remove the poly V-belt (see chapter 1, section 21).
15. Remove the generator (see chapter 5, section 13).
16. Disconnect the air conditioning pipe bracket from the generator bracket (see illustration). Remove the generator bracket (see illustration).
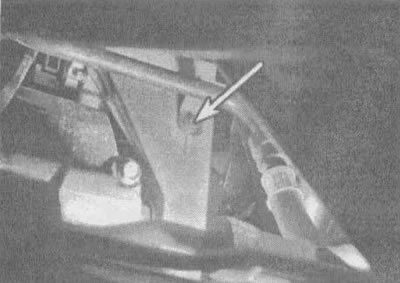
4.16a. Unscrew this bolt (shown by arrow) and disconnect the air conditioning line from the rear wall of the generator bracket |
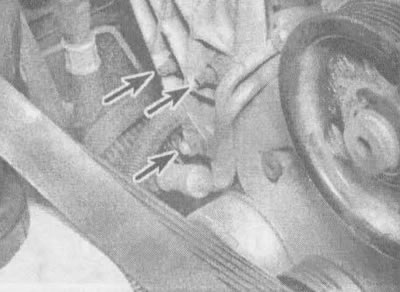
4.16b. To remove the generator bracket from the engine, unscrew the lower nut (shown by the lower arrow), disconnect the harness clamp and the power steering line clamp, then remove the nuts from all three studs |
17. Unscrew the nuts (bolts) of the valve mechanism cover.
Note: Some vehicle models are equipped with special bolts. Unscrew them using a T-30 Torx head.
18. Remove the valve cover.
Note: If the cover is stuck to the cylinder head, try to pry it loose using a wooden block and a hammer. If the cover still does not budge, remove it by gently prying it off with a suitable tool, being careful not to damage the flange.
Installation
19. Before installing the covers, the mating surfaces of each cylinder head and valve cover must be absolutely clean. Use a suitable scraper to remove any remaining material from the old seal or gasket, then clean the mating surfaces with lacquer thinner or acetone (if there are traces of sealant or grease left on the mating surfaces when installing the cover, oil leakage may occur through these areas).
20. Install the valve cover with a new gasket, then tighten the nuts or bolts. Tighten the bolts in several stages to the required tightening torque specified in the specifications given in this chapter.
21. Complete the installation in reverse order. After starting the engine, carefully check the joints between the valve cover and the cylinder head for oil leaks.