
Contents: Examination ↧ Replacement ↧
Caution! When performing repairs, a special GM tool, Item No. J28467, is available to support the engine. If the vehicle is supported only by a jack, do not stand under the engine or transmission! Improper lifting techniques or failure of the winch or hoist can result in serious injury or death.
Note: Information on mounting the gearbox is provided in chapter 7, Section 8.
1. Engine mounts are generally maintenance-free, but if they become damaged or broken, they must be replaced immediately, otherwise the additional load on the transmission may cause damage or premature wear.
Examination
2. During the inspection, the engine should be slightly raised so that the supports are unloaded.
3. Raise the vehicle and securely support it on stands. Place a block of wood between the jack base and the oil pan, then carefully raise the engine just enough to take the weight off the engine mounts.
4. Check the bearings for defects such as hardening, cracking and peeling of the rubber element from the metal plates (see illustration). Sometimes the cracking occurs right in the center of the rubber element.
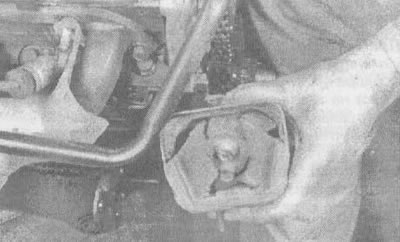
19.4. This is what a broken engine mount looks like - the rubber has separated from the metal backing (for clarity, the part was removed from the car)
5. Check for relative movement of the support plates and the engine or frame (using a large screwdriver as a lever, push down on the rod to see if the support will move). If relative movements are detected, lower the engine and tighten the mounts.
6. To increase the service life of the supports, put protective rubber covers on them.
Replacement
7. Disconnect the negative battery cable, then raise the vehicle and support it securely on stands (if it hasn't been done yet).
8. Raise the engine slightly with a jack or lift. Place a support under the engine as described above. Loosen the bolts and remove the support from the frame bracket.
9. After unscrewing the bolts securing the support to the cylinder block, remove the support.
10. Installation of the support is carried out in the reverse order. Apply sealant to all fasteners and tighten them securely.