ChevyMan.ru
Mazda Mitsubishi Toyota Land Rover Honda Kia Nissan
English Русский
Български
Беларускі
Український
Српски
Hrvatski
Română
Polski
Slovenský
Magyar
|
Articles | Sitemap | Contacts |


Home   Aveo   Captiva   Cruze   Lacetti   Lanos   Niva   Tahoe   Others  
Orlando 1 (2010-2018) Trailblazer 1 (2001-2008, petrol) Lumina 1 (1989-1994)
  • Home
  • Chevrolet
  • Lumina 1
  • Electrical equipment
  • Equipment and devices
  • Headlight adjustment

Headlight adjustment (Chevrolet Lumina 1)

            0

Note: Correct adjustment of headlights is a condition for safe driving. If the adjustment is incorrect, the headlights will blind oncoming drivers, which can lead to an accident or significantly impair visibility of the road. Headlight alignment should be checked every 12 months and any time new headlights are installed or work is carried out on the front of the vehicle. Please note that the following procedures provide only temporary adjustment until the headlights are adjusted in a properly equipped workshop.


1. There are two spring-loaded adjustment screws for adjusting the headlights. One of them is on the top - it provides up and down movement, and one on the side - it provides right and left movement (see illustration).

13.1a. The vertical adjustment screw for the headlight is located at the top of the housing…

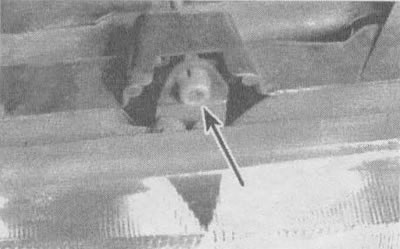
13.1a. The vertical adjustment screw for the headlight is located at the top of the housing (indicated by the arrow)
13.1b. A special Torx key is required to adjust the headlight horizontally

13.1b. A special Torx key is required to adjust the headlight horizontally


2. There are several methods for adjusting headlights. To implement the simplest of them, you need a clean wall located 8 meters from the front of the car and a flat horizontal floor.

3. Apply vertical stripes of tape to the wall in line with the center line of the car and the center lines of both headlights.

4. Apply a horizontal strip of adhesive tape in line with the center line of all headlights.

Note: To make it easier to accurately place the strips of tape, position the vehicle a few inches from the wall.


5. When performing adjustment, the vehicle must be in normal condition, the fuel tank must be half full and there must not be too much load in the vehicle.

6. Starting with the low beam headlights, set the maximum illumination zone two inches below the horizontal line and two inches to the right of the vertical line of the headlight. Adjustment is made by turning the upper adjustment screw clockwise to raise the light beam and counterclockwise to lower it. The side adjustment screw is used in a similar manner to move the light beam to the right or left.

7. For high beam headlights, the area of maximum illumination is centered exactly on the corresponding vertical lines just below the horizontal line.

Note: It may not be possible to accurately adjust both the low beam and high beam headlights at the same time. When choosing a compromise, keep in mind that low beam headlights are used more often and their condition is of the greatest importance for driver safety.


8. Have the headlights adjusted at the service department or service station as soon as possible.

The original article can be found on the resource CHEVYMAN.RU

The article was checked: Vladimir Romannikov
This article is available at russian, bulgarian, belarusian, ukrainian, serbian, croatian, romanian, polish, slovak, hungarian

Share information:

Previous articles
Lumina 1: Equipment and devices
Next articles

Replacing headlight bulbs
Removal and installation the windshield wiper and washer switch
Removal and installation the headlight switch
Replacing the ignition lock cylinder
Removal and installation the turn signal switch
Replacing lamps in lighting fixtures
Removal and installation the radio and speakers
Removal and installation the instrument panel
Checking and repairing the rear window defroster
Removal and installation the windshield wiper motor


See similar articles on the topic of Chevrolet cars:
Headlight beam height adjustment system Chevrolet Aveo T200 (2003-2008)
Manual headlight range adjustment Chevrolet Captiva 1 (2006-2018)
Headlight range adjuster Chevrolet Cruze 1 (2008-2016)
Steering column switches, switches, headlight corrector, instrument lighting brightness adjustment Chevrolet Lacetti 1 (2002-2009)
Headlight beam direction regulator Chevrolet Lanos T150 (2002-2009)
Headlight adjustment Chevrolet Niva 1 (2002-2016)
Shift Rod (1987-1994 Models) — Removal, Installation and Adjustment Chevrolet Tahoe 1 (1992-2000)
Link in different formats to this page


Visitor comments

No comments yet


How much will 11 + 16 =


Orlando 1 (2010-2018) 
  • General information
  • Introduction to manual
  • User manual
  • Maintenance
  • Troubleshooting
  • Power unit
  • Engine repair
  • Fuel and control system
  • Cooling and lubrication system
  • Ignition system
  • Transmission
  • Clutch
  • Gearbox
  • Drive shafts
  • Chassis
  • Car suspension
  • Steering
  • Brake system
  • Body
  • Exterior (external elements)
  • Doors, locks and windows
  • Electrical equipment
  • Equipment and devices
  • Windscreen wipers
  • Power devices
  • Electrical diagrams


Trailblazer 1 (2001-2008) 
  • General information
  • User manual
  • Troubleshooting
  • Maintenance
  • Power unit
  • Engine in a car
  • Engine overhaul
  • Cooling and heating
  • Fuel and exhaust system
  • Engine electrical equipment
  • Engine control
  • Transmission
  • Automatic gearbox
  • Transfer case
  • Drive shafts and cardan
  • Chassis
  • Brake system
  • Car suspension
  • Steering
  • Body
  • Exterior (external elements)
  • Interior (internal elements)
  • Doors, locks and windows
  • Electrical equipment
  • Equipment and devices
  • Electrical circuits


Lumina 1 (1989-1994) 
  • General information
  • Maintenance
  • Power unit
  • Engine 3.1L V6
  • Engine 3.8L V6
  • Engine overhaul
  • Cooling system
  • Power and exhaust system
  • Fuel injection
  • Engine electrical equipment
  • Reduced exhaust gas toxicity
  • Transmission
  • Automatic gearbox
  • Drive shafts
  • Chassis
  • Brake system
  • Car suspension
  • Steering
  • Body
  • Heating and air conditioning
  • Repair of body elements
  • Doors, covers and windows
  • Interior (internal elements)
  • Electrical equipment
  • Equipment and devices
  • Electrical circuits


ChevyMan.ru © 2017-2026 · Mobile version · Feedback · Site search · Interesting to read · Sitemap: EN BG BY UA RS HR RO PL SK HU

Aveo 2003-2008 · Aveo 2006-2011 · Aveo 2012-2018 · Captiva 2006-2018 · Cruze 2008-2016 · Lacetti 2002-2009 · Lanos 2002-2009 · Niva 2002-2016 · Tahoe 1992-2000 · Tahoe 2000-2014 · Lumina 1 1989-1994 · Trailblazer 1 2001-2008 · Orlando 1 2010-2018 ·
🛡️ For your security and to improve our service, this site uses cookies. You can disable them in your browser.