ChevyMan.ru
Mazda Mitsubishi Toyota Land Rover Honda Kia Nissan
English Русский
Български
Беларускі
Український
Српски
Hrvatski
Română
Polski
Slovenský
Magyar
|
Articles | Sitemap | Contacts |


Home   Aveo   Captiva   Cruze   Lacetti   Lanos   Niva   Tahoe   Others  
Orlando 1 (2010-2018) Trailblazer 1 (2001-2008, petrol) Lumina 1 (1989-1994)
  • Home
  • Chevrolet
  • Lumina 1
  • Electrical equipment
  • Equipment and devices
  • Removal and installation the windshield wiper motor

Removal and installation the windshield wiper motor (Chevrolet Lumina 1)

            0

Contents: Cars produced in 1990. ↧ Cars produced since 1991. ↧
1. Raise the hood.

2. Disconnect the cable from the negative terminal of the battery.

Cars produced in 1990.


3. Loosen the nuts and disconnect the windshield wiper arms.

4. Remove the air filter and disconnect the electrical connector from the wiper motor.

5. Remove the two wiper housing bolts using a 55 Torx key and the three nuts securing the housing to the vehicle using a 10 mm socket wrench. Lower the housing down and remove it from the engine compartment.

6. Loosen the two lever mounting bolts enough to allow the bushing to be disconnected from the ball joint on the lever crank.

7. Remove the three bolts and disconnect the windshield wiper motor from the gearbox.

8. Installation is carried out in reverse order.

Cars produced since 1991.


9. Disconnect the connector from the windshield wiper motor.

10. Loosen the two bushing bolts, disconnect the crank arm from the rod, then unscrew the electric motor mounting bolts and remove the electric motor from the grooves in the housing, having first lowered it into the engine compartment (see illustration).

18.10. Loosen the two bushing mounting bolts (A) and disconnect the lever, then unscrew the bolts…

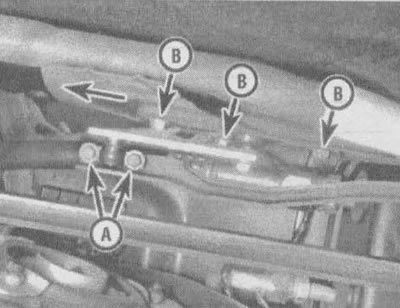
18.10. Loosen the two bushing mounting bolts (A) and disconnect the lever, then unscrew the bolts (B) and remove the electric motor from the gap in the direction shown (1991 and later model cars)


11. Installation is carried out in reverse order.

(The article is reprinted from the website «ChevyMan.ru»)

The article was checked: Vladimir Romannikov
This article is available at russian, bulgarian, belarusian, ukrainian, serbian, croatian, romanian, polish, slovak, hungarian

Share information:

Previous articles
Lumina 1: Equipment and devices
Next articles

Checking and repairing the rear window defroster
Removal and installation the instrument panel
Removal and installation the radio and speakers
Replacing lamps in lighting fixtures
Headlight adjustment
Removal and installation the rear window wiper motor
Description and verification of the constant speed control system (cruise control)
Description and testing of electric windows
Description and testing of the central lock
Airbag — General Information


See similar articles on the topic of Chevrolet cars:
Removal and installation the windshield wiper linkage assembly with gear motor Chevrolet Aveo T300 (2012-2018)
Replacing windshield wiper blades Chevrolet Captiva 1 (2006-2018)
Windshield wiper blade replacement Chevrolet Cruze 1 (2008-2016)
Replacing windshield and tailgate glass wiper blades Chevrolet Lacetti 1 (2002-2009)
Replacing Windshield Wiper Blades Chevrolet Lanos T150 (2002-2009)
Windshield wiper gear motor test data Chevrolet Niva 1 (2002-2016)
Windshield Wiper Motor — Removal and Installation Chevrolet Tahoe 1 (1992-2000)
Link in different formats to this page


Visitor comments

No comments yet


How much will 49 + 36 =


Orlando 1 (2010-2018) 
  • General information
  • Introduction to manual
  • User manual
  • Maintenance
  • Troubleshooting
  • Power unit
  • Engine repair
  • Fuel and control system
  • Cooling and lubrication system
  • Ignition system
  • Transmission
  • Clutch
  • Gearbox
  • Drive shafts
  • Chassis
  • Car suspension
  • Steering
  • Brake system
  • Body
  • Exterior (external elements)
  • Doors, locks and windows
  • Electrical equipment
  • Equipment and devices
  • Windscreen wipers
  • Power devices
  • Electrical diagrams


Trailblazer 1 (2001-2008) 
  • General information
  • User manual
  • Troubleshooting
  • Maintenance
  • Power unit
  • Engine in a car
  • Engine overhaul
  • Cooling and heating
  • Fuel and exhaust system
  • Engine electrical equipment
  • Engine control
  • Transmission
  • Automatic gearbox
  • Transfer case
  • Drive shafts and cardan
  • Chassis
  • Brake system
  • Car suspension
  • Steering
  • Body
  • Exterior (external elements)
  • Interior (internal elements)
  • Doors, locks and windows
  • Electrical equipment
  • Equipment and devices
  • Electrical circuits


Lumina 1 (1989-1994) 
  • General information
  • Maintenance
  • Power unit
  • Engine 3.1L V6
  • Engine 3.8L V6
  • Engine overhaul
  • Cooling system
  • Power and exhaust system
  • Fuel injection
  • Engine electrical equipment
  • Reduced exhaust gas toxicity
  • Transmission
  • Automatic gearbox
  • Drive shafts
  • Chassis
  • Brake system
  • Car suspension
  • Steering
  • Body
  • Heating and air conditioning
  • Repair of body elements
  • Doors, covers and windows
  • Interior (internal elements)
  • Electrical equipment
  • Equipment and devices
  • Electrical circuits


ChevyMan.ru © 2017-2026 · Mobile version · Feedback · Site search · Interesting to read · Sitemap: EN BG BY UA RS HR RO PL SK HU

Aveo 2003-2008 · Aveo 2006-2011 · Aveo 2012-2018 · Captiva 2006-2018 · Cruze 2008-2016 · Lacetti 2002-2009 · Lanos 2002-2009 · Niva 2002-2016 · Tahoe 1992-2000 · Tahoe 2000-2014 · Lumina 1 1989-1994 · Trailblazer 1 2001-2008 · Orlando 1 2010-2018 ·
🛡️ For your security and to improve our service, this site uses cookies. You can disable them in your browser.