ChevyMan.ru
Mazda Mitsubishi Toyota Land Rover Honda Kia Nissan
English Русский
Български
Беларускі
Український
Српски
Hrvatski
Română
Polski
Slovenský
Magyar
|
Articles | Sitemap | Contacts |


Home   Aveo   Captiva   Cruze   Lacetti   Lanos   Niva   Tahoe   Others  
Orlando 1 (2010-2018) Trailblazer 1 (2001-2008, petrol) Lumina 1 (1989-1994)
  • Home
  • Chevrolet
  • Lumina 1
  • Power unit
  • Engine 3.8L V6
  • Removal, checking and installation valve rocker arms and rods

Removal, checking and installation valve rocker arms and rods (Chevrolet Lumina 1)

            0

Contents: Removal ↧ Examination ↧ Installation ↧

Removal


1. Remove the valve covers (see section 4) from the cylinder head.

2. Unscrew the valve rocker arm struts one by one and disconnect the valve rocker arms, supports and support retainers (see illustration). Place each rocker arm assembly separately in labeled plastic bags to avoid confusion when installing the assembly.

5.2. Valve rocker arm parts: 1 - bolt, 2 - valve rocker arm support, 3 - valve rocker arm, 4 - rod…

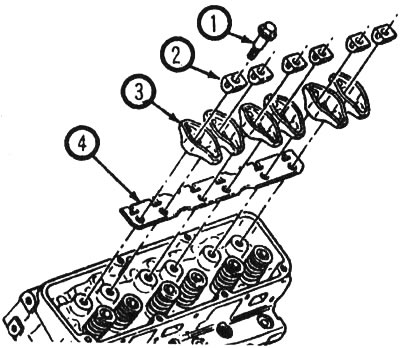
5.2. Valve rocker arm parts: 1 - bolt, 2 - valve rocker arm support, 3 - valve rocker arm, 4 - rod guide


3. After removing the rods, store them separately to avoid confusion during installation (see illustration).

5.3 If you are removing more than one rod, store them in a cardboard box with holes to avoid…

5.3 If you are removing more than one rod, store them in a cardboard box with holes to avoid confusion during installation. Pay attention to the sign "Front of the car"


Examination


4. Inspect each rocker arm for signs of wear, cracks or other damage, especially where the rocker arms and valve stems meet.

5. Check the condition of the bearings and bearing faces of all valve rocker arms. Look for signs of metal abrasion, cracks in stress areas and unusual wear patterns. If the valve rocker arms are worn or damaged, replace them with new ones; install new supports at the same time.

6. Make sure that the holes in all valve rocker arms on the valve lifter rod installation side are not clogged.

7. Check the valve lifter rods for cracks and signs of severe wear. Roll each rod across the glass to check for bending.

Installation


8. Apply a coat of motor oil or molybdenum-based grease to the lower ends of the valve lifter rods and install each one in place. Make sure each one is fully seated in its nest.

9. Apply a coat of molybdenum-based lubricant to the ends of the valve stems, the upper tails of the valve lifters and the surfaces of the valve supports to prevent damage to the mating surfaces before the engine oil pressure reaches operating pressure.

10. Apply non-hardening thread lubricant to the rocker arm support bolts. Install the rocker arms, supports, support retainers and bolts; tighten the bolts to the torque specified in the Technical Data section. Once the bolts are tightened, check that the pushrods are seated correctly on the rocker arms.

11. Install the valve covers (see section 4).

For details, visit the website CHEVYMAN

The article was checked: Vladimir Romannikov
This article is available at russian, bulgarian, belarusian, ukrainian, serbian, croatian, romanian, polish, slovak, hungarian

Share information:

Previous articles
Lumina 1: Engine 3.8L V6
Next articles

Removal and installation valve covers
Determining the position of the top dead center of the 1st cylinder
Repair work performed without removing the engine
General information about engine repair
Technical data of the 3.8 liter engine (V6)
Replacing springs, crackers and valve cuffs
Removal and installation the intake manifold
Removal, checking and installation valve lifters
Removal and installation of exhaust manifolds
Removal and installation the cylinder head


See similar articles on the topic of Chevrolet cars:
Removal, checking and installation the purge valve of the adsorber Chevrolet Aveo T300 (2012-2018)
Checking the valve block Chevrolet Captiva 1 (2006-2018)
Removal, checking and installation the purge valve of the adsorber Chevrolet Cruze 1 (2008-2016)
Checking the condition of wheels and tires Chevrolet Lacetti 1 (2002-2009)
Checking the condition of wheels and tires Chevrolet Lanos T150 (2002-2009)
Checking the ball joints of the steering rods Chevrolet Niva 1 (2002-2016)
Rocker arms and push rods — cleaning and checking Chevrolet Tahoe 2 and 3 (2000-2014)
Link in different formats to this page


Visitor comments

No comments yet


How much will 39 + 44 =


Orlando 1 (2010-2018) 
  • General information
  • Introduction to manual
  • User manual
  • Maintenance
  • Troubleshooting
  • Power unit
  • Engine repair
  • Fuel and control system
  • Cooling and lubrication system
  • Ignition system
  • Transmission
  • Clutch
  • Gearbox
  • Drive shafts
  • Chassis
  • Car suspension
  • Steering
  • Brake system
  • Body
  • Exterior (external elements)
  • Doors, locks and windows
  • Electrical equipment
  • Equipment and devices
  • Windscreen wipers
  • Power devices
  • Electrical diagrams


Trailblazer 1 (2001-2008) 
  • General information
  • User manual
  • Troubleshooting
  • Maintenance
  • Power unit
  • Engine in a car
  • Engine overhaul
  • Cooling and heating
  • Fuel and exhaust system
  • Engine electrical equipment
  • Engine control
  • Transmission
  • Automatic gearbox
  • Transfer case
  • Drive shafts and cardan
  • Chassis
  • Brake system
  • Car suspension
  • Steering
  • Body
  • Exterior (external elements)
  • Interior (internal elements)
  • Doors, locks and windows
  • Electrical equipment
  • Equipment and devices
  • Electrical circuits


Lumina 1 (1989-1994) 
  • General information
  • Maintenance
  • Power unit
  • Engine 3.1L V6
  • Engine 3.8L V6
  • Engine overhaul
  • Cooling system
  • Power and exhaust system
  • Fuel injection
  • Engine electrical equipment
  • Reduced exhaust gas toxicity
  • Transmission
  • Automatic gearbox
  • Drive shafts
  • Chassis
  • Brake system
  • Car suspension
  • Steering
  • Body
  • Heating and air conditioning
  • Repair of body elements
  • Doors, covers and windows
  • Interior (internal elements)
  • Electrical equipment
  • Equipment and devices
  • Electrical circuits


ChevyMan.ru © 2017-2026 · Mobile version · Feedback · Site search · Interesting to read · Sitemap: EN BG BY UA RS HR RO PL SK HU

Aveo 2003-2008 · Aveo 2006-2011 · Aveo 2012-2018 · Captiva 2006-2018 · Cruze 2008-2016 · Lacetti 2002-2009 · Lanos 2002-2009 · Niva 2002-2016 · Tahoe 1992-2000 · Tahoe 2000-2014 · Lumina 1 1989-1994 · Trailblazer 1 2001-2008 · Orlando 1 2010-2018 ·
🛡️ For your security and to improve our service, this site uses cookies. You can disable them in your browser.