
ChevyMan.ru
Mazda Mitsubishi Toyota Land Rover Honda Kia Nissan
English Русский
Български
Беларускі
Український
Српски
Hrvatski
Română
Polski
Slovenský
Magyar
|
Articles | Sitemap | Contacts |


Home   Aveo   Captiva   Cruze   Lacetti   Lanos   Niva   Tahoe   Others  
Orlando 1 (2010-2018) Trailblazer 1 (2001-2008, petrol) Lumina 1 (1989-1994)
  • Home
  • Chevrolet
  • Orlando 1
  • Chassis
  • Steering
  • Steering rod tip

Steering rod tip (Chevrolet Orlando 1)

            0

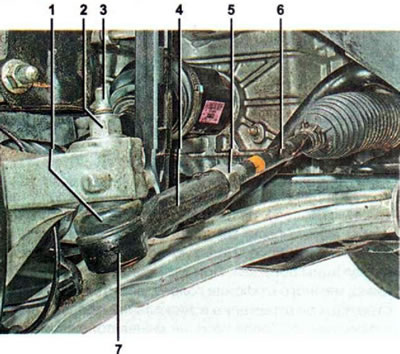
The tie rod end connects the tie rod to the steering knuckle. The tip is screwed directly onto the steering rod and locked with a lock nut, and is connected to the steering knuckle lever via a ball joint. The tip hinge is non-detachable and covered with a rubber cover. When the steering rod is screwed in or out of the end, the toe-in of the front wheels changes. Therefore, after performing work related to disassembling the steering rods, it is necessary to check the wheel alignment angles and adjust them if necessary.

1 - Protective cover of the steering rod end joint; 2 - nut; 3 — ball joint pin; 4 — steering rod…

1 - Protective cover of the steering rod end joint; 2 - nut; 3 — ball joint pin; 4 — steering rod end; 5 — lock nut; 6 - steering rod; 7 — tip hinge


The need to replace the steering tip is determined during the inspection of the technical condition of the steering control. The work is carried out in the following order:

Note: The operation is shown using the left steering tip as an example. The right steering tip is replaced in a similar manner.


1. We prepare the car for maintenance and repair.

2. Remove the front left wheel.

3. Clean from dirt and rust.
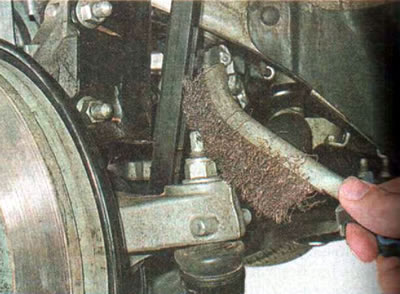
3. Clean from dirt and rust.


...and we treat the steering rod and tip pin with penetrating lubricant.
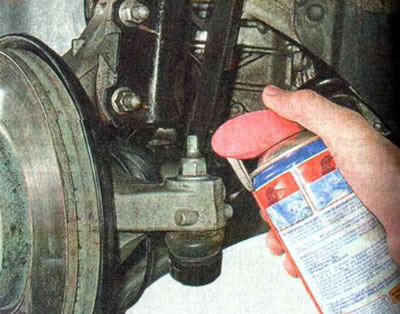


...and we treat the steering rod and tip pin with penetrating lubricant.


4. Measure the distance from the center of the hinge on the steering rod to the beginning of the thread on the steering rod.
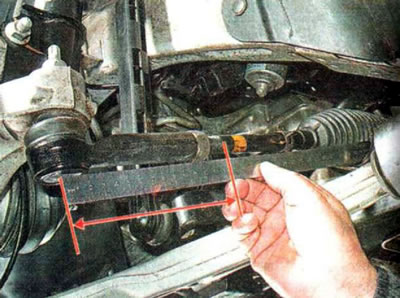
4. Measure the distance from the center of the hinge on the steering rod to the beginning of the…


5. Holding the tie rod end with a 21 mm wrench, loosen its lock nut with a 24 mm wrench.
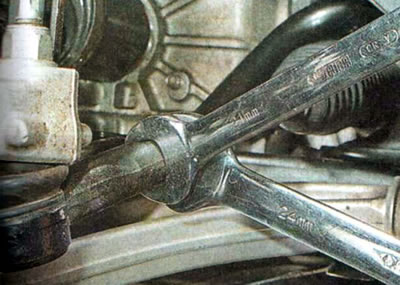
5. Holding the tie rod end with a 21 mm wrench, loosen its lock nut with a 24 mm wrench.


6. Using a 18 mm³ open-end wrench, unscrew the ball joint pin mounting nut.
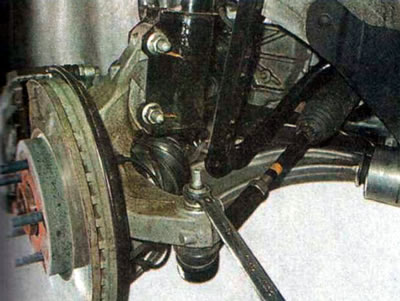
6. Using a 18 mm³ open-end wrench, unscrew the ball joint pin mounting nut.


7. Install the ball joint puller and press the ball joint pin out of the steering knuckle arm.
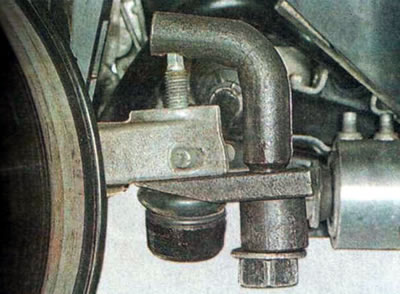


7. Install the ball joint puller and press the ball joint pin out of the steering knuckle arm.


Recommendation. Before pressing out, it is advisable to secure the puller, for example, by tying it to the front suspension strut. This will prevent it from falling after the tip is pressed out.


8. Unscrew the steering rod end manually or, if necessary, with a 21 mm wrench, holding the rod with a 15 mm wrench.
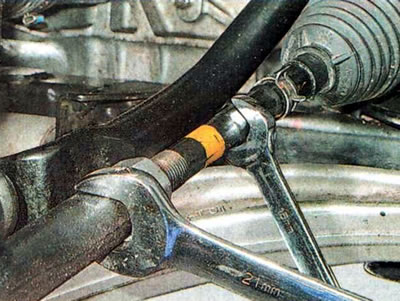
8. Unscrew the steering rod end manually or, if necessary, with a 21 mm wrench, holding the rod…


9. Install the new tip in the reverse order so that the distance from the center of its hinge to the beginning of the thread on the steering rod remains the same.

10. Using an 18 mm open-end wrench, tighten the ball joint pin mounting nut, holding the pin from turning with an 8 mm wrench.
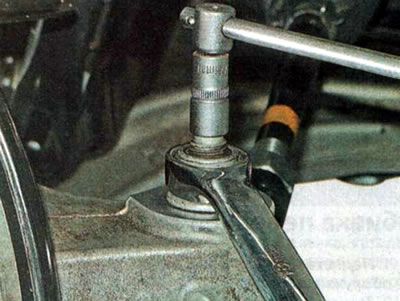
10. Using an 18 mm open-end wrench, tighten the ball joint pin mounting nut, holding the pin from…


11. Finally tighten the pin nut to a torque of 35 Nm, and the tip lock nut to 60 Nm.

Recommendation. After completing the work, check the wheel alignment angles.

The article was checked: Vladimir Romannikov
This article is available at russian, bulgarian, belarusian, ukrainian, serbian, croatian, romanian, polish, slovak, hungarian

Share information:

Previous articles
Orlando 1: Steering
Next articles

Checking the steering


See similar articles on the topic of Chevrolet cars:
Adjusting the position of the steering wheel Chevrolet Aveo T300 (2012-2018)
Adjusting the position of the steering wheel Chevrolet Captiva 1 (2006-2018)
Steering wheel-mounted controls Chevrolet Cruze 1 (2008-2016)
Checking the level of working fluid in the power steering reservoir Chevrolet Lacetti 1 (2002-2009)
Steering column switches Chevrolet Lanos T150 (2002-2009)
Adjusting the position of the steering wheel Chevrolet Niva 1 (2002-2016)
Power steering fluid Chevrolet Tahoe 1 (1992-2000)
Link in different formats to this page


Visitor comments

No comments yet


How much will 30 + 32 =


Orlando 1 (2010-2018) 
  • General information
  • Introduction to manual
  • User manual
  • Maintenance
  • Troubleshooting
  • Power unit
  • Engine repair
  • Fuel and control system
  • Cooling and lubrication system
  • Ignition system
  • Transmission
  • Clutch
  • Gearbox
  • Drive shafts
  • Chassis
  • Car suspension
  • Steering
  • Brake system
  • Body
  • Exterior (external elements)
  • Doors, locks and windows
  • Electrical equipment
  • Equipment and devices
  • Windscreen wipers
  • Power devices
  • Electrical diagrams


Trailblazer 1 (2001-2008) 
  • General information
  • User manual
  • Troubleshooting
  • Maintenance
  • Power unit
  • Engine in a car
  • Engine overhaul
  • Cooling and heating
  • Fuel and exhaust system
  • Engine electrical equipment
  • Engine control
  • Transmission
  • Automatic gearbox
  • Transfer case
  • Drive shafts and cardan
  • Chassis
  • Brake system
  • Car suspension
  • Steering
  • Body
  • Exterior (external elements)
  • Interior (internal elements)
  • Doors, locks and windows
  • Electrical equipment
  • Equipment and devices
  • Electrical circuits


Lumina 1 (1989-1994) 
  • General information
  • Maintenance
  • Power unit
  • Engine 3.1L V6
  • Engine 3.8L V6
  • Engine overhaul
  • Cooling system
  • Power and exhaust system
  • Fuel injection
  • Engine electrical equipment
  • Reduced exhaust gas toxicity
  • Transmission
  • Automatic gearbox
  • Drive shafts
  • Chassis
  • Brake system
  • Car suspension
  • Steering
  • Body
  • Heating and air conditioning
  • Repair of body elements
  • Doors, covers and windows
  • Interior (internal elements)
  • Electrical equipment
  • Equipment and devices
  • Electrical circuits


ChevyMan.ru © 2017-2026 · Mobile version · Feedback · Site search · Interesting to read · Sitemap: EN BG BY UA RS HR RO PL SK HU

Aveo 2003-2008 · Aveo 2006-2011 · Aveo 2012-2018 · Captiva 2006-2018 · Cruze 2008-2016 · Lacetti 2002-2009 · Lanos 2002-2009 · Niva 2002-2016 · Tahoe 1992-2000 · Tahoe 2000-2014 · Lumina 1 1989-1994 · Trailblazer 1 2001-2008 · Orlando 1 2010-2018 ·
🛡️ For your security and to improve our service, this site uses cookies. You can disable them in your browser.