
Contents: Headlights ↧ Fog lights ↧
Warning: The headlights must be adjusted correctly. Incorrectly adjusted headlights can blind the driver of an oncoming car or significantly limit visibility while driving, which can result in an accident. Checking the correct direction of the headlights should be done at least once a year, as well as after replacing a headlight or performing work on the front body parts. Below is a description of the procedure for temporarily adjusting the direction of the headlights, after which you should make the adjustment at the first opportunity by contacting a service and repair station.
Headlights
Note: Do not neglect the correct adjustment of the headlight direction. Incorrectly adjusted headlights can blind the driver of an oncoming car or significantly limit visibility while driving, which can result in an accident. Checking the correct direction of the headlights should be done at least once a year, as well as after replacing a headlight or performing work on the front body parts. The method for temporarily adjusting the direction of the headlights is described below. after which, at the first opportunity, adjustments should be made at a service and repair station.
1. The vehicles described use headlights that have an adjustment screw to adjust the beam direction in a vertical position (see illustration). There is no horizontal adjustment.
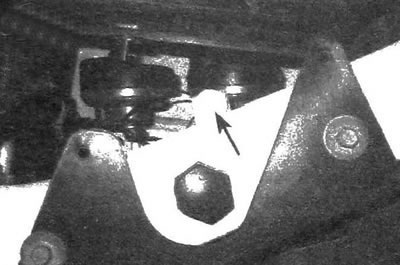
15.1. Headlight regulator located on the back of its casing
2. There are several methods for adjusting headlights. The simplest method requires a blank wall and a horizontal support surface (see illustration).
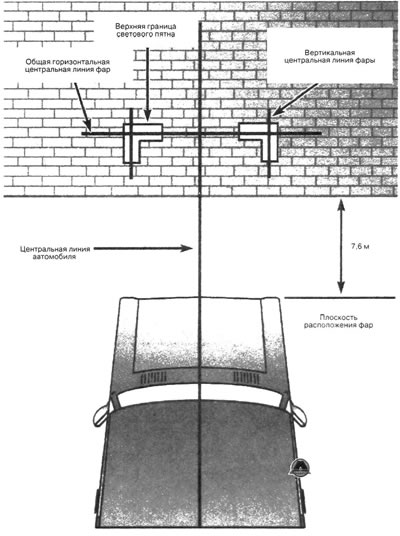
15.2. Adjusting the direction of the headlight beams
3. Stick vertical pieces of tape on the wall in line with the center line of the car and the center lines of both headlights.
4. Apply a horizontal piece of tape in accordance with the position of the common center line of both headlights.
Note: The process of applying the tape strips may be made easier if you position the vehicle close to the wall.
5. Adjustment is made when the distance from the wall to the vehicle is 7.6 m, it is on a horizontal support surface, the fuel tank is half full and there is no heavy load in the vehicle. The driver's seat must accommodate a person weighing 70 kg or an equivalent load.
6. When adjusting the low beam, direct the beam so that the upper boundary of the headlight light spot is located 50 mm below the horizontal axis of the headlight. Adjustment is made by turning the adjusting screw (see illustration 15.1).
7. As soon as possible, have the headlight beams adjusted at a service and repair station.
Fog lights
8. Some models have fog lights as an option, which should be adjusted using the same method as the main headlights. Like the main headlights, the fog lights are not horizontally adjustable.
9. Stick the tape on the wall, which is located at a distance of 7.6 m from the car (see illustration 15.2). Apply horizontal tape according to the location of the center horizontal line of the fog lights. Glue another piece of tape under the horizontal one at a distance of 100 mm.
10. Behind each fog light, next to its connector, there is an adjustment screw. Turn the screw until the upper edge of the headlight's light spot is level with the lower section of the glued tape.