
Contents: Headlight switch ↧ Circuit breakers ↧
Warning: The vehicles described in this manual are equipped with a Supplemental Restraint System (SRS), also known as an air bag system. Before carrying out work in the area where the elements of this system are located, it is necessary to disconnect its power supply, since accidental deployment of the airbags can result in serious injury (see subsection 28).
Headlight switch
1. Disconnect the negative battery cable (see chapter 1).
2. Remove the cover from the left end of the instrument panel (see chapter 11).
3. Using a small screwdriver, pry up and remove the four plastic clips, then, gaining access through the opening under the cover, pull the headlight switch out of the instrument panel (see illustration).
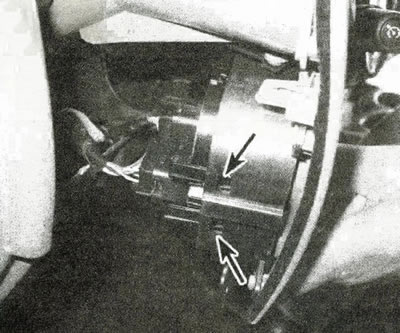
10.3. Pry up the two clips on each side (left clamps shown), using a small screwdriver, remove the headlight switch
4. Disconnect the connectors located on the back of the switch.
5. Installation is carried out in the reverse order of removal.
Circuit breakers
6. Depending on the level of equipment of the vehicle, one or more switches are located on the instrument panel, which include a transfer case mode switch, as well as a rear wiper/washer switch.
7. Access to all the described switches is opened after removing the instrument panel trim frame or the central trim panel (see chapter 11). Use a small screwdriver to pry up the retainer and remove the switch from the trim frame or dashboard cover (see illustration).

10.7 Remove the circuit breaker switch by squeezing the tabs and pushing it out of the panel
Caution: Before removing the SRS switch, the power to the SRS system must be disconnected (see subsection 28).
8. To test the functionality of a simple on/off switch, use an ohmmeter or a circuit tester with an independent power source. Check for open circuit between the switch terminals. The circuit should be closed only when the switch is turned to the on position. If the switch does not pass the described test, replace it.
[The text of the article was obtained from the website: «chevyman.ru»]